Many users do not know that Apple’s iPhone App Store is completely different than the Mac App Store. Through you can use the same Apple ID and subscriptions, these are two stores. That essentially means not all iPhone/iPad apps are available to use in Mac. This problem is resolved to certain extent with Apple M1 (and later) chips. If you are using Mac with Apple chip (not the older Intel chip), then here is how you can install iPhone and iPad only apps in Mac.
Check Your Mac Model
Before proceeding, make sure you are using Apple M series Mac.
- Click on the Apple logo showing on top left corner of the screen.
- Select “About This Mac” option.
- Check the “Chip” is showing Apple M*.

If you are using an older Mac, go to “Apple menu > About This Mac” and you will see a pop-up like below. Check the “Processor” under “Overview” tab and you should see Dual-Core Intel series instead of Apple M series chip. These models do not support installing apps from iPhone/iPad App Store.

Install iPhone and iPad Apps in Mac
- Open App Store app from the Dock on your Mac. Alternatively, launch Finder and go to “Applications” folder to find and open App Store app.
- Type a keyword about your app in the search box and press enter. All Mac App Store only apps are shown under “Mac Apps” section and click on the “iPhone & iPad Apps” option showing below the top heading.

- Under each app, you will find whether the app is designed for iPhone or iPad.
- If the app is not verified by Apple for Mac, you will see a notification showing “Designed for iPhone/iPad. Not verified for macOS”. Click on the link to read more details about using mobile apps on Mac.

- Simply tap on the “Get” button and then “Install” to download and install the iPhone or iPad app on your Mac.
Since the subscription works through your Apple ID, you can make in-app purchases or buy subscription and use the app on both iPhone/iPad and Mac.
Install an Already Purchased App from iPhone
Follow the below steps if you want to install an already purchased an app from iPhone.
- Open Mac App Store and click your profile name showing on bottom left corner.
- Now, go to “iPhone and iPad Apps” section. Select the user from “Purchased by” dropdown when you are using family sharing option.
- Click the cloud with down arrow icon to download the app from iCloud.

Why Not All Apps are Available?
Not all iPhone and iPad apps are available for Mac due to the following reasons:
- Apps primarily work through touch interface may not work on Mac and hence will not be available in Mac App Store. Racing and other games are the best example for this.
- App needs iPhone or iPad hardware for working.
- App developers do not want users to install their iPhone or iPad apps on Mac and make them unavailable.
If you see the “…not verified for macOS” notification, then the app will not work 100% as they work on iPhone/iPad.
Using Touch Control for iPhone Apps in Mac
If the app can be installable but still needs touch interface, then you can hold the option or alt key to use your trackpad as a virtual touch interface. Some of the apps also offer touch controls which you can access from the app’s settings.
- Launch the installed app and press “Command + Comma” keys. Alternatively, go to “App name > Settings…” menu.

- In the app settings pop-up, go to “Touch Alternatives” section and turn on “Touch Alternatives” option.
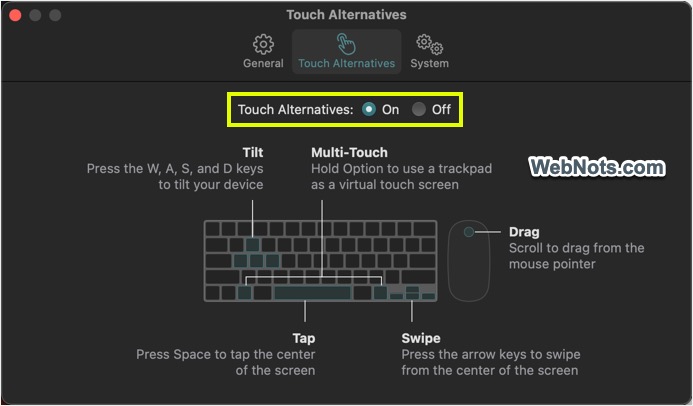
You will see the details of how to use keyboard and mouse for touch controls. Here are the available options you will find with “Touch Alternatives”.
| Shortcut | Purpose |
|---|---|
| A, S , D or W key | Tilt your device |
| Hold alt or option key | Use trackpad as multi-touch purpose |
| Space key | Tap center of screen |
| Arrow keys | Swipe from center of the screen |
| Mouse scroll | Drag from the mouse pointer |
Deleting Apps Installed from iPhone or iPad
For deleting the iPhone/iPad app installed on your Mac, go to “Applications” folder in Finder. Control-click (or right-click) on the app name and select “Move to Trash” option. Alternatively, drag and drop the app to Trash. If prompted, provide your admin password or use touch id to confirm your action.