
Static HTML themes are one of the easiest website types to customize because everything is directly editable. Unlike WordPress or CMS-based websites, HTML themes rely on individual files such as HTML, CSS, JavaScript, and images. Once uploaded to a hosting server, you can edit these files directly and instantly see the changes on your live website. In this guide, we will explain how to edit a live HTML theme on the server using a simple workflow. We will also use a basic theme structure as an example to explain the modification process.
Understanding the Structure of an HTML Theme
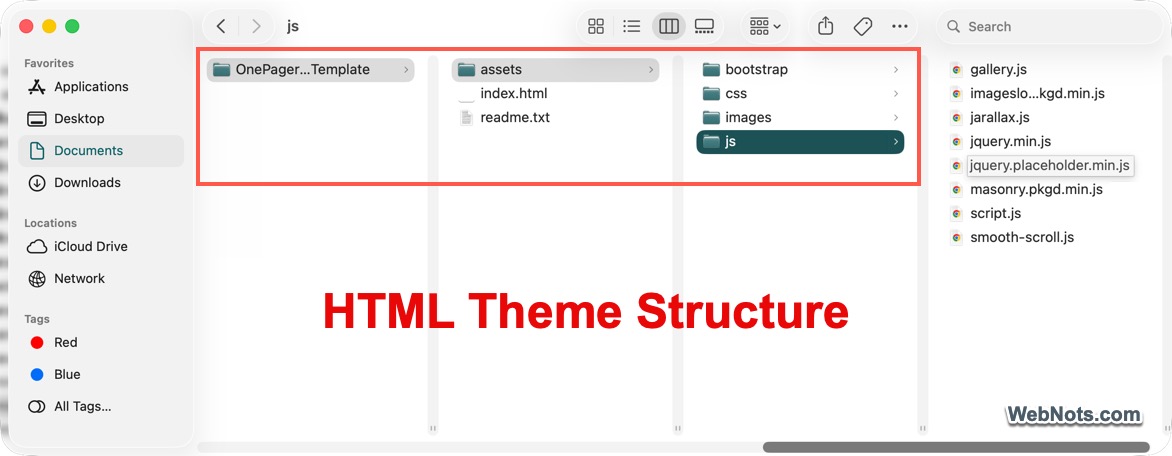
Most HTML themes come with a collection of folders and files arranged in a predefined structure. Before editing anything, it is important to understand where different parts of the website are located.
For example, a typical HTML theme may look like this (compressed in a single ZIP archive file):
/theme-folder
│── index.html
│── readme.txt
│── /assets
│   ├── /css
│   ├── /js
│   ├── /images
Each folder has a specific purpose:
index.htmlcontains the main webpage content./assets/css/stores stylesheets that control colors, spacing, fonts, and layouts./assets/js/includes JavaScript files for sliders, menus, animations, or interactive features./assets/images/stores all website images and graphics.readme.txtusually contains installation instructions and copyright information.
There may be additional folders included in the package, especially when the theme is built with a framework. For example, a Bootstrap-based theme may include a separate “Bootstrap” folder containing the framework’s CSS, JavaScript, and font files. Understanding this structure helps you edit the correct files without accidentally breaking the website layout.
Step 1: Read the Installation Instructions
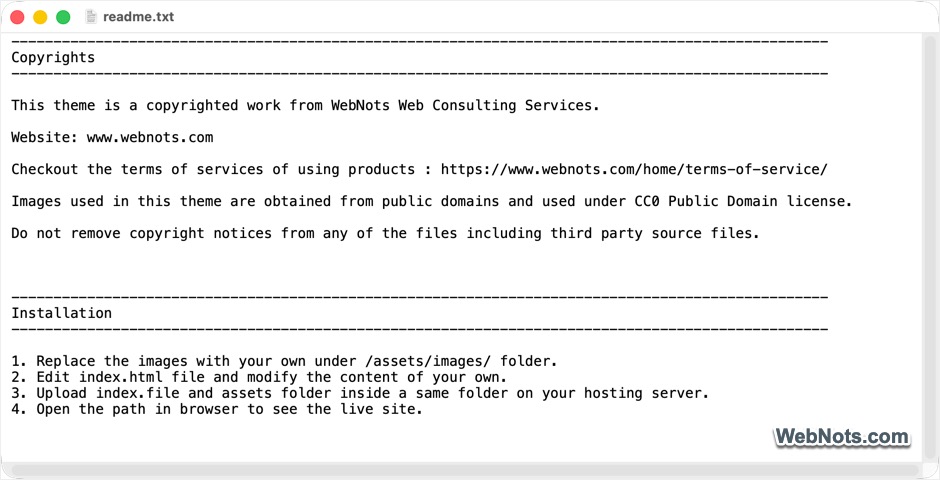
Before making changes, open the readme.txt file included with the theme download. This file usually contains:
- Installation instructions
- Copyright details
- Licensing terms
- Theme installation and modification guidance
- Folder structure information
For example, many themes include instructions similar to this:
- Replace the images with your own under
/assets/images/folder. - Edit
index.htmlfile and modify the content of your own. - Upload
index.htmlandassetsfolder inside the same folder on your hosting server. - Open the path in the browser to see the live site.
Even though themes may look different, the editing process generally follows the same approach.
Step 2: Access Your Hosting Server
To edit a live HTML theme, you first need access to the hosting server where the files are stored. There are two common ways to do this:
Using Hosting File Manager
Most hosting providers offer a built-in File Manager inside the hosting control panel. To access it:
- Log in to your hosting account.
- Open the control panel such as cPanel or DirectAdmin.
- Search and open the “File Manager” app.
- Navigate to the folder where the theme is uploaded. For example:
public_html/orpublic_html/theme-folder/. - Once you locate the theme files, you can directly edit them from the browser.

Using FTP Software
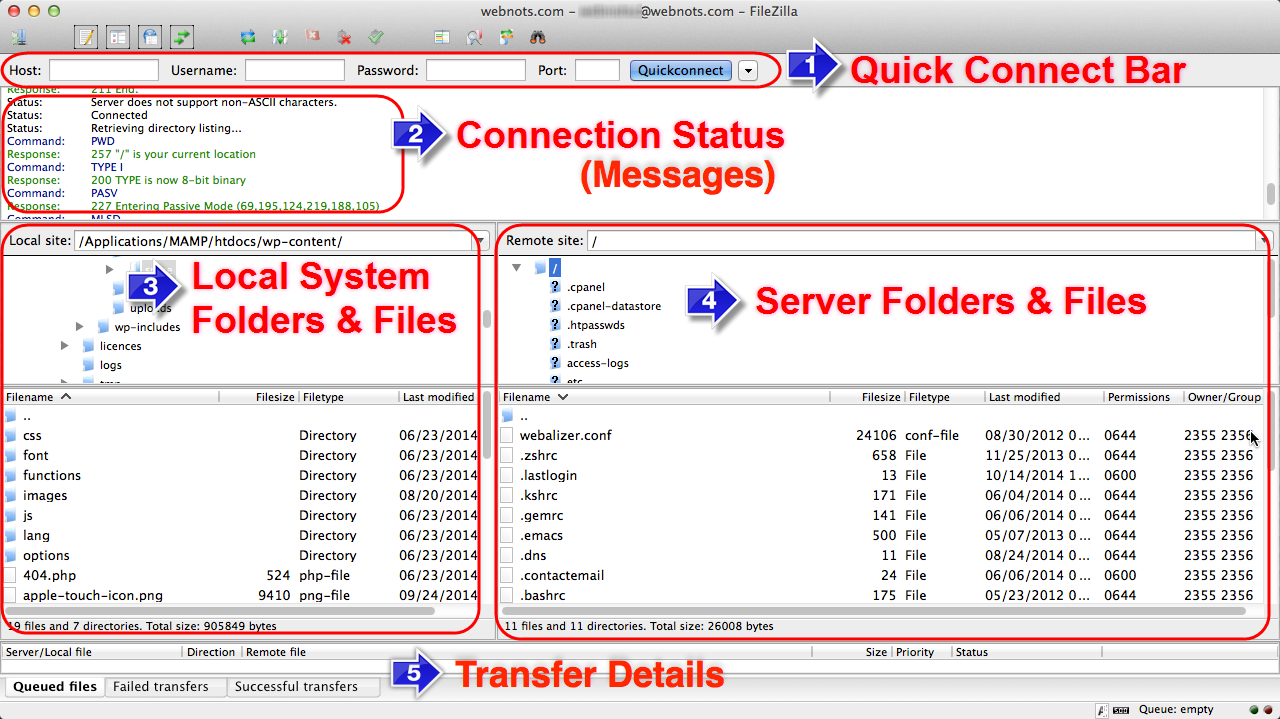
You can also connect through an FTP client like FileZilla. To use FTP:
- Install an FTP application.
- Enter your hosting FTP credentials.
- Connect to the server.
- Open the website folder.
FTP is useful when editing many files because it allows quick uploading and downloading. However, you should have an app like Visual Studio Code on your computer for editing the text files (avoid editing files with apps like Notepad or TextEdit).
Step 3: Edit the HTML Content
The primary content of an HTML theme is usually stored inside the index.html file. This file controls all sections and elements like headings, paragraphs, menus, buttons, contact form, hero sections, footer text, etc. For example, suppose the original HTML contains:
<h1>Welcome to My Website</h1>
<p>This is a sample website theme.</p>
You can replace it with your own content:
<h1>Welcome to My Business</h1>
<p>We provide professional web solutions.</p>
Save the file after editing. Once saved, refresh the browser to immediately view changes on the live website. This instant update capability is one of the biggest advantages of editing HTML themes directly on the server.
Step 4: Replace Theme Images
As mentioned, most themes store images inside the /assets/images/ folder. You may find files like:
hero.jpg
banner.png
team-1.jpg
logo.png
To customize the theme:
- Prepare your replacement images.
- Rename them to match the original filenames, or
- Update the image path inside
index.html.
For example, this image code:
<img src="assets/images/hero.jpg" alt="Banner">can be changed to:
<img src="assets/images/my-banner.jpg" alt="Business Banner">Then upload the new image file to the images folder. After refreshing the page, the updated image will appear.
Step 5: Modify Colors and Styling
If you want to customize fonts, colors, spacing, or layouts, edit the CSS files stored inside /assets/css/. Look for files like style.css, main.css, or theme.css.
Let’s say, the original CSS for a heading color is:
h1 {
    color: #333;
}
To change to a different color, simply replace the color code in the CSS:
h1 {
    color: #0056b3;
}
You can also change background colors, font sizes, button styles, margins and padding, website width, and mobile responsiveness. Make sure to always save a backup before editing CSS files.
Step 6: Edit Navigation Links
Most HTML themes include navigation menus inside index.html. For example:
<ul>
    <li><a href="#">Home</a></li>
    <li><a href="#">About</a></li>
    <li><a href="#">Services</a></li>
</ul>
You can modify these links to point to your actual pages:
<ul>
    <li><a href="index.html">Home</a></li>
    <li><a href="about.html">About Us</a></li>
    <li><a href="contact.html">Contact</a></li>
</ul>
This helps organize your website into multiple pages.
Step 7: Test Changes on the Live Website
After editing files, always test the website for the following:
- Text formatting
- Images loading properly
- Broken links
- Mobile responsiveness
- Menu functionality
- Page speed
Sometimes browsers show cached content. If changes are not visible:
- Clear browser cache
- Open the page in Incognito mode
- Hard refresh the page
- Purge your CDN cache
What Cannot Be Edited with HTML Alone?
While HTML themes are easy to customize, it is important to understand their limitations. A static HTML page can only display content and basic interactions inside the browser. Features that require storing data, processing user input, authentication, or secure transactions usually cannot work using HTML alone.
Contact Forms Need Server-Side Processing
Many HTML themes include a contact form design, but in most cases, the form itself is only visual. For example:
<form>
    <input type="text" placeholder="Your Name">
    <input type="email" placeholder="Your Email">
    <textarea placeholder="Message"></textarea>
    <button type="submit">Send</button>
</form>
Although the form appears functional, pressing the submit button usually does nothing unless a backend script processes the data. To make contact forms work, you generally need PHP scripts, email processing systems, form handling APIs, and SMTP configuration. A common approach is to connect the form to a PHP mail script that sends submissions to your email address. Alternatively, you can use third-party contact form widgets and services that work without coding. These services usually provide a small embed code that can be pasted into your HTML page.

Payment Integration Requires Backend Support
Payment systems generally require secure authentication, payment token processing, database handling, transaction validation, and webhooks and API communication. This cannot be handled by HTML alone as static HTML websites cannot securely process payments on their own. If you want to accept online payments, product purchases, membership subscriptions, or booking deposits, you will need server-side integration or external payment services.
Instead of building everything from scratch, many website owners use third-party payment widgets or hosted checkout pages. These services usually provide add to cart and buy buttons, embedded checkout forms, hosted payment links, and subscription management tools. You can simply paste their embed code into your HTML website.
User Login and Dynamic Features Are Limited
Static HTML themes also cannot natively handle:
- User registration systems
- Login/logout functionality
- Password management
- User dashboards
- Comment systems
- Search databases
- Shopping carts with saved sessions
These features require backend programming languages such as PHP, Node.js, Python, or ASP.NET along with a database like MySQL or PostgreSQL.
Frequently Asked Questions
1. Can I add contact forms, payment buttons, or booking systems to an HTML theme?
Yes, but these features typically require more than HTML alone. Contact forms, payment processing, bookings, live chat, newsletters, and analytics often rely on server-side code or external services to function properly.
2. What is the easiest way to add advanced features to an HTML website?
If you are not a developer, the easiest approach is to use third-party widgets and embedded services. Most providers offer ready-made solutions that can be added to your website using a simple copy-and-paste embed code.
3. Do I need to modify the theme files when using third-party widgets?
In most cases, no. You only need to paste the provided embed code into the appropriate location on your HTML page. The core theme files usually do not require significant modifications.
4. Can developers build custom functionality for HTML themes?
Yes. Developers can create custom backend solutions using PHP or other server-side languages to add fully functional contact forms, payment gateways, user authentication systems, databases, and other dynamic features.
5. Are HTML themes suitable for complex websites?
HTML themes are excellent for presenting content, images, and design layouts. However, advanced functionality generally requires either third-party integrations or custom server-side development.
6. What should I do before editing a live HTML theme?
Always create a backup of important files before making any changes. Having a backup allows you to quickly restore the website if something goes wrong.
7. Is it safe to edit multiple files at once?
It is generally better to edit one section at a time. Making smaller changes makes it easier to identify and fix problems if an issue occurs.
8. Can I delete files that I don’t recognize?
No. Some CSS and JavaScript files may appear unnecessary but are required for the theme to function correctly. Only remove files if you are certain they are not being used.
9. Why are my changes not showing on the website?
This is often caused by browser caching. Try clearing your browser cache or performing a hard refresh to load the latest version of the page. You may also need to purge the server level and CDN caching as static files need to be replaced for the latest changes to reflect.
10. Why are images missing after I update them?
Missing images are usually caused by incorrect file paths, broken links, or filename mismatches. Verify that the image files are uploaded to the correct folder and that the paths in your HTML code are accurate.
11. Why does the website layout look broken after editing?
Layout issues are commonly caused by HTML or CSS syntax errors. Review your recent changes, check for missing tags or brackets, and restore a backup if necessary.
12. What should I do if the entire theme stops working?
This can happen if an important CSS, JavaScript, or theme file is accidentally deleted or modified. Re-upload the original theme files from your backup or the original download package to restore functionality.
Final Thoughts
Editing a live HTML theme on the server is a straightforward process once you understand the file structure. Most modifications involve updating the index.html file for content, replacing images inside the /assets/images/ folder, and customizing CSS for design changes.
A typical workflow looks like this:
- Read the installation guide in
readme.txt. - Upload the theme files to hosting.
- Replace images with your own.
- Edit
index.htmlcontent. - Customize styling if required.
- Save changes and refresh the browser.
Since HTML themes update instantly after editing, you can quickly personalize your website and see the results live without needing advanced development tools.


