Filetype decides the file format and the associated app to open the file. You can identify the type of file based on its extension which generally ends with three characters after the file name and a dot. For example, myimage.jpg is an image file while mytext.docx is a Word document. Windows uses the file extension to open the .jpg image in Photos app and .docx file in Word app. However, file extensions are hidden in Windows by default and not shown in File Explorer. In this article, we will explain why to see the file extension and how to show or hide in File Explorer.
Why to View File Extension?
Let us say, you have downloaded a document file from a website and want to open that. However, after downloading you are suspicious whether it is a document file or a virus. Especially if you do not see the know file icon, you should first check its extension before opening the file. Otherwise, the file may be a malware and cause damage to your system if you open it.
Other problem is that Windows do not assign associated app for opening all file extensions. For example, you might have received an .eps graphics file (Encapsulated PostScript). Windows do not have any default apps associated to open .eps files. In this case, you should check the file extension and get a third-party apps like EPS Viewer to open the file.
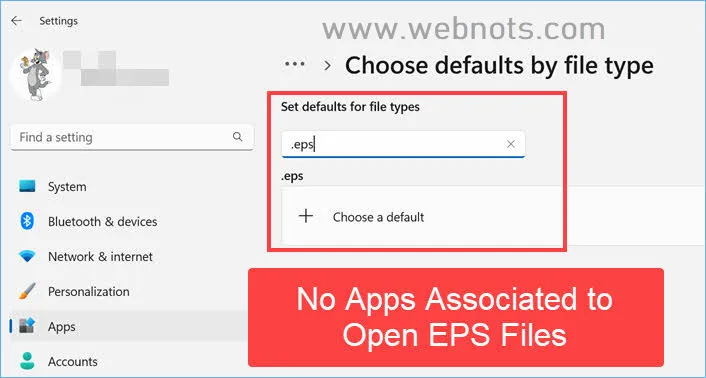
Note: Remember, Windows only hides the know file extensions like JPG, DOCX, PNG, GIF, PDF, etc. However, other filetypes like PHP will show the extension at the end of the file. This is even dangerous when a malware file does not show the extension. You may think it is a known filetype for system and open it wrongly.
1. Using Details View in File Explorer to See Extensions
The simplest option to view file extensions is to change the view in File Explorer.
- Open File Explorer and go to the folder which contains the files.
- Click on the horizontal lines icon showing on the lower right corner.
- Alternatively, click “View” from tool bar and select “Details” option.

- This will change the view and show all file details.
- Check the file extension under “Type” column.

Though this an easy way, as you can see Windows shows JPG for image while “Microsoft Word Document” for a .docx file. If you want to see the full file extension, then follow one of the below options.
2. View File Extensions Using Show Menu
If you want to see the file extensions on desktop, File Explorer and all other places in your computer, then this is an easy option.
- Open File Explorer and click on “View” menu from tool bar.
- Select “Show” option from the dropdown.
- Click “File name extensions” option to enable it.

Now, you will be able to find the file extension for each file in File Explorer. You can also go to desktop and check the files will start showing the extensions.

3. Disable Hiding Known File Extensions
As mentioned, Windows by default will hide all known file extensions like JPG and DOCX. However, you can disable this feature from File Explorer settings.
- When you are in File Explorer, click on three dots in the tool bar that says “
“See more” when you hover on it. - Select “Option” from the list of menu items to open “Folder Options” dialog box.

- Go to “View” tab and disable “Hide extensions for known file types” option under “Advanced settings” section.
- Click “Apply” button and then click “OK” button to close the dialog box.
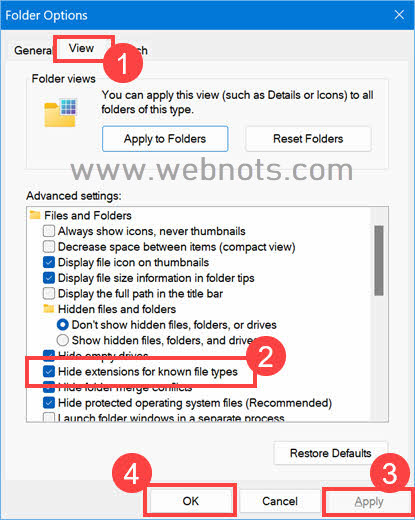
This will instantly start showing all known file extensions. You can use this option to easily find suspicious or unknown files which do not show extension at the end.
4. Enable Showing File Extensions from Control Panel
The next option is to enable showing known file extensions from Control Panel.
- Click the “Search” button in taskbar and search “control panel”.
- Find and open “Control Panel” app from the search results.
- Arrange the items by category and click on the “Ease of Access” link.

- From the list of menu items appearing in the sidebar, click on “Appearance and Personalization” option.

- Click “Show hidden files and folders” link under “File Explorer Options” heading.

- This will open “File Explorer Options” dialog box where you can disable “Hide extensions of known file types” option under “View” tab.

- Click “Apply” button and then “OK” to start showing known file extensions for files.
5. Edit Registry for Showing File Extensions
The next option is to use Registry Editor and enable showing file extensions. Try this option only if you really want to play with registry or use one of the above options.
- Press “Win + R” keys to open Run prompt.
- Type regedit in the box and press enter key.

- This will open Registry Editor app.
- Copy and paste the following path in Registry Editor’s address bar. Press enter key to go to that location.
Computer\HKEY_CURRENT_USER\Software\Microsoft\Windows\CurrentVersion\Explorer\Advanced- Find HideFileExt on the right pane. Right-click on it and select “Modify…” option.

- It opens and edit DWORD pop-up, enter the “Value data” as 0 and click “OK” button. The value 0 is for showing and 1 is for hiding file extensions.

- Close all apps and restart your system to find all files will start showing the file extensions.
6. Show File Extensions from Command Prompt
It is also possible to show or hide file extensions in Windows using Command Prompt (or Terminal app).
- Press “Win + R” to open Run prompt.
- Type cmd and press enter key to open Command Prompt app.
- Type the following command and press enter.
reg add HKCU\Software\Microsoft\Windows\CurrentVersion\Explorer\Advanced /v HideFileExt /t REG_DWORD /d 0 /f- You will see a message “The operation completed successfully”.

Restart your computer and check the file extensions and visible. The command will directly edit the HideFileExt DWORD in Registry Editor and set the value as 0 as explained above. If you want to hide the files extensions, replace the value 0 to 1 in the command.
Files Without File Names
There are also files without any name but only with extension. For example, .htaccess is the Apache server access configuration file used in popular content management systems like WordPress. Windows by default will hide these types of files and showing extensions will NOT show these files. You should enable showing hidden files option in File Explorer to view the hidden files.