The Windows Registry is a powerful tool that allows users to view, modify, and control system settings and configurations. While it’s usually reserved for advanced users, understanding the basics of the Registry Editor can be useful for anyone who wants to customize their Windows experience or troubleshoot issues. This beginner’s guide will walk you through the essentials of the Registry Editor on Windows 11, including what it is, how to navigate it, and some tips to get started.
Windows Registry and Registry Editor
The Windows Registry is a hierarchical database where Windows stores settings and configurations for the operating system, user accounts, applications, hardware, and more. Essentially, it acts as Windows’ “brain,” keeping track of everything from installed applications to user preferences. Changes made in the Registry affect how Windows functions, so understanding how to navigate it is the first step in effectively using it.
The Registry Editor is a system app that allows you to access and modify the Windows Registry. While there are many user-friendly settings available in Windows Settings app (replacement of the old Control Panel), the Registry Editor provides access to advanced settings not otherwise accessible, making it a valuable tool for power users.
Why to Access Registry Editor?
There are many reasons for you to access Registry Editor to delete or modify the entries.
- Changing settings that are not available in Windows Settings app and tweaking settings to enhance performance.
- Delete redundant data left when you uninstall applications from your computer that occupies space.
- Cleaning up the entries that can cause a sluggish running of your computer over time.
However, making changes to the registry requires you to be conversant with the registry as incorrect changes can cause system instability or even render Windows unusable. In order to avoid any unexpected results, ensure to create a backup of your computer before making changes. You can also backup registry entries and restore if something goes wrong.
How to Access Windows Registry Editor?
In case you are new to the registry, accessing might be difficult since it does not have a direct application shortcut icon. You can try creating a shortcut on your desktop later on if you need frequent quick access.
- Click on the Windows Search icon on the Taskbar.
- Type, “Registry Editor” and search.
- Select the Registry Editor application to open.
- Allow it to make changes to your computer from the User Account Control prompt message.

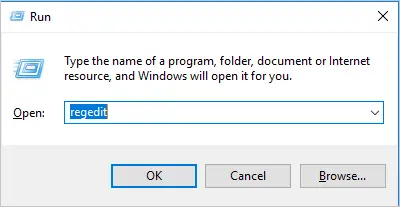
Alternatively, you can press “Windows Logo + R” shortcut keys to open Run prompt. Type regedit in the box and press “OK” button to open Registry Editor.
Registry Editor Structure
The Registry Editor is tiered structure with hives (root keys), keys, subkeys, and values.

Hives or Root Keys (or Subtrees)
There are five hives in the Registry Editor:
- HKEY_CLASSES_ROOT – Abbreviated as HKCR hive contains software and application data to support Windows features such as drag and drop, Windows shortcuts, OLE and other main aspects of Windows. Data from HKEY_CLASSES_ROOT is derived from HKEY_LOCAL_MACHINE\SOFTWARE\Classes and HKEY_CURRENT_USER_SOFTWARE\Classes.
- HKEY_CURRENT_USER_SOFTWARE – This section, abbreviated as HKCU, is created when users log in to their user accounts and contain specific user data. Examples of information associated with this branch include login names, start menu settings, user printer settings, and desktop settings.
- HKEY_LOCAL_MACHINE – HKCM subtree contains system data centered on hardware, software and other information related to different users. Such information helps computer users login to their specific profiles.
- HKEY_USERS – HKU hive holds all temporary information and settings data regarding all user accounts logged in to the PC.
- HKEY_CURRENT_CONFIG – HKEY_CURRENT_CONFIG contains computer’s hardware configuration data only. However, it does not store any data.
Keys
After subtrees, next is the keys. Keys can be broken down further to subkeys and, finally, the entries. However, some keys don’t have subkeys, but entries are associated with specific system data.
Subkeys
Just like there is a subfolder on a folder, a subkey is from a key. Entries or values are stored in the subkeys. Also, you might get a further broken down subkey with multiple subkeys.
Entries/Values
Values appear on the right-hand side of the screen. Entries are the least level elements of the registry and contain data regarding the keys or the registry. The entries contain data in the form of an entry name, data forms in the registry, and the value registry entry field. Unlike the subtrees, keys and subkeys, entries store information/data for the programs and operating system.
Windows Registry Values
Besides the descriptions of the subtree and the related keys, you can differentiate them visually and their purpose.

- Closed Key – Denoted by a closed folder icon (
 ), the closed key contains the registry subkeys. Or else, it’s the subtree folder that contents are not displayed.
 - Open Key – The open key is denoted by an open folder (
 ). Values of an open key are displayed on the right side of the registry window. However, in Windows 10, you cannot recognize this difference.
 - String Value – String value denoted by (
 ) icon is a REG_SZ type of value that enables any string value, a series of characters, to be displayed in a single path. It is the most popular subkey in the registry.
 - String Array Value – A set of character string values is described as a string array value. It is classified as a REG_MULTI_SZ type of value.
- Expanded String Value – Described as a REG_EXPAND_SZ type of value, it contains editable values such that other Windows programs can use them. Cumulatively, they are described as environmental or system values.
- Binary Value – Binary value classified as a REG_BINARY type of value classifies digits in binary form, a numbering system used in computers. It is visible on the registry window’s right-hand side and denoted by the (
 ) icon.
 - DWORD Value – Classified as a REG_DWORD type of value denotes files being defined in the hexadecimal numbering system besides the binary value system. However, values can be converted from hexadecimal to binary, but complex to a general user. DWORD value is available on the right side pane of the Registry Editor.
- QWORD Value – QWORD Value is classified as a REG_QWORD type of value. It is similar to QWORD but stores its data in a 64-bit value read format, unlike DWORD, which uses the 32-bit format.
 ), the closed key contains the registry subkeys. Or else, it’s the subtree folder that contents are not displayed.
 ). Values of an open key are displayed on the right side of the registry window. However, in Windows 10, you cannot recognize this difference.
 ) icon is a REG_SZ type of value that enables any string value, a series of characters, to be displayed in a single path. It is the most popular subkey in the registry.
 ) icon.
Making Changes in Registry Editor
You can paste the path in address bar and press enter to reach that location. Alternatively, click on the arrow (or expand icon) next to each hive or key to expand the tree and view subkeys. Continue expanding until you reach the key you want. The right pane will display values associated with the selected key. Once you locate the key or value you want to modify, you can make changes to it.
Editing or Deleting a Value
- Right-click on the value you want to edit and select “Modify”.
- In the dialog box that appears, enter the new data or value.
- Click “OK” to save your changes.
- For deleting the value, right-click on it and select “Delete” option. Confirm your action to delete it.

Adding a New Key or Value
- Right-click on a key in the left pane where you want to add a new entry. Go to “New > Key” to create a new key and name it as you need.

- For creating a value, right-click on empty area on the right pane. Select “New” and choose the type of value you want to create.
- Name your new value, then double-click on it to set its data.

Note that deleted keys and values cannot be recovered, so proceed with caution.
Backup the Registry Before Making Changes
Before making any changes to the Registry, it’s essential to back it up. This way, you can restore the original settings if anything goes wrong.
- In the Registry Editor, go to “File > Export” menu.
- Choose “All” under Export range to back up the entire registry.
- Name the file and select a save location, then click “Save” button.

- To restore a backup, go to “File > Import” menu and open the backup file you saved.
For backing up a specific key, right-click on that key and select “Export” option. Learn top 10 registry hacks for Windows PC that beginners may want to try in the Registry Editor.
Search for a Key or Value in Registry Editor
If you don’t know the exact location of a key or value, you can search for it. Press “Control + F” keys or go to “Edit > Find” menu to open the search tool.
- Type in the name of the key, value, or data you are looking for.
- Choose to search by Keys, Values, or Data depending on what you need.
- Click “Find Next” button to start the search. The Registry Editor will highlight the first matching entry.
- To continue searching, press F3 or go to “Edit > Find Next” menu.

Tips for Using the Registry Editor Safely
Here are some of the tips you should follow when working on Registry Editor:
- Always back up the registry or individual keys before making changes.
- Only follow registry guides from reputable sources to avoid harmful changes.
- Deleting keys or values can have unintended effects. Only delete entries if you are confident they are unnecessary.
- Keep a log of any registry edits you make, so you can revert if necessary.
Wrapping Up
The Registry Editor in Windows 11 offers advanced control over your system settings and configurations. While powerful, it is also a tool that requires caution. With this beginner’s guide, you should have a good understanding of how to navigate, search, and make simple edits in the Registry Editor, allowing you to customize your Windows experience. Always remember to back up your registry before making changes, and proceed carefully to keep your system safe and stable.