Windows operating system has so many features that we do not even know some of them. However, learning a simple tip or trick can change the way you use your computer routinely. In this article, we will list down few tips for Windows PC users to improve your productivity.
1. Virtual Desktops
Are you are struggling with managing multiple apps on the desktop? Virtual desktops are easy way to keep apps in multiple desktop screen and follow your workflow without interruption.
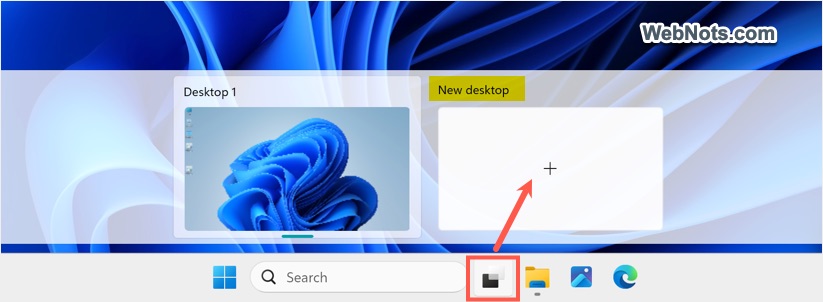
- Click on the “Task View” icon on your taskbar.
- Click “New desktop” option shown on the top left corner.
- Select the desktop you want to work and follow different tasks on different desktop screens without interfering.
- Again, click on the “Task View” icon to switch between desktops.
2. Switch Modes in Calculator App
Calculator app is much more powerful than what you think. You can do multiple tasks like data calculation and conversion by toggling the mode. Click on the three horizontal lines icon on the top right corner of Calculator app to switch modes.
- Standard – this is default mode you can use for basic mathematical calculation.
- Scientific – for advanced calculations.
- Programmer – for binary code.
- Date Calculation – find differences between any dates and add or subtract dates.
- Converter – convert currency, length, volume, length, weight / mass, temperature, energy, area, speed, time, power, data, pressure and angle from one unit to other. For example, you can convert degrees to radians using angle converter.
3. Focus Mode
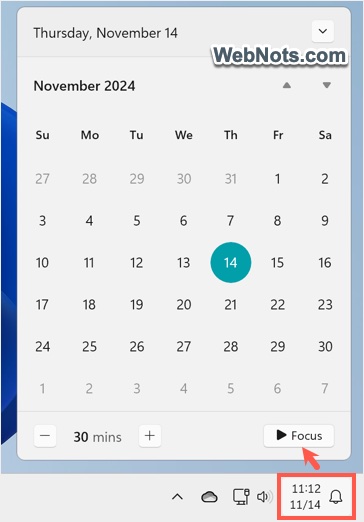
Did you ever get distracted with the popping email notifications when doing important task? Windows has a solution for distraction free working. Focus (earlier known as Quiet Hours or Focus Assist) allows you to work without distracting notifications.
- Click on the date / notification on the bottom right corner of the taskbar.
- Enable “Focus” by clicking on that button.
- Start working detractions free.
4. Using Magnifier
Magnifier is part of the Ease of Access Center that allows you to magnify the screen. You can use Magnifier to zoom particular section of a screen for better visibility or readability. Good part is that you can quickly enable or disable Magnifier with shortcuts.
- Press “Windows Logo + Plus” keys to launch Magnifier.
- Turn it off by pressing “Windows Logo + Esc” keys.
If you want to turn on Magnifier with mouse or touchpad, go to “Start > Settings > Ease of Access > Magnifier”.
5. Hide Desktop Icons
When sharing screen with others, it is a good idea to hide all your personal stuff on the desktop.
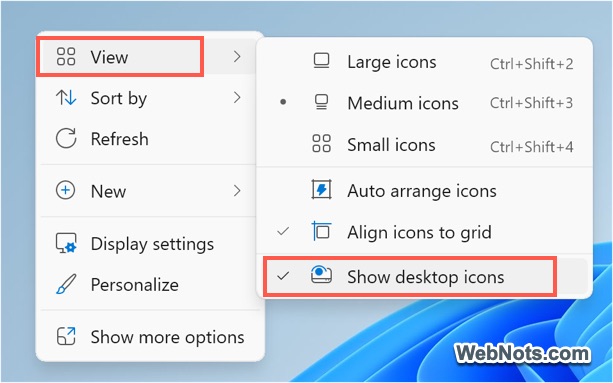
- Right click on the desktop.
- Disable “Show desktop icons” under “View” menu.
- This will instantly hide all your desktop icons.
- You can again enable the option to bring the icons back.
6. Arrange App Side by Side
Sometime you need to work on two apps in parallel. If you do not have two monitors, Windows allows you to arrange the apps in parallel on single desktop screen.
- Move the app with your mouse to the right or left side of the screen.
- Windows will show a transparent boundary to split the screen equally.
- Leave the app to occupy that section.
- You will see all other open apps on the other section.
- Click on the app you want to view on other section.
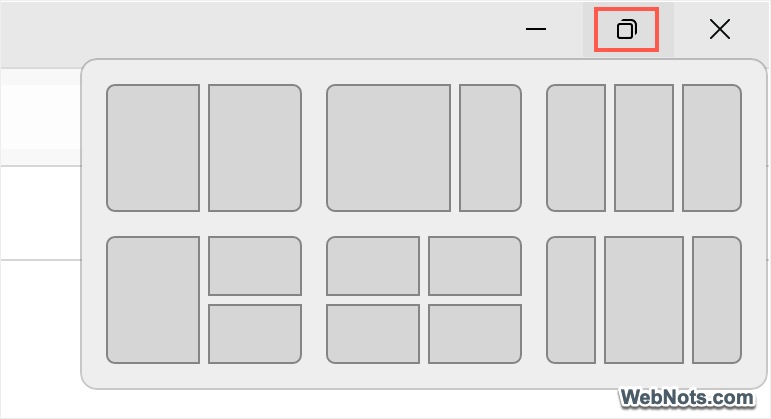
There are also other snapping options to arrange app windows on the screen. Simply hover the mouse over maximize / resize icon to view the available options for your screen size.
7. Resize Photos Quickly
Windows comes with an in-built Photos app that you can use for quick picture editing.
- Launch Photos app and open the picture you want to resize.
- Right-click on the picture and select “Resize image” option.
- Adjust the size and save your picture.
8. Add Address Bar in Taskbar (Windows 10)
With Windows 10, you do not need to open the URL every time by opening the browser. You can easily add the address bar to taskbar and open webpages quickly.
- Right-click on the taskbar and enable “Address” option under “Toolbar” section.
- You can directly paste the URL to open the page using default browser (generally Edge).
- It is also possible to type search query in the address bar to get search results from your default search engine.
- You can anytime disable the address bar from the taskbar.
9. Windows Keys Quick Shortcuts
In our earlier article, we have provided list of Windows Logo key shortcuts. Here are some most useful shortcuts:
- Win + D – Show or hide desktop
- Win + E – Open File Explorer
- Win + I – Open Settings app
- Win + K – Show Connect options
- Win + L – Lock computer
- Win + M – Minimize windows
- Win + Shift + M – restore minimized windows
- Win + P – Show Project options
10. Window Power User Menu
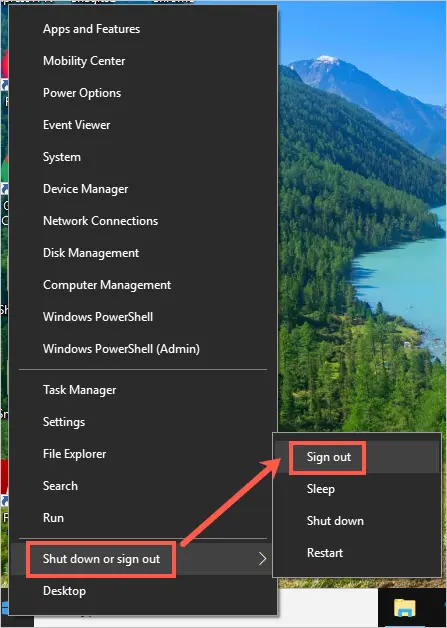
The default Start menu does not show many useful links like Device Manager. Press “Windows Logo + X” keys to open power user menu that contains quick access to various features. You can easily access Terminal, Sign out menu and system settings.
11. Dark Mode
If you are bored with the white and grey appearance of apps, Windows allows you to switch the appearance to dark mode.
- Go to “Start” button and click on “Settings” app (All > Settings).
- Click on “Personalization” and got to “Colors” section.
- Choose “Dark” option under “Choose your mode”.
12. Print to PDF
Most of us do not use printer with our computer. However, we would like to take the copy of documents in PDF format for future use.
- After opening a file, go to “File > Print” menu or press “Control + P” shortcuts to open print options.
- Select “Microsoft Print to PDF” as your printer and click on “Print” button.
- Type a name for your file and save the file in PDF format.
If you are missing Microsoft Print to PDF option, learn how to add it.
13. Use AutoCorrect
Windows helps you to automatically correct the spelling mistakes or highlight the misspelled words.
- Press “Windows Logo + I” keys to open Settings app.
- Go to “Time & language > Typing” section.
- Enable “Autocorrect misspelled words” option.
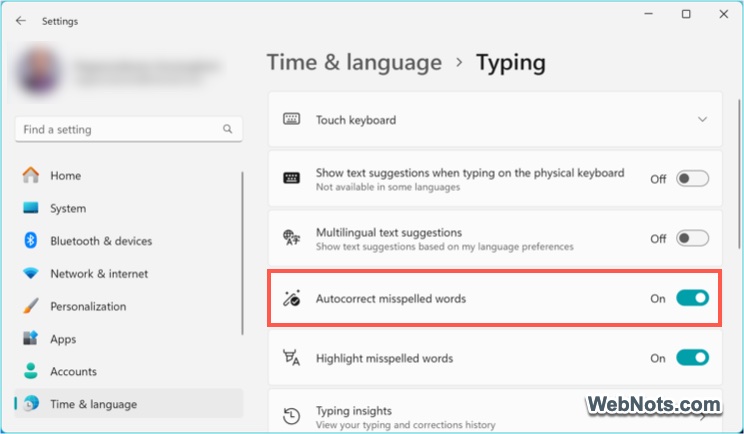
This will work on the operating system level though you can setup AutoCorrect separately in Microsoft Office documents. Open a Word document or PowerPoint presentation. Go to “Files > Options > Proofing > AutoCorrect Options…” and setup your preferences.
14. On-Screen Keyboard
Windows offers a soft keyboard for typing when you do not have physical keyboard. Though this is an accessibility feature, you can use this when some keys are not working on your keyboard or with touch screen laptops.
- Press “Windows Logo + S” keys to open Windows Search.
- Type “on-screen keyboard” and open On-Screen Keyboard app.
Alternatively, go to “Settings > Ease of Access > Keyboard” and enable “Use the On-Screen Keyboard” option. You can also toggle the soft keyboard using “Windows Logo + Control + O” keys.
15. Offline Maps
Do you know that you can download the maps to use when you are offline? First, you have to download the maps; the Maps app will use the download offline map when you are not connected to internet.
- Press “Windows Logo + I” settings and open Widows Settings app.
- Click on “Apps” and go to “Offline maps” section.
- Click on “Download maps” to choose the location map you want to download.
The offline map can help when you are searching for local shops and directions.
16. God Mode
Windows assigns a Global Unique Identifier (GUID) key for each application. You can create folders with this GUID to duplicate the functions of the app. God Mode is the popular Master Control Panel for duplicating Control Panel settings.

The name “God Mode” has no real meaning; you can call it anything else you want.
17. Clipboard History
With Windows, you can copy multiple items and keep all of them in clipboard.
- Go to “Settings > System > Clipboard” and enable “Clipboard history” option.
- Copy two or three items. You can copy text as well as images.
- Press “Windows Logo + V” keys to open cloud clipboard that contains the list of copied items.
- Click on the item to paste.
Final Words
We hope you enjoyed reading these tips and tricks for Windows PC. Using features like clipboard history will resolve your copy / paste problems and permanently change the way you work.