Regardless of profession, working with Microsoft Office apps is the one common thing almost all of us do. Besides Excel, PowerPoint and Outlook, Microsoft Word is the most used word processor app (even Mac users need this). While Word app is comfortable to use for typing, formatting, and inserting images, it hides a surprising number of powerful features hidden in the ribbon, menus, and settings (also called Word Options). Here are 11 hidden features in Microsoft Word that can save time, improve productivity, and enhance the quality of your writing.
Word Windows Vs Mac
Though Word interface looks similar on Windows and Mac, some of the functions are not available on Mac. For example, you can’t use the clipboard history on Word for Mac. Here we explained with Windows version (Word Microsoft 365) along with necessary screenshots.
1. The Navigation Pane – Jump to & Rearrange Sections
If you scroll endlessly through long documents, Word has a tool that lets you jump to any section instantly: Navigation Pane. This is also useful when working on a large monitor screen to make use of the display area effectively.
- Go to “View” menu and check the “Navigation Pane” box available under “Show” group.
- This will open “Navigation” pane in the sidebar.
- If your document uses Heading Styles, all headings appear as a clickable list under “Headings” tab.
- You can expand or collapse the sections. The best part is that you can simply drag and drop a heading to move the entire section under that heading.
- Go to “Pages” tab to view thumbnails of all pages and use the search box to get the results under “Results” tab.

If you write long documents (like an eBook or research paper), this feature alone can save hours of your time.
2. Format Painter – Apply Formatting for Multiple Elements
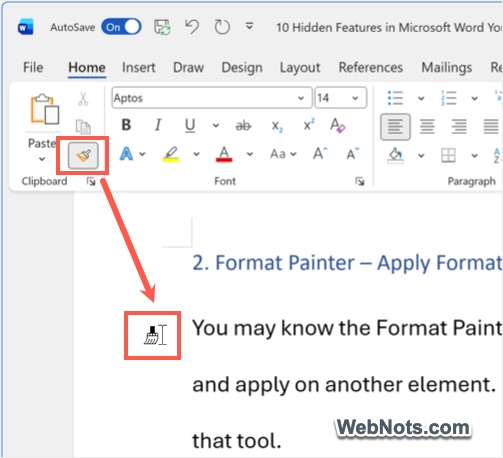
You may know the Format Painter is useful for copying style from one element and apply on another element. However, there are two more tricks when using that tool.
- First, select an element (for example – a heading) and then double-click on the Format Painter icon (in “Home” tab under “Clipboard” group). Now, you can click on multiple elements to apply the copied formatting. This is useful in cases like changing all H4 headings to H3 headings in a document with few clicks.
- Instead of double-clicking to active the tool, you can simply use the keyboard shortcuts. Press “Alt + Control + C” to copy the style and press “Alt + Control + V” to apply the style for multiple elements.
3. Remove the Angle Symbols on Corners
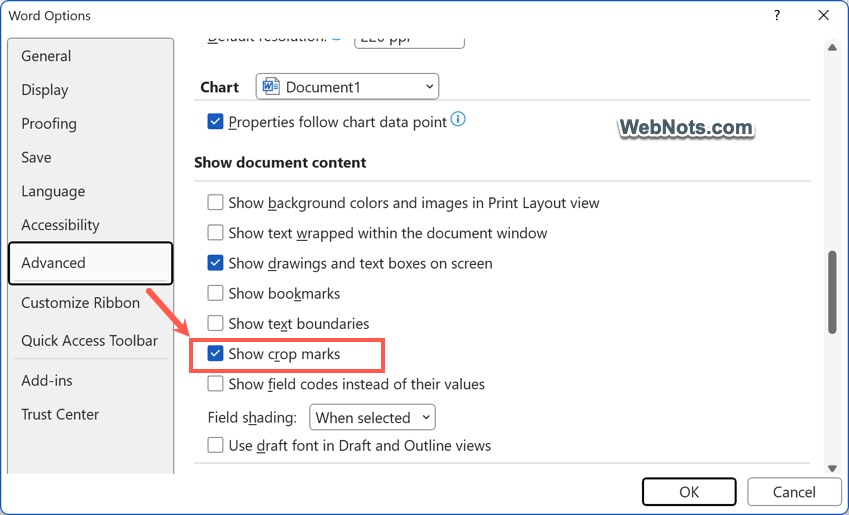
Have you ever been annoyed with the angle brackets showing on all the corners of your document? This symbol is called crop mark and indicates the text margin / printing boundaries. You can remove those light-grayed angles easily:
- Go to “File > Options”.
- Go to “Advanced” tab and find “Show document content” section.
- Simply uncheck “Show crop marks” option.
- Click “OK” button to apply the changes.
4. Version History – Recover and Compare Changes
Ever overwritten a file or lost important edits? Word quietly stores document versions when synchronized with OneDrive.
- Click the file name showing on the top bar (just above the menu items).
- Click “Version History” to open the copy of your document showing all previously saved copies in the sidebar.
- Browse through the versions and restore content from an older copy if needed.

You can even compare two versions to see what changed. It’s like a built-in time machine for your document. However, this feature works only with OneDrive and you should turn on the “AutoSave” option.
5. Quick Parts – Save Reusable Text Blocks
Sometimes you may need to frequently type the same content like disclaimers and company details. In such cases, using Quick Parts will boost your productivity.
- Select text you want to reuse.
- Go to “Insert” menu and click on the “Quick Parts” option under “Text” group.
- Select “Save Selection to Quick Part Gallery…” option.
- Provide a name, description and save it as a new building block.

Now you can insert that text anytime with just one click from “Quick Parts” button from ribbon. Instead of creating a new block, you can also insert an existing block like author, publish date, company address, company name, etc. (from “Quick Parts > Document Property”).
6. Dictation – Type with Your Voice
You don’t always need to type. Word includes a powerful speech-to-text feature.
- Go to “Home” and click on the “Dictate” button under “Voice” group.
- Start speaking naturally and Word will automatically type the content.
- Use punctuation voice commands like “comma”, “period” and “new line” when needed.
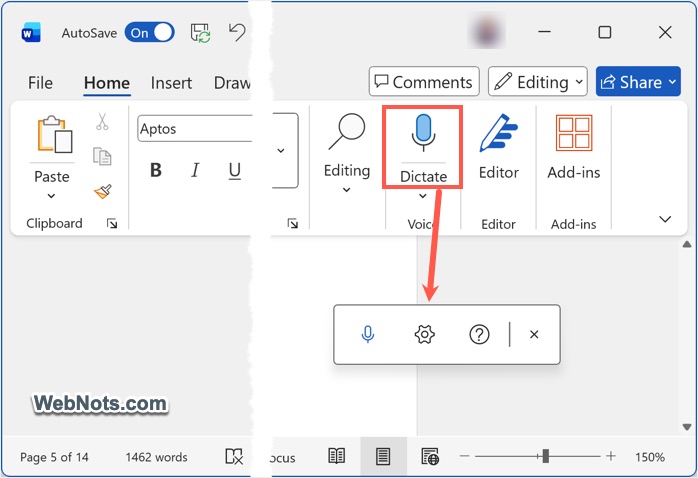
This helps to reduce typing fatigue and write faster with hands-free. Though dictation works with most of the languages, the accuracy is better with English and your voice’s clarity.
7. Focus Mode – Write Without Distractions
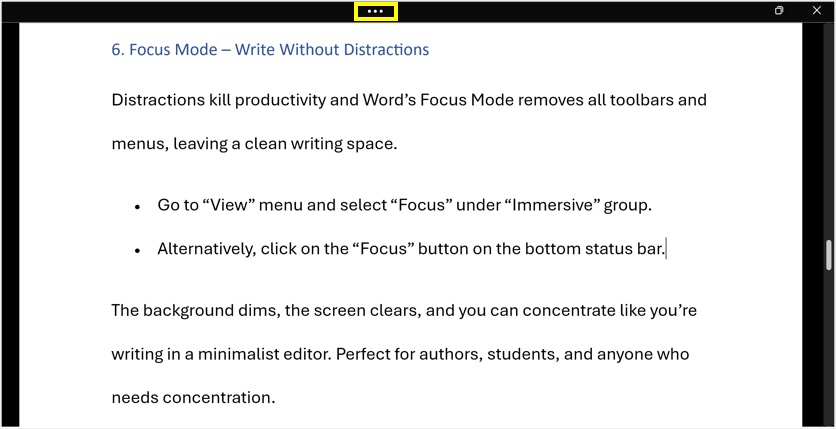
Distractions kill productivity and Word’s Focus mode removes all toolbars and menus, leaving a clean writing space.
- Go to “View” menu and select “Focus” under “Immersive” group.
- Alternatively, click on the “Focus” button on the bottom status bar.
- This will change to full screen mode with no distraction.
- Click the three dots showing on the top center to bring the ribbon or press escape to quit the focus mode.
8. Document Comparison – Instantly Spot Differences
If you work with edited files, Word can automatically compare two documents and highlight every change.
- Go to “Review” menu and click “Compare” option.
- Select original and revised documents.
- Word generates a third document showing insertions, deletions, formatting changes, etc.

This is extremely useful for reviewing different versions of the business proposals, collaborated documents, etc.
9. Transcribe Audio – Convert Speech to Text Automatically
If you have a recorded interview, meeting, lecture, or conversation, Word can transcribe audio for you.
- Go to “Home” menu and click the “Dictate” dropdown (small arrow below the button).
- Select “Transcribe” option to open the sidebar.
- Upload an audio file or start a recording.
- Word separates speech by each speaker and generates a transcript.

You can insert it into your document saving countless hours of manual typing.
10. Built-in Translator – Translate Without Google
You can translate the whole documents or selected text directly in Word.
- Go to “Review” menu and click on the “Language” button.
- Click “Translate” and choose “Translate Selection” (you must have selected text before) or choose “Translate Document” option.
- This will open “Translator” sidebar where you can change the language and get the translated content.
- If you want, it is also possible to insert the translated content in your document.
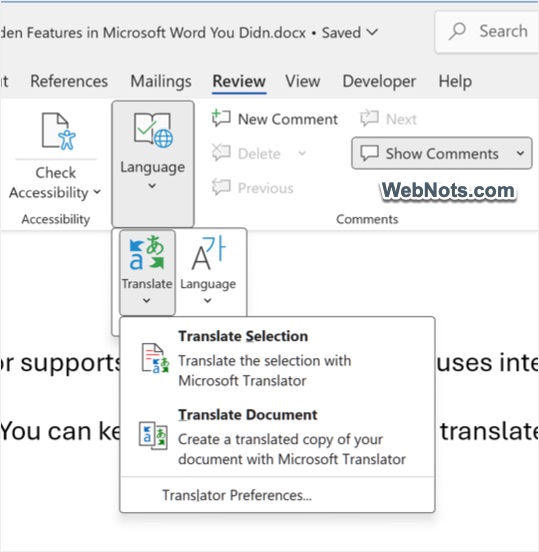
The translator supports all popular languages allowing you to get the professionally translated content with a few clicks.
11. Clipboard History in Word
You may know Windows has an in-built clipboard history feature which you can bring it with “Windows Logo + V” keys. But do you know that you can access the same clipboard history within Word app?
- Go to “Home” menu.
- Click the small arrow against “Clipboard” group to expand it.
- Now, you can view the “Clipboard” panel showing all previously copied items (including from other apps).
- Click on the item to insert it immediately in your document.
- Otherwise, hover on an item and click the small arrow and select “Paste” or “Delete” option.
- Click the “Options” button to enable or disable additional settings like shown the icon on Taskbar (in system tray), activate with keyboard shortcuts, etc.

This is a cool way to copy multiple items from any other app and paste on Word without using the Windows clipboard. You can close the Clipboard sidebar anytime when not needed.
Bonus Features Worth Exploring
Beside the above listed features, Word has many lesser-known tools that can change how you work:
- Read Aloud – Word can read your document in a natural voice which is great for proofreading (right-click on the selected content and select “Read Aloud”).
- Remove Background from Images – You don’t need another app for removing background from an image. Go to “Insert > Picture” and insert an image. Select the image, go to “Picture Format” menu and click “Remove Background” option. After the background is removed, check the picture and accept or reject the changes.
- Convert to PDF – Go to “File > Export > Create PDF/XPS Document” and click on the “Create PDF/XPS” button.
Learning few hidden features can save you lot of time, eliminate repetitive work, improve writing quality, and help to manage long or complex documents easily.