Windows operating system has lot of system files and deleting them accidentally will result in your PC from stop working. To avoid this, Windows has a default feature to hide important system files. However, there are times when you might need to access these files for troubleshooting a problem, make customizations or recover lost data. In this article, let us learn how to view the hidden files in Windows 11, 10, 8 and 7.
Before Dealing with Hidden Files
Simply viewing files and folders does not affect your system. For instance, to access the hidden “AppData” folder in “C:\Users\<Username>\”, use one of the methods below. However, make sure to take a backup if you are deleting or modifying hidden system files.
1. Show Hidden Files on Windows 11
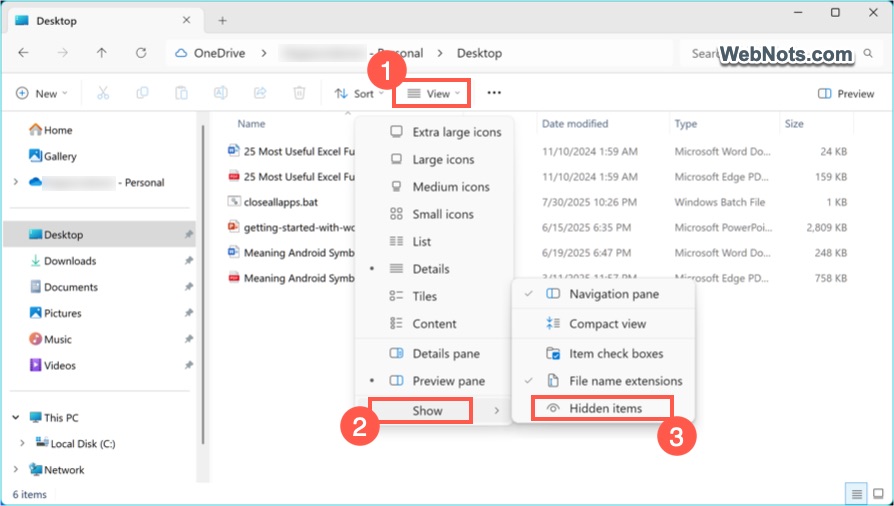
- Open File Explorer and click on the “View” tab in toolbar.
- Go to “Show” menu and select “Hidden items” option.
2. View Hidden Files on Windows 10 and 8
- Open File Explorer and click on “View” tab showing on top of the File Explorer .
- Now enable the check box for “Hidden items” option under “Show/hide” group.

- You will be able to see all hidden folders and files in Windows.

3. Using Folder Options Dialog Box (Windows 11, 10 & 8)
This method works on almost all recent Windows versions. First, press “Windows + E” keyboard shortcuts to open File Explorer
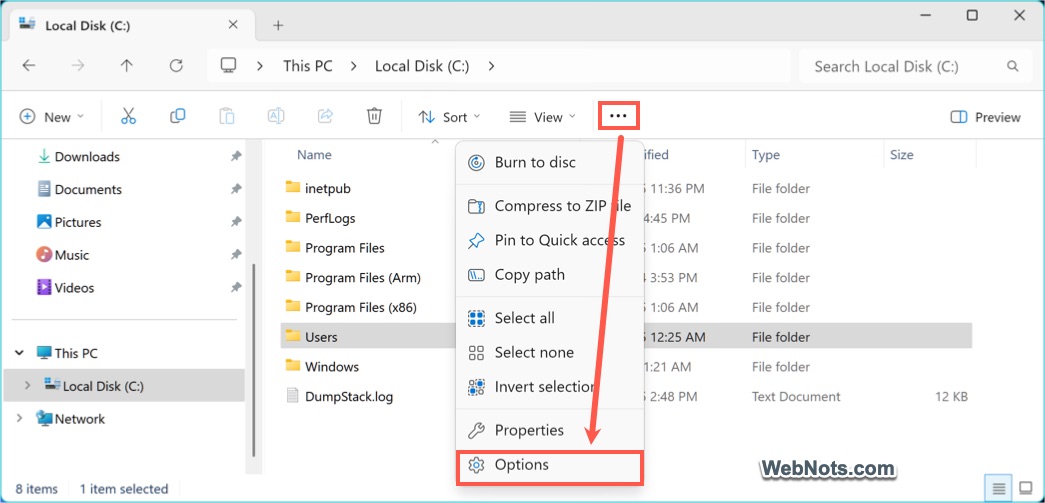
- On Windows 11: Click the three dots icons that says, “See more” on the toolbar and select “Options” from the menu.
- On Windows 10 & 8: Go to “View” tab from the menu. Click on “Options” dropdown and choose “Change folder and search options”.

- This will open the “Folder Options” dialog box. Go to the “View” tab and look for “Hidden files and folders” section.
- Turn on the “Show hidden files, folder and drives” option
- Click “Apply” button to save your changes.
- Now, you will be able to see all hidden files in Windows.

4. View Hidden Files on Windows 7
The process for viewing hidden files is bit different in Windows 7.
- Open the folder in which you want to view the hidden files.
- Click on the “Organize” button at the top and then click “Folder and search options”.

- It will open the “Folder Options” dialog box and go to “View” tab.
- Under the “Advanced setting” section, click on “Show hidden files, folders and drives”.
- Click “Apply” button and then “OK” to save your changes.
- Now, you will see all the hidden files and folders when you open File Explorer.

5. Using Command Prompt
Though the above methods are easier, they will show hidden files in all the folders on your computer. You need to follow the same steps to reverse the changes to hide the files again. Alternatively, you can use the command-line tools to view hidden files under a particular folder without enabling the option at system level (you also do not need to hide them again). First, let us show how to do it using Command Prompt.
- Press “Windows + R” keys, type cmd and press enter to open the Command Prompt.
- Navigate to the folder you are interested in by typing cd folder_path (replace folder_path with the actual path).
- Type dir /a and press enter.
- This command lists all files, including those with hidden attributes.

6. Using Windows PowerShell
Windows PowerShell is another powerful tool for managing files, including viewing hidden ones.
- Search and open Windows PowerShell app or open it from the Start menu list.
- Navigate to your desired directory using cd folder_path.
- Type the command Get-ChildItem -Force and press enter.
- This lists all files and folders, including those that are hidden.

Good thing is that both Command Prompt and Windows PowerShell methods work on all Windows versions.
Final Words
Hope this article helped you to understand how to view the hidden files on different Windows versions. Though File Explorer is easier option, you should revert back to the setting to avoid accidentally deleting hidden system files. So, if multiple people are using your system, we recommend using Command Prompt or PowerShell and deal with individual folders.