Microsoft Authenticator is a free mobile only application (no desktop version available) that provides an additional layer of security for your online accounts. The security layer is commonly referred as two-factor authentication (2FA) though some people also call it as multi-factor authentication (MFA). Rather than relying solely on your password (which can be guessed, stolen, or phished), Authenticator generates unique security codes or prompts, making it much harder for unauthorized users to gain access – even if they have your password. In this beginner’s guide, we will walk you through everything you need to know about Microsoft Authenticator, from installation to daily use.
Why to Use Microsoft Authenticator?
There are plenty of password manager apps available to keep all your credentials in one place. Even you can use Edge or Chrome browser’s in-built password manager option for this purpose. However, entire digital world is moving towards passwordless logins using passkeys and codes for better security. So, apps like Microsoft Authenticator comes handy in such a situation to generate passcodes and supports passwordless sign in to your Microsoft accounts.
Here are some of the additional reasons to use Authenticator app:
- No need to wait for SMS codes or worrying about slow text message delivery since the app provides instant codes.
- Works not only with Microsoft accounts but also with Google, Facebook, Amazon, and many other services that support time-based one-time passwords (TOTP).
- The app is free to download and simple to set up, making it accessible to everyone.
Remember that you should always keep your mobile device handy for logging into your accounts on desktop devices.
Downloading the App
Microsoft Authenticator app can be used on both iOS and Android devices. Simply open the App Store (for iPhones) or Google Play Store (for Android phones), search for “Microsoft Authenticator”, and install the app.

It’s also a good idea to install the app on all your mobile devices (if you have multiple phones). Make sure to turn on the backup from app’s settings page to synchronize added accounts across all your devices.
Note: We explain here with iPhone app, you might find some changes in the interface on Android app.
Adding Your Accounts
It is possible to add accounts from Microsoft (school, work, or personal) accounts or from any other third-party services (like Google and Facebook) in the app.
- First, you need to get the QR code from the website. For example, you can get the QR code from your Microsoft account’s “Security” settings as explained in our earlier article. We recommend doing this on your desktop so that it is easier to scan the code from your mobile.
- Tap on the QR code icon floating on the Authenticator app’s interface or tap the + icon on top-right corner of the app and select the account type.


- Simply scan the code and add your account in the app (You need to provide camera access permission for the app if prompted).

- Microsoft accounts will have 8-digit codes while other third-party accounts will have 6-digit codes. These codes will refresh every 30 seconds automatically.
You can rename the account name or remove it if not needed.
Two-Factor Authentication and Passwordless Sign Ins
After setup, whenever you log in to a protected account, you will be prompted to provide a second factor. Simply open the Authenticator app and enter the 6-digit verification code displayed for your account.

For Microsoft accounts (and some others), you will see a “Send notification” button to receive a push notification on Authenticator app.

Tap on the button to trigger a two-digit code.

Select the same code on your Authenticator app to approve the login without password.
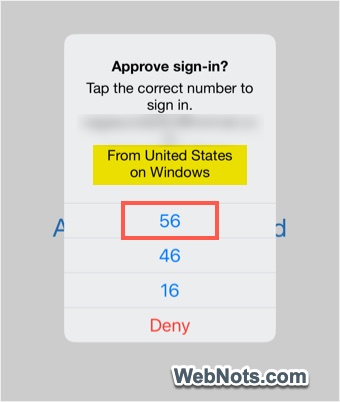
Note that though the code generation does not need internet, sending push notifications need internet connection.
Tips for Making the Most of Microsoft Authenticator
Here are some tips to make the most out of the app:
- Back Up Your Accounts: Always enable cloud backup to your Microsoft account for easy restoration.
- Enable App Lock: Use your phone’s biometrics (fingerprint or face ID) or a PIN to protect the app from unauthorized access.
- Organize Your Accounts: Label each entry clearly (e.g., “Work Email,” “Bank Account”) for quick identification.
- Remove Old Accounts: If you stop using a service, delete its entry from Authenticator to keep things tidy.
- Watch for Phishing: Always verify the site or service before approving a login request – never approve a request you didn’t initiate.
- Accidentally Approved a Login: Immediately change your password and review account activity if you approve a login by mistake.
Frequently Asked Questions (FAQ)
Yes. The app uses industry-standard security protocols, and your secrets are encrypted on your device. Enabling app lock and cloud backup further protects your data.
Any service that supports TOTP (like Google, Facebook, Dropbox, etc.) can be added in the app.
If you lose access to your phone, use backup recovery options (like SMS, email, or backup codes) set up previously. Always keep backup options up to date.
Yes, the app can generate verification codes without an internet connection, though you’ll need connectivity for push notifications.
This feature was removed from July 2025 end and the app no more supports password saving and auto filling. You can use Edge password manager for this purpose.