Microsoft officially ended the support for Windows 10 (on October 2025) and Windows 11 took the center stage in the world of operating systems. Now, the biggest problem you may encounter is the compatibility issues when attempting to run older apps designed for previous versions of Windows& (10, 8 or 7). It might be a game app you love or a custom app from your organization, that hasn’t been updated for years, causing compatibility issues. Good thing is that Windows 11 offers a variety of tools to bridge the gap between legacy applications and the modern operating environment.
Compatibility Issues with Legacy Apps
Frequent crashes, display distortions, and nonfunctional features are common compatibility issues caused by running an outdated app on Windows 11. In some cases, your security software or the built-in User Account Control may block the app from opening. Before trying the options listed below, update the app, Windows OS, and all relevant drivers. This alone often resolves most software or hardware related compatibility problems. If the issue persists, proceed with the steps that follow.
1. Enabling Compatibility Mode in Windows 11
Compatibility Mode allows apps to run in an older Windows environment. However, you need to enable this for individual apps.
- First, navigate to the folder where the app is installed and find the .exe application file of that app. Generally, apps are installed with their own folder under C:\Program Files\ or C:\Program Files (x86). If you are running Windows ARM, check under C:\Program Files (Arm).
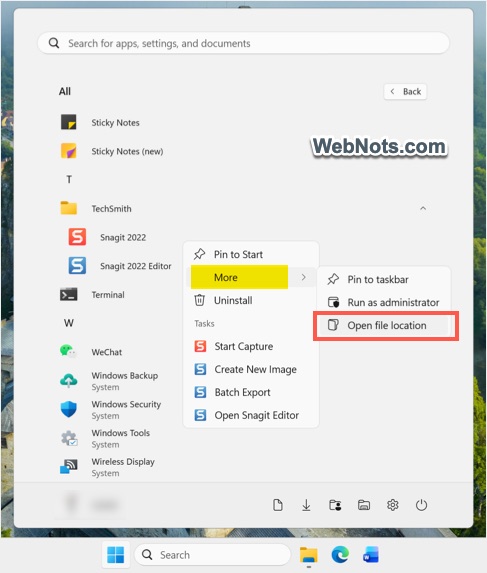
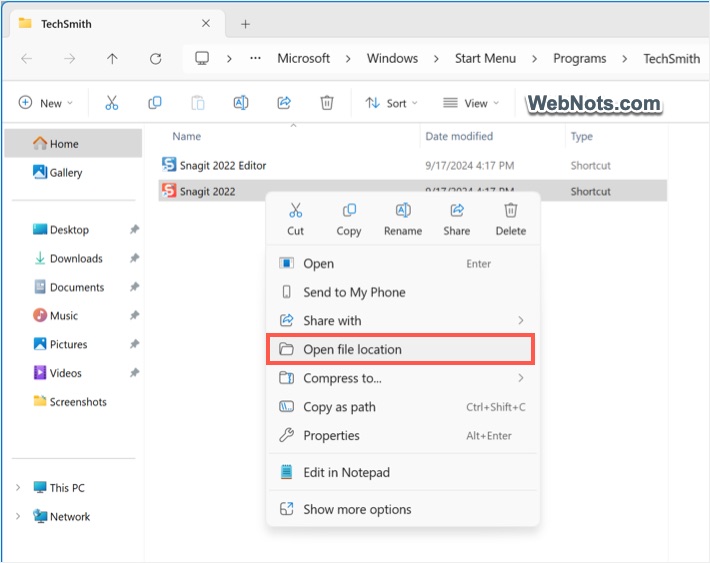
- If you are not able to locate, open Start menu and go to “All” programs list. Find the application in the list and right-click on it. Select “Open file location” option from “More” menu. If this opens the shortcut, again right-click on the shortcut and select “Open file location” to find the .exe application file of that app.
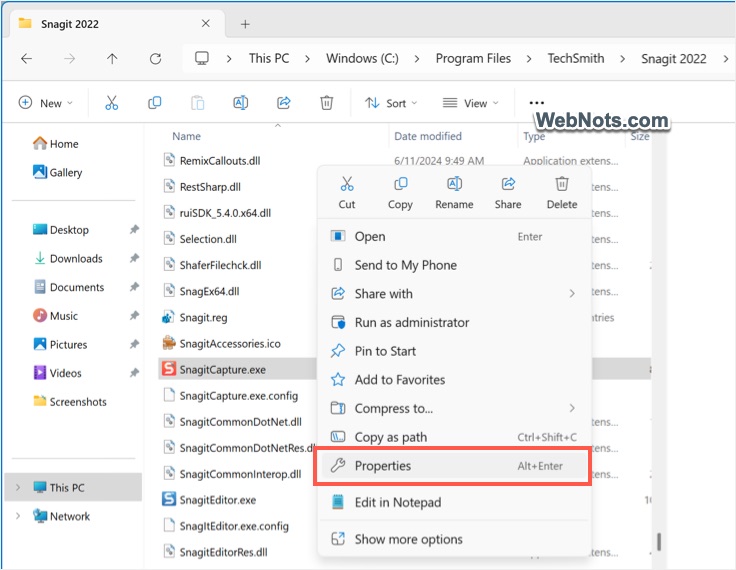
- Right-click on the application file and select “Properties” option (or highlight the app and press “Alt + Enter” keys).
- In the “Properties” dialog box, go to “Compatibility” tab.
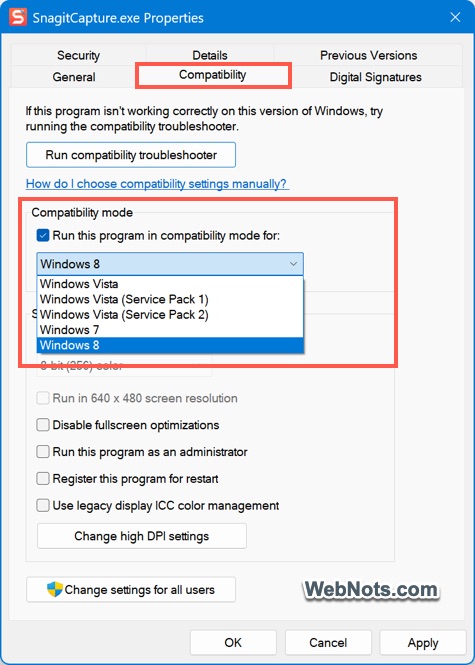
- Under “Compatible mode” heading, check “Run this program in compatibility mode for:” option.
- Select one of the Windows versions from the drop-down like Windows 8, Windows 7, or Windows Vista.
- Click “Apply” and “OK” buttons to apply the changes.
- Now, launch the app and check whether it works properly.
2. Additional Compatibility& Settings
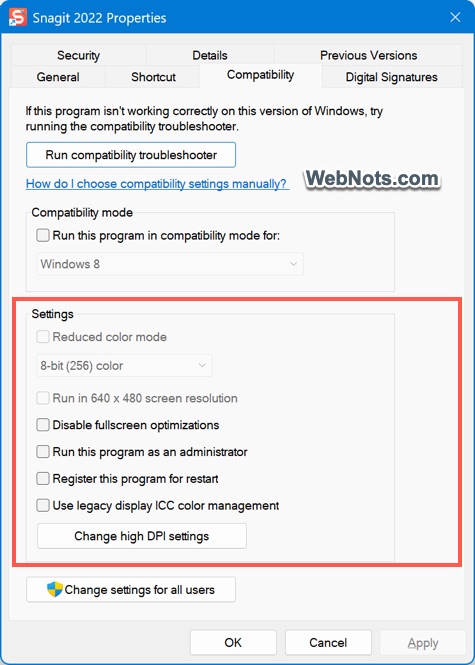
You can also make use of the additional options available on the same “Compatibility” tab.
- Reduced color mode: This will be disabled for most apps. If available, check this option and select the color more from the dropdown.
- Run in 640×480 screen resolution: Try this if the app’s display is distorted on higher resolution or the app window is going outside the display area.
- Disable fullscreen optimizations: Turn off the default Windows OS settings applied when the app is opened in fullscreen mode.
- Register this program for restart: Allow the app to restart after a system reboot.
- Run this program as an administrator: Allow the app to run with administrator permissions.
- Use legacy display ICC color management: Allow the app to use legacy International Color Consortium profiles supported by monitor.
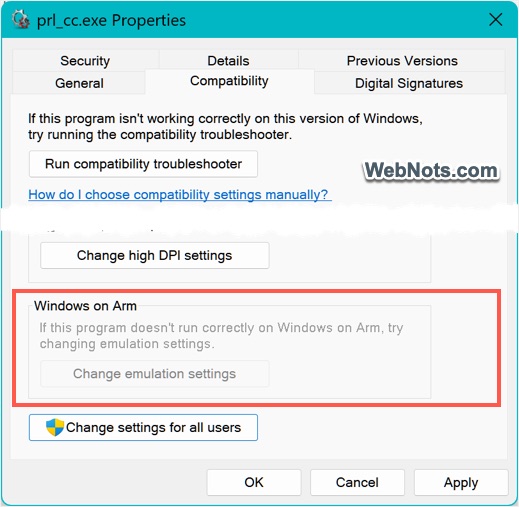
Note: Depending on the app, some of these settings may not be available. App’s properties will also show an additional option under “Compatibility” tab when you run Windows ARM. Click the “Change emulation settings” button showing under “Windows on Arm” heading and adjust the settings.
3. Change DPI Settings
There is also a “Change high DPI settings” button available under “Compatibility” tab. By default, Windows uses the display scaling and resolution setup in the “Settings > System > Display > Scale & Layout” section. However, you can override that by using this DPI setting for a specific app (DPI stands for Dots Per Inch).
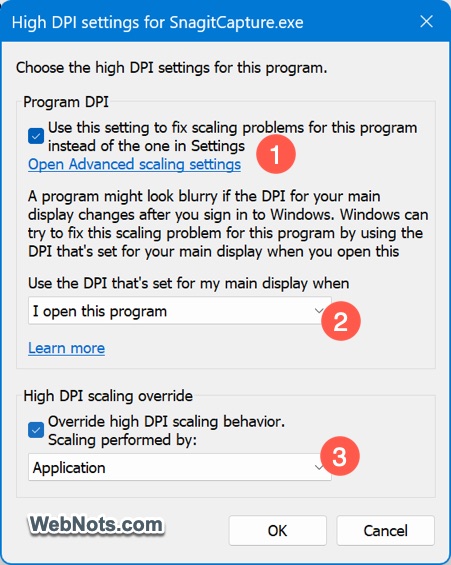
- Click the button to open another dialog box.
- Check “Use this setting to fix scaling problems…” option.
- Select “I open this program” to use the DPI setting.
- Select “Application” for high DPI scaling override.
- Click “OK” button to close the pop-up and then click “Apply” button on the properties dialog box.
This will help to resolve to fit the app window properly on the screen and use it without the need of dragging and aligning.
Note: Compatibility settings will be applied only for the current system user. Click the “Change settings for all users” button and then make changes if you want to allow all users to run the app in compatibility mode. You should have administrator access for doing this action.
4. Run Compatibility Troubleshooter
Windows also offers a troubleshooter for diagnosing and fixing the compatibility issues.
- Click the “Run compatibility troubleshooter” button under “Compatibility” tab of the app’s properties dialog box.
- Otherwise, go to “Windows Settings > System > Troubleshoot > Other troubleshooter” and click the “Run” button against “Program Compatibility Troubleshooter” option.

- This will open a wizard and follow the instructions shown to fix the issues.

5. Using Third-Party Emulator or VM
If compatibility mode settings are not having any effect, then the last option is to use a third-party emulator or virtual machine (VM). This is not recommended as it is a long process needs considerable time to setup and manage.
- Virtual Machine: Try the popular options like Hyper-V or VirtualBox to install an older version of Windows (like Windows 7).
- DOSBox: If you want to run an old MSDOS based app or game, then this will be the best choice. Check more details on how to play DOS games in Windows 11.
Finally, consider an alternative for your app that can run on Windows 11.