The UAC (User Account Control) is a Windows security component that works to prevent any authorized changes to your computer system. Whether a genuine application, user or malicious malware and viruses start these changes, the UAC ensures that critical system changes are made with the knowledge and consent of the system administrator.
How Does User Account Control Works?
When the User Account Control feature is active (enabled), Windows will display a consent prompt whenever an application or a process attempts to make changes to the operating system. Depending on your UAC settings, the prompt may run in a “secure desktop”, which freezes the desktop and other active applications until the user accepts or denies the approval. When using a standard user account, Windows 10 will display a credential prompt that requires the user to provide Admin credentials to approve the changes.

If the user declines to approve consent request, Windows will abort the changes and remain unchanged. UAC, is therefore, a central Windows security tool that helps prevent malicious processes or software installs or runs quietly, mitigating the risk of malware and viruses.
Types of Users in Windows 10
There are two major user account types in a Windows – Administrator account and Standard user account.
- Administrator Account – Windows by default will assign you as an administrator if you are the only user on your computer. In such a case or when you create additional admin accounts, it will have the highest privileges on your computer. For example, admin user can do any actions on the system like installing or deleting apps. In most cases, admin needs to simply enter the password to unlock system settings.
- Standard User Account – On other hand, standard users will have limited access to the computer. Windows will not allow standard users to make changes to the hard drive or system files and ask for administrator permission. However, standard users can still use the computer for browsing the internet, sending and receiving emails, playing games, using apps, etc.
Adding or Deleting User Accounts in Windows 10
As an administrator you can add, change or delete users on your computer.
Adding User Account
- Press “Win + I” shortcut keys and open Windows Settings app and click on the “Accounts” section.
- Navigate to “Family and other people” section and click on “Add someone else to this PC” option.

- Next, click on the link that says, “I don’t have this person’s sign in information”.

- On the next screen, click on “Add a user without a Microsoft account” link.

- Enter username, password and security questions/answers then click next.

- Now you can see the new user has been successfully added. By Default Windows adds a new account as a standard user with limited privileges.
Change User Account
Follow the below instructions in order to change an account from your computer.
- Click on the user account you want to delete or modify under the “Family and other people” section.
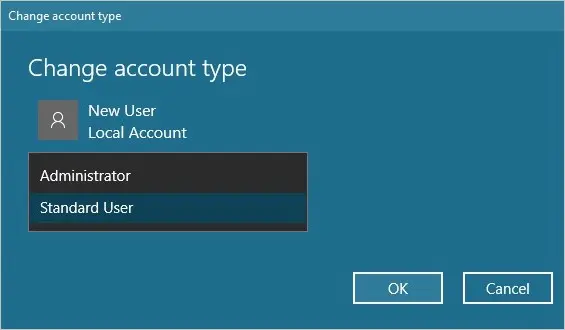
- In order to change account type click on change account type and select “Standard User” or “Administrator” from the drop down menu.
Delete User Account
To remove a user account you just need to:
- Click on the account you want to delete and select remove.
- Click on delete account and data.

- Windows will delete the account along with all associated data to that account.
Disable / Enable the User Account Control in Windows 10
The user can enable or disable the UAC feature, as well as set a preferred notification level depending on their security requirements.
- Ensure that you are signed in to an administrator account or have the admin credentials to access administrator elevation token.
- Click the Start button and type “Account Control” in the search box. Select “Change User Control…” from the result.

- On the UAC settings window, you can disable the feature by selecting the lowest level “Never Notify” and click “Ok” at the bottom of the window.

- To enable the UAC feature, slide the bar to any of the other three upper levels depending on your preferred security settings. The three notification levels are:
- “Notify me only when applications try to make changes to my computer (do not dim my desktop)”- Windows will show the elevation prompt but not on secure desktop mode, only when an application attempts to make changes.
- “Default” Level – The default Windows 10 UAC setup.
- “Always Notify” – A high-security level that monitors changes from applications or users.
Note: after clicking “Ok” Windows will show the UAC consent request for the user to approve or deny the changes.
How to Secure UAC Elevation Prompt with Security Policy Settings?
Windows 10 further secures the consent/credential UAC prompts by using the secure desktop mode. The secure desktop mode dims the PC desktop and freezes other open apps, displaying only the UAC elevation prompt. Once the user accepts or declines the request, it switches back to normal. You can enhance your PC security by setting the UAC to always display in secure desktop.
- Click the Start button and type “Local Security” in the Cortana and open the “Local Security Policy” editor.

- Expand the “Local Policies” and then click the “Security Options” folder to display the policies on the right panel.
- Scroll down to find the “User Account Control” policies.

- Double click the “Switch to secure desktop..” policy, check the “Enable” option on the resulting pop-up and click “Ok”.
- You can also adjust the “Behavior of the elevation prompt…” and configure it to request credentials for both admin and standard user. Double click the policy, choose your preferred behavior and click “Ok” to save. This will prevent actions by any malware masquerading the secure desktop.

- You can customize other UAC settings by double-clicking the policy, modify the settings and click “Ok” to implement the changes.
- For instance, you can enable the Virtualization and installer controls from the security policy settings.
Managing the UAC Settings with the Registry Editor?
You can also customize User Account Controls by editing the registry.
- Open the Registry editor and use the path, “Computer\HKEY_LOCAL_MACHINE\SOFTWARE\Microsoft\Windows\CurrentVersion\Policies\System” to access the UAC keys.

- On the right side panel, double click the key for the setting you want to change.
- Edit the “Value data” field appropriately and click “Ok”.

Conclusion
The User Account Control is a very important feature that adds another security layer to your computer system. The tool prompts for approval for any action attempt to make changes to the computer, thus preventing malicious changes that can result from malware. Besides, UAC also prevents users from making unauthorized or accidental changes to your computer system keeping it functional at all times. You can enable and set UAC notification and elevation prompt levels from the UAC settings. However, if you want a strong control, you can customize User Accounts Controls from the registry editor or the policy editor.