It’s a common task for most of us to copy content from one app to another app. Text copied from AI tools, emails, websites, or PDFs often brings along fonts, colors, spacing, and styles you never asked for. For example, you maybe copying content from ChatGPT or Gemini and paste in a Word document. It will be frustrating to see the pasted content is not as per your default styles. Before you start fixing things line by line, it’s usually better to wipe the formatting completely and start fresh.

Why Remove Formatting in Word?
Removing formatting helps when:
- Pasted text looks different from the rest of the document.
- Fonts, spacing, or colors won’t behave as expected.
- Styles are inconsistent or broken.
- You want a clean document before applying your own styles.
In short, clearing formatting gives you control over the appearance and readability of the document. All the below explained methods work on Word Microsoft 365 version on Windows and the screenshots are also shown from the latest Word version. Though you can follow the same steps on Word for Mac also, the interface as well a keyboard shortcuts are different.
1. Use Paste Options
If formatting issues start when you paste text, stop them at the source. This is the best option for the content copied from websites, emails, and PDFs.
After pasting, Word will automatically show a “Paste Options” icon at the bottom right of the content. Click that icon or press the Control key and select “Keep Text Only (K)” option to remove all formatting.

Click the “Set Default Paste…” option to go to “Word Options > Advanced” dialog box. Scroll down to “Cut, copy, and paste” section and select the default option as “Keep Text Only” for “Pasting from other programs”. You can also set the default option when pasting from same and another Word document.

Note: You can access the “Paste Options” from “Home > Paste” menu or by right-clicking on the selected content.
2. Try Paste Special
This is another way to paste the content without any formatting.
- First, copy your content to the clipboard.
- Go to “Home” tab and click the small arrow below the “Paste” icon in the ribbon.
- Select “Paste Special” option from the drop-down.
- Select “Unformatted Text” as a “Paste” option and click “OK” button.


3. Clear Formatting from Ribbon Icon
This is the most common and beginner-friendly option and fastest for cleaning up chunks of text without affecting the entire document.
- Select the text you want to clean or press Ctrl + A to select all the content.
- Go to the “Home” tab and check under the “Font” group.
- Find and click “Clear All Formatting” icon (the icon with an eraser and letter A).

This removes font styles, colors, bold, italics, and underline and resets text to the default font and size (as per your document template). This will also keep the paragraph structure and line breaks intact.
4. Apply the “Normal” Style
Sometimes the problem isn’t manual formatting, but broken styles. This method can fix your documents with inconsistent headings, spacing, or theme conflicts.
- Select the text (or press Ctrl + A for the whole document).
- Go to “Home > Styles” and click “Normal”.

This reapplies Word’s default paragraph and font settings thus fixing any style-based formatting conflicts.
Note: From “Styles” drop-down also you can select “Clear Formatting” option.
5. Clear Formatting Using Find and Replace
In one of our earlier articles, we have explained the complete tricks for using Find and Replace in Word. You can also remove the formatting using Find and Replace, which helps when formatting problems are widespread but specific. For example, you can use this method to remove one specific font, color, or style across a large document. Here, we show how to quickly remove all Bold formatting.
- Press Ctrl + H to open the Find and Replace dialog box.
- Click “More” button to expand the options.
- Click inside the “Find what” box and then click the “Format” button on bottom left corner.
- Select the format you want to remove, we need to select “Font” for removing “Bold” formatting.
- Select “Bold” from the “Font style” list and click “OK” button.

- This will show “Format:” as “Font: Bold” below the “Find what” option and leave that box empty.
- Now, click onside “Replace with” box, follow the same steps, and select “Regular” font style. This will show the “Format:” as “Font: Not Bold, Not Italic” below the “Replace with” option and leave that box also empty.
- Click the “Replace All” button and all bold formatting on the document will be replaced with regular text.

6. Convert the Document to Plain Text
This is the final option if your document is heavily corrupted and needs a total reset.
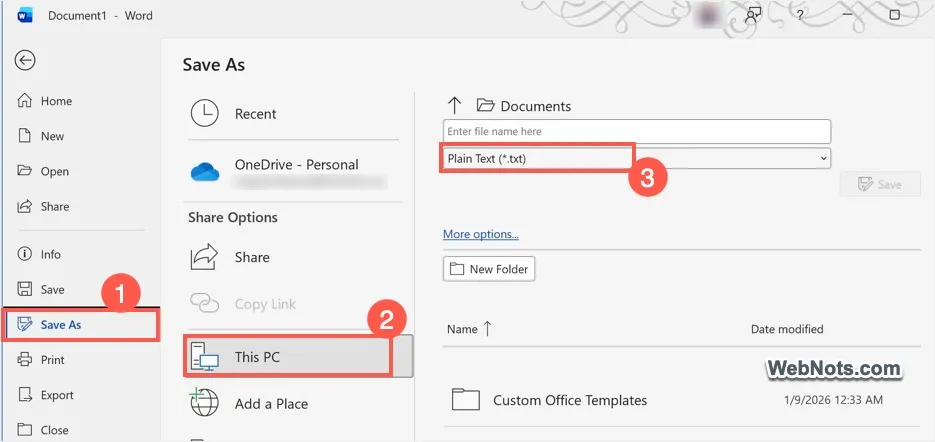
- Go to “File > Save As” menu.
- Click the drop-down above the “Save” button.
- Select “Plain Text (.txt)” option.
- Save the copy of your file.
- Reopen the file in Word app and save it again as a Word document (.docx).
Remember that you will lose fonts, styles, and visual elements like images, and tables.
7. Use Keyboard Shortcuts
Keyboard shortcuts are ideal if you work fast or clean text often.
- Use Ctrl + Spacebar to remove character formatting like font, size, and color.
- Press Ctrl + Q to remove paragraph formatting like alignment, spacing, and indents.
- Press Ctrl + A, then use both the above shortcuts to clear formatting from the entire document.
Final Thoughts
Since copy and paste can’t be avoided, the best option is to set the defaults for pasting as explained in method 1. It’ also important to customize your blank template (Normal.dotm) as per the styles and fonts you need so that the “Normal” styles will be applied correctly. Whatever method you follow, you may find some issues after clearing all formatting like the text looks too plain or the spacing disappears. In these cases, you may need to manually reapply styles and spacing to adjust the appearance.