The built-in camera on a Mac, often referred to as the “FaceTime HD Camera”, is an integral tool for video calls, online meetings, and content creation. Though the camera works flawlessly, it can sometimes malfunction, leaving you frustrated during critical moments. If you’re frequently facing glitches, here are various steps and solutions for fixing camera issues on your Mac.
Understanding Common Mac Camera Problems
Before jumping into troubleshooting, it’s worthwhile to identify the nature of your camera issue. Common problems include:
- Camera not detected: The camera does not appear in apps or system settings.
- Camera shows a black screen: The camera is detected, but the image is blank.
- Poor image quality: Displays fuzzy or distorted visuals.
- Camera used by another app: You get a notification that the camera is in use, but you can’t access it.
- Camera freezing or lagging: Video is delayed or freezes completely.
Identifying which category your issue falls into makes troubleshooting more effective.
Basic Troubleshooting Steps
Start with these simple solutions before moving on to more advanced diagnostics.
1. Restart Your Mac
Sometimes, a simple restart solves the problem. Restarting the Mac closes all active processes, including any background apps that might have locked the camera.
- Click the Apple logo in the top-left corner of your screen.
- Select “Restart”.
2. Check App Permissions
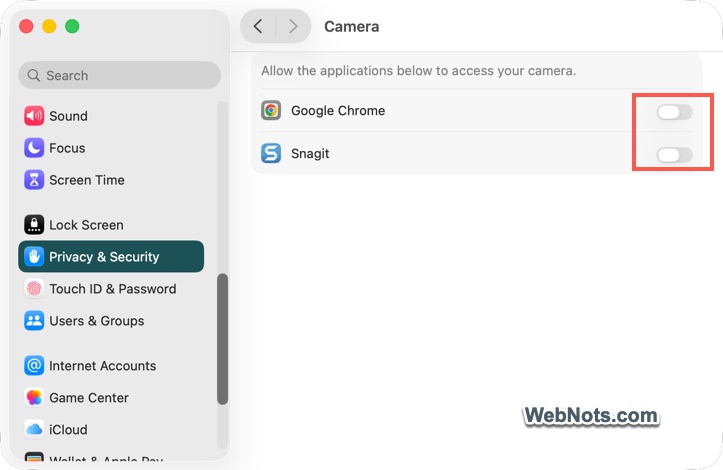
macOS restricts access to the camera for privacy reasons. Make sure the app you’re using has permission to access the camera. Sometimes, you will not see any permission error when using the app leaving you clueless about the issue.
- Go to “Apple Menu > System Settings…” (or System Preferences on older macOS versions).
- Click on “Privacy & Security” and navigate to “Camera” section.
- Ensure the app you’re trying to use has the toggle enabled.
3. Close Conflicting Applications
Only one application can use the camera at a time. If an app is already using it, other apps may not be able to access the camera.
- Quit all applications that might be using the camera (such as Zoom, FaceTime, or web browser app).
- Reopen the desired application and try again.
4. Update macOS and Apps
Software bugs can interfere with camera functionality. Keeping your operating system and applications up to date ensures compatibility and stability.
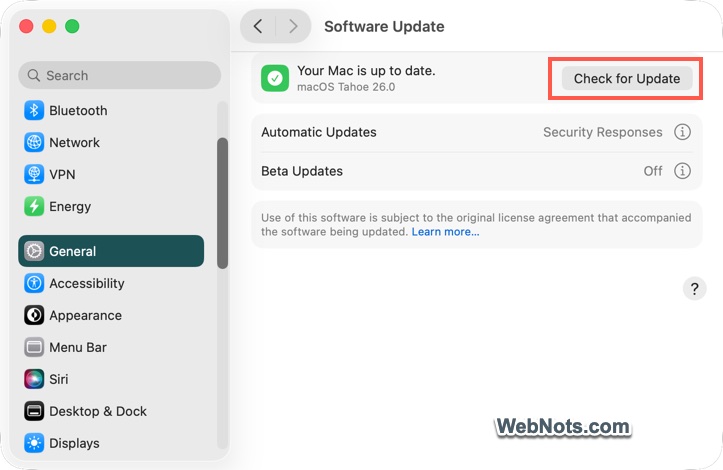
- Go to “Apple Menu > System Settings…” and navigate to “General > Software Update” section.
- Click “Check for Update” button and install any available macOS updates.
- Update individual apps via the App Store or the developer’s website.
5. Check for Hardware Issues
Sometimes, the problem is physical. Inspect the area around the camera for obstructions such as stickers, dirt, or damage. If you have an external webcam, try plugging it into a different USB port.
- Clean the camera lens with a soft, dry cloth.
- Check for any cracks or visible damage.
Advanced Troubleshooting Steps
If basic steps fail, proceed with advanced solutions.
6. Reset the System Management Controller (SMC)
SMC controls power-based hardware functions. However, it also controls the sensors and status indicators which may affect the camera. The process depends on your Mac’s processor type:
- Apple Silicon Macs: These models do not have an SMC to reset. It will reset automatically when you shut down or restart your Mac.
- For MacBooks with a T2 Security Chip: First, shut down your Mac. Press and hold “Left Control + Left Option + Right Shift” keys for 7 seconds and then hold power button (along with those keys) for another 7 seconds. After that release the keys, wait for a moment, and boot your Mac.
- For other MacBook models: Shut down your Mac. Press and hold “Left Shift + Left Control + Left Option + Power button” for 10 seconds. Release all keys and turn the Mac back on.
Note: If you are using iMac or a desktop, follow this process: Shot down > Unplug > Wait 15 seconds > Plug the Power Cable > Wait 5 seconds > Press Power button.
7. Reset PRAM/NVRAM
PRAM/NVRAM stores system settings that might impact the camera on Intel based processors (it’s not applicable for Macs with Apple Silicon processors).
- Shut down your Mac.
- Turn it on and immediately hold “Option + Command + P + R” for 20 seconds.
- Release the keys and allow the Mac to boot normally.
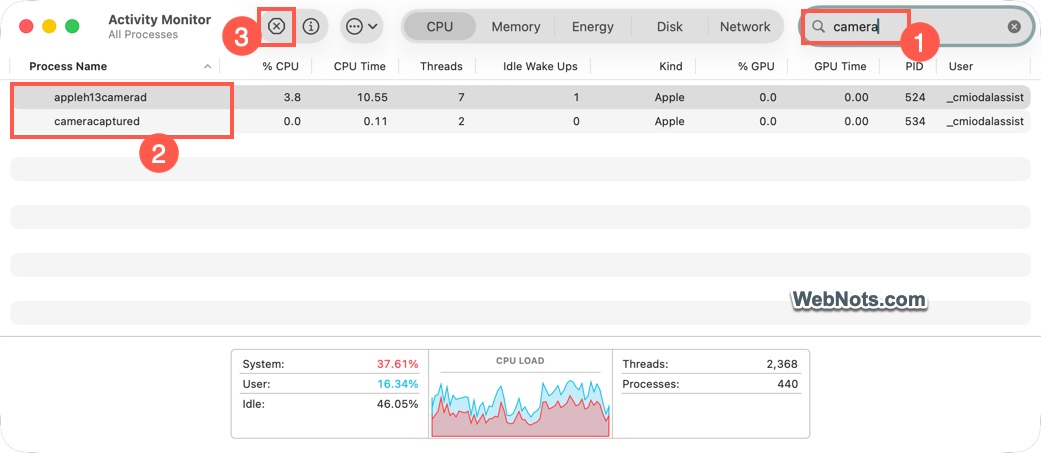
8. Use Activity Monitor to Terminate Camera Processes
Occasionally, camera related background processes may not close properly and prevent camera access.
- Open “Activity Monitor” from “Finder > Applications > Utilities”.
- Type “camera” in the search box to filter related processes.
- Select them (using Shift + Click) and click the “⊗” button to force quit.
- Restart your app and test the camera.
9. Try Your Camera in Different Apps
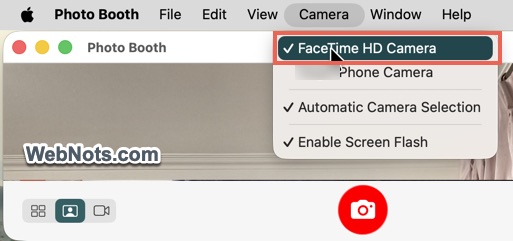
Test your camera in built-in apps like FaceTime or Photo Booth. If it works in one app but not another, the issue may be app-specific. If you are using multiple camera (external or from iPhone or iPad with Continuity), some apps like Photo Booth will automatically select camera based on your previous use. So, make sure you are using the default Mac’s camera.
- Open “Photo Booth” from the Applications folder.
- Go to “Camera” menu and select “FaceTime HD Camera” option.
- Check if the camera is functioning.
Additional Tips
- If you are having problem with a specific app like Zoom, check for app updates or try uninstalling and reinstalling the app.
- On Safari, go to “Safari > Settings… Websites > Camera” and ensure camera access is allowed for the site. Also, retry after clearing the browser’s cache (use “Safari > Clear History” menu).
- Clean your camera lens to ensure clear image quality.
- Avoid physical damage by using protective cases and handling your device with care.
- Use trusted applications to minimize risk of software conflicts or malware.
When to Seek Professional Help?
If you’ve tried all the troubleshooting steps and your camera still isn’t working, it may be time to contact Apple Support or visit an Apple Store or authorized service provider. Hardware failure, logic board issues, or connector problems require expert attention.
- Visit Apple Support website and login with your Apple account.
- Navigate to “Mac > Camera” section and book a reservation for repair.
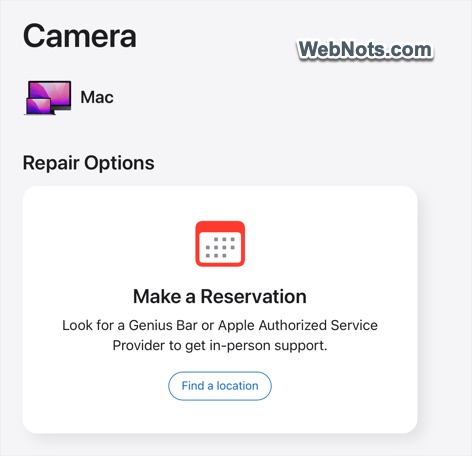
This is the best option if your device is still covered under warranty.