Task Manager is one of the default apps in Windows Tools collection to manage system resources in Windows 11. You can use this app to check which processes and apps in the system are consuming memory, CPU, disk and network. This is primarily used by administrators to kill processes that consume high system resources and find users who occupy system bandwidth. If you are an administrator of the system with multiple users, you may want to disable the access of Task Manager for other users. In this article, we will explain different methods to disable Task Manager in Windows 11.
Task Manager in Windows 11
There are multiple ways to open Task Manager app like searching and opening using Windows Search.

You have two context menu options available as explained below.
- Right-click on the Start menu icon and you will see “Task Manager” option in the power user menu that appears.

- Alternatively, right-click on the empty area on “Taskbar” and click on “Task Manager” option.

Disable Task Manager in Windows 11
There are no default settings available in Windows to enable or disable Task Manager app. So, you need to tweak the backend to achieve this. Though these methods are not harmful to your data, make sure to take a system backup or create a restore point. After disabling with one of the below methods, system will show an error message when you try to open Task Manager app.
1. Using Registry Editor
First option is to add a Windows Registry entry using Registry Editor to disable Task Manager.
- Press “Windows + R” keys to open the Run dialog box.
- Type “regedit” in the box and press “OK” button.

- Before making any changes, create a backup of your current Windows Registry entries. Click on the “File” tab and select “Import…” option to save the backup at your desired location.

- After that, navigate to the following path to reach the “Policies” folder (you can simply copy, paste the path in address bar and press enter key):
Computer\HKEY_CURRENT_USER\Software\Microsoft\Windows\CurrentVersion\Policies

- Right-click on “Policies” and select “New” and then click on “DWORD (32-bit) Value” to create a new key.
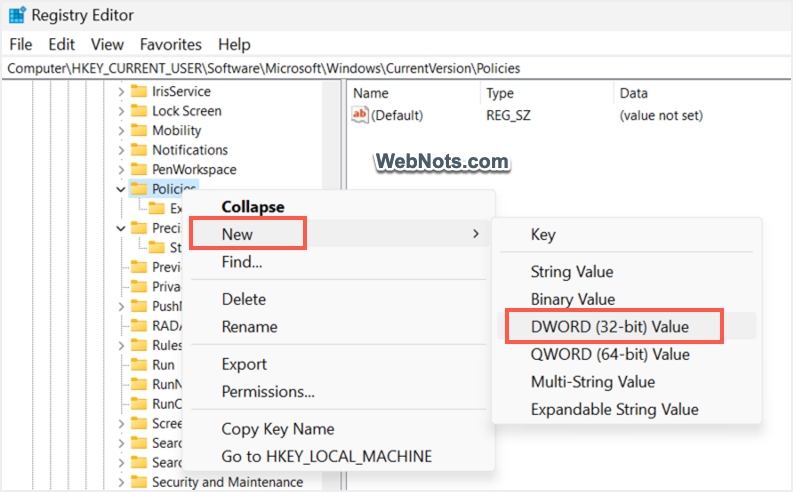
- Rename the key as “DisableTaskMgr”.

- Double-click on DisableTaskMgr and set the Value data to 1 and click “OK”.

This is how you can disable Task Manager using Registry Editor.
2. Using Local Group Policy Editor
Second option is to use the Local Group Policy Editor app and configure the policy. By default, Local Group Policy Editor app comes with Windows 11 Pro, Students or Enterprise edition and not with Home edition. You can follow the trick as explained in this article to bring the app in Home edition as well.
- Open Run dialog box, type “gpedit.msc” and press the “OK” button.

- On the left side menu, go to “User Configuration > Administrative Templates” section.
- Expand “System” folder to find “Ctrl+Alt+Del Options”.

- Select “Ctrl+Alt+Del Options” and then double-click on “Remove Task Manager” policy showing on the right-pane.

- Select “Enabled” option, click on “Apply” and then “OK” buttons to disable Task Manager.

Note: The policy name is “Remove Task Manager” and hence you should “Enable” it to disable the app.
3. Using Windows PowerShell or Command Prompt
This method is similar to the first method and if you don’t want to use “Registry Editor” you can use “Windows PowerShell” instead.
- Use Windows Search from Taskbar to find “Windows PowerShell” app.
- Right-click on the app name and choose “Run as administrator” option.

- Paste the below command in the prompt and press enter key.
reg add HKCU\Software\Microsoft\Windows\CurrentVersion\Policies\System /v DisableTaskMgr /t REG_DWORD /d 1 /f
- This will disable Task Manager in your system and if you want to enable it back, use the following command:
reg add HKCU\Software\Microsoft\Windows\CurrentVersion\Policies\System /v DisableTaskMgr /t REG_DWORD /d 0 /fYou can also use the same commands in Command Prompt with admin mode to disable or enable Task Manager app.
Note: The value 1 is stored as “Value data” in Registry Editor as explained in method 1. When you enable the app, it will be changed to 0 in the Registry.
4. Using Third Party Apps – Ultimate Windows Tweaker
There are several free apps available to disable Task Manager in a few clicks. Ultimate Windows Tweaker is one such app that offers more than 200 tweaks for Windows 11 to personalize your computer.
- Go to the Windows Club website and download the zip file for Ultimate Windows Tweaker app.
- Extract the file and open the app. you do not need any installation to use the app.
- Navigate to “Security & Privacy” section available on the left menu.
- Check “Disable Task Manager” option and press “Apply Tweaks” button.
- After that, restart your system and you will see the Task Manager is disabled.

How to Know Task Manager is Disabled?
Each of the above explained methods work differently – some remove the right-click context menu on Taskbar while others simply disable Task Manager leaving the menu items as they are. Registry Editor and Local Group Policy Editor options will also remove the “Task Manager” option from Taskbar right-click menu.

Though Ultimate Windows Tweaker may not remove menu items, you will get a warning message saying, “Task Manager has been disabled by your administrator” when you try to search and open Task Manager app.

At any case, you will see the same warning message after disabling Task Manager using any of the above methods. Any time later, you can revert the changes to enable Task Manager app again.
Note: Windows 11 has many other tools to monitor system resources like Resource Manager, Performance Manager, etc. Disabling Task Manager will not disable those apps.