
We develop and test local WordPress sites regularly using MAMP on Mac. With every new release of macOS as well as MAMP, localhost sites will stop working on Mac. If you are facing such issues, here are some suggestions.
MAMP and MAMP Pro
When you extract the installer package, both MAMP and MAMP Pro apps will be installed on your Mac. earlier, you had an option to choose only MAMP, which has been removed subsequently. So, you can go to “Applications” folder and simply delete the MAMP Pro app if you are not using the premium subscription. The points discussed in this article are only relevant to the free MAMP version. Make sure you have installed the latest MAMP version from the official website and updated macOS to the latest release.
1. Disconnect VPN
If you are receiving “Internal Server Error” message after updating MAMP or macOS, the most probable cause will be your proxy or VPN settings.Simply disable your VPN, proxy or firewall and try connecting the MAMP server. If it works, clear your DNS cache or change to another VPN / proxy server and check the connection.

2. Use Firefox Instead of Safari
The free version of MAMP uses HTTP for accessing the localhost website. By default, Safari browser on Mac will block all insecure connections with http protocol. Even clicking “Continue” button will not load the site in most cases.

You can manually allow HTTP by going to “Safari > Settings… > Security” section and check “Non-secure connections” option. The best option is to use Firefox, which will allow HTTP without any additional setup.

3. Apache Server is Not Running
Sometimes MAMP cannot start the Apache server although MySQL Server is started. Earlier versions used to show the status of Apache and SQL servers separately making it easier to find which one is running. Unfortunately, later MAMP versions only show a “Start” or “Stop” button hiding the detailed information.

Here is a solution to fix the Apache server problems and open MAMP successfully.
- Open “Finder” and navigate “Applications > MAMP > Library > bin”.
- Locate the file called envvars or a file with similar name.
- Click on the file and press enter to change the file name to _envvars (or simply delete it).
- Relaunch MAMP again.
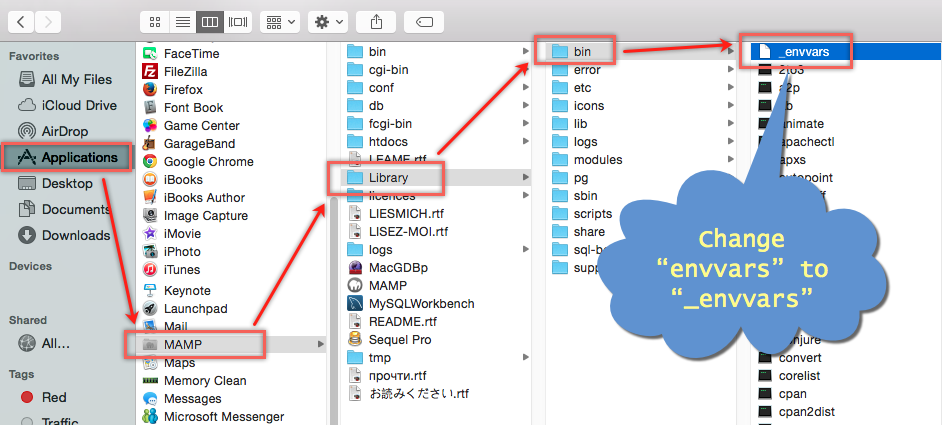
This should start both Apache and MySQL servers and your localhost site should be accessible again.

4. MySQL Server is Not Running
In case if your MySQL server is not started when launching MAMP app, follow the below steps.
- Open Finder and go to “Applications > MAMP > bin” folder.
- Find and open startMysql.sh file in a text editor app.
- Add the below code at the start.
# /bin/sh
unset DYLD_LIBRARY_PATH
Now, restart MAMP app and it should launch both Apache and MySQL servers.
5. Select Correct MySQL Server Version
MAMP 7.0 introduced a new MySQL server version 8.0. This will change the folder structure and you should upload the database files under the following path:
Applications > MAMP > db > mysql80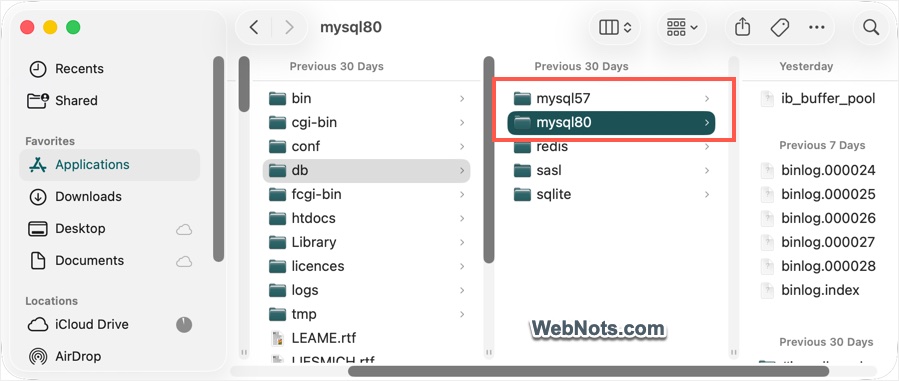
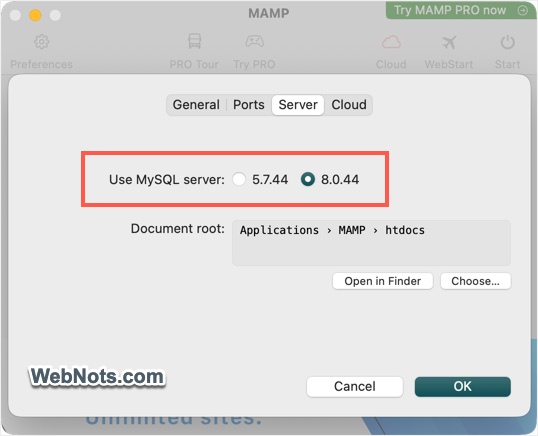
Also, select the correct SQL version in the app’s interface by going to “Preferences > Server” section.
6. Changing PHP Version
- The free MAMP only allows a few PHP versions. So, there are lot of possibilities that the incompatible version causing the conflict with your localhost server. Simply open the MAMP app and click the dropdown next to “PHP Version” on the home screen.
- Switch to the required (mostly the old) version.
- Start the server and check whether it helps to launch your site.

7. Setting Correct Port and Localhost URL
By default, MAMP uses 8888 as a port for Apache / Nginx and 8889 for MySQL server. This means you should access the localhost using the following URL:
http://localhost:8888if you simply want to access using http://localhost, then you should change the ports.
- Open MAMP app and click the “Preferences” settings icon on top left corner.
- Go to “Ports” tab and click “80 & 3306” button.
- The new ports (80 for Apache / Nginx and 3306 for MySQL) will be applied.
- Click “OK” to close the pop-up and click “Start” to launch your local servers with the new ports.

Note that the browsers will automatically redirect http://localhost:80 to http://localhost.
6. Edit php.ini File
The php.ini file is the main configuration file for PHP, the programming language that WordPress and many other web applications use. It controls how PHP behaves, including settings like maximum file upload size, memory limit, execution time, error reporting, date/time zone and enabled extensions. So, editing the php.ini file may be needed if you are facing PHP related errors.
- Open MAMP app and click the “WebStart” button.
- Expand “PHP” section and click the phpinfo link to find your configurations.

- Check the value of the parameter that shows in the error message. Let’s say, you are facing a memory exhausted error and the
memory_limitis showing as 256M in phpinfo. In this case, you can increase the memory limit to 512M and check if that is sufficient. - Create a plain text file, add the following code and save the file as php.ini.
memory_limit = 512M- Upload the file under “Applications > MAMP > bin > php > php_version_folder > conf”. The
php_version_foldershould be the version of the PHP MAMP uses.
Now, launch your localhost site and check it works as expected.

8. Database Import Failure
MAMP offers phpMyAdmin and Adminer for managing your databases. In most cases, these tools will fail when you try to import a large database file. As explained above, you can change the upload size using php.ini file (by increasing upload_max_filesize and post_max_size values). However, that will not help if your database is in GB (for example 1.5GB). In this case, using Terminal is the best option to upload your database as explained in this article.

Once the database is imported, you should be able to configure the local site and access it normally.
Final Words
MAMP is one of the best options to create a localhost setup on your Mac. However, there is a bit of technical knowledge needed for troubleshooting and fixing the issues. Without which, you will not be able to access the site as macOS, PHP, and the base applications (like WordPress, Drupal or Joomla) will be updated continuously.






Thanks for the save.
It solved my project, thanks a lot
the best answer i have ever find, directly in the point!
and well explained u the best.