So, you have received an image in email or social app but find it is in a wrong direction either horizontally or vertically. Perhaps it’s a portrait photo and you wanted to rotate the image and fix the direction. Do not worry!!! Windows 11 offers multiple options for image processing and you can use one of them to rotate your images.
Rotate Image in Windows 11
It is possible to rotate a single or multiple images quickly in Windows 11 without any third-party apps. The images can be rotated 90° in clockwise or anticlockwise direction. However, you probably need a third-party app for advanced annotation, text overlay features and to rotate to a specific angle.
1. Rotate Image from Right-Click Context Menu
This is the simplest method as you can use it anywhere on the system like on desktop or in File Explorer.
- Find the image in desktop or in File Explorer.
- Right-click on it and select “Rotate right” or Rotate left” option as you need.
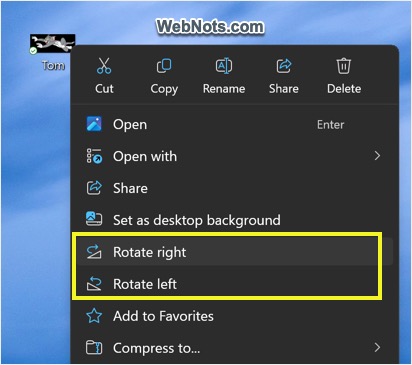
You can also select multiple images and rotate them without even opening them. If you do not see rotate option in the right-click context menu, select “Show more options” to view the complete list of items in the menu list. Learn more on how to always show all items in right-click menu.
2. Using Rotate Option in File Explorer
The latest File Explorer in Windows 11 has plenty of in-built options including image rotation.
- Press “Windows Logo + E” keys to open File Explorer app.
- Browse and locate the images you want to rotate.
- Select one or multiple images and click on “Rotate left” or “Rotate right” in the top toolbar.

Sometimes the rotate option may be hidden if the screen resolution is smaller. In that case, click on the three horizontal dots showing “Show more” and find the rotate menu.
3. Using Default Photos App
- Find your image and double-click on it to open in Photos app.
- Click the “Rotate” icon on top toolbar or press “Control + R” keys.
- This will rotate the image 90 degrees in clockwise direction.
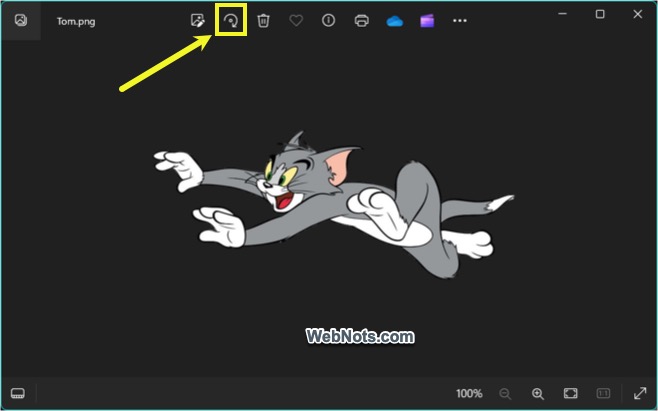
If the image is not opening in Photos app, probably you have another app set as your default for photos viewing. In that case, right-click on the image and select “Open with > Photos” app option. Though you can open multiple photos in the app, you need to use the rotation option on each image separately. If required, you can also resize the app to reduce the size.
4. Rotate with Paint App
If you are fond of the old Paint app, you can also use that app to rotate an image.
- Right-click on the image and select “Open with > Paint” option.
- Click the “Rotate” icon showing in “Image” group of icons.

- Select one of the options to Rotate right 90°, Rotate left 90° or Rotate 180°.

Though you can only rotate single image at a time, there are many advantages of using the revamped Paint app. You can flip the image horizontal or vertical, add text overlay, insert shapes, remove background and resize the image with Paint app.
Note that you can also use the Paint 3D app in similar manner.
5. Using Third-Party Apps
In most cases, you do not a third-party app for simply rotating an image. However, you can use premium apps like Snagit to create professional images with large number of options. For example, you can directly open a screenshot or paste from clipboard in Snagit to rotate that image to a specific angle and add annotations which is not possible with the default apps.
- Simply copy the image you want to rotate.
- Open Snagit app and click “New from Clipboard” tool to insert the copied image in editor.

- Go to “Image” menu and select “Rotate image…” option or press “Control+ R” keys.
- Use 90 degrees clockwise rotation option or manually enter an angle and click “Rotate” button.

Final Words
All default Windows 11 options allow you to rotate the image with 90° clockwise or anticlockwise. Whether you use right-click context menu, File Explorer, Paint or Photos app, you can send or share the rotated images right from the menu or app itself. You only need a third-party app for rotating the image to a specific angle with additional features.