Many people use Microsoft Word for simply typing text content. However, there are many things you can do with images in a Word document. For example, you can remove background from images in Word without any additional tools. If you anytime wondered how to mirror or flip an image in Word document, here is a step-by-step instruction for that. Here, we explain with Microsoft 365 and you can do this in both Word for Windows and Mac versions.
Mirroring or Flipping an Image
Flipping an image is NOT simply rotating it by 180 degrees in horizontal or vertical direction. It is reversing or mirroring the image in horizontal or vertical axis. To make it simple for understanding, below is how the horizontal and vertical flipped images will look like along with the original image.

Flip Image in Word for Windows
- Open Word app and go to “Insert > Pictures” menu. Let us insert an airplane image using “Online Pictures…” option. You can select “Airplane” category to find the online images using Bing search and insert with appropriate copyright information.
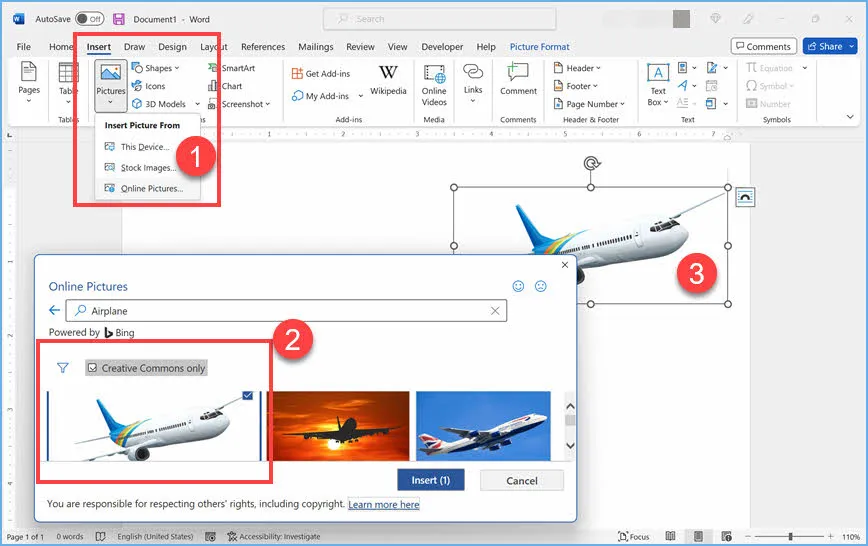
- After inserting an image, click on it to view “Picture Format” menu.
- Click “Rotate Objects” icon under “Arrange” group.
- Select “Flip Vertical” or “Flip Horizontal” option from the dropdown menu.
- This will mirror the selected image as per your selection.
- To undo flipping and restore the image to its original position, simply select the same “Flip Vertical” or “Flip Horizontal” action again.

Flip Image in Word for Mac
- Go to “Insert > Pictures” menu and select the option to embed your image in Word document. Alternatively, you can simply paste the image from your clipboard.

- Click on the inserted image and Word will show an additional menu item “Picture Format” in the ribbon.
- Go to “Picture Format” menu and click on “Rotate Objects” icon.
- Select “Flip Vertical” or “Flip Horizontal” option from the dropdown menu to flip the image.
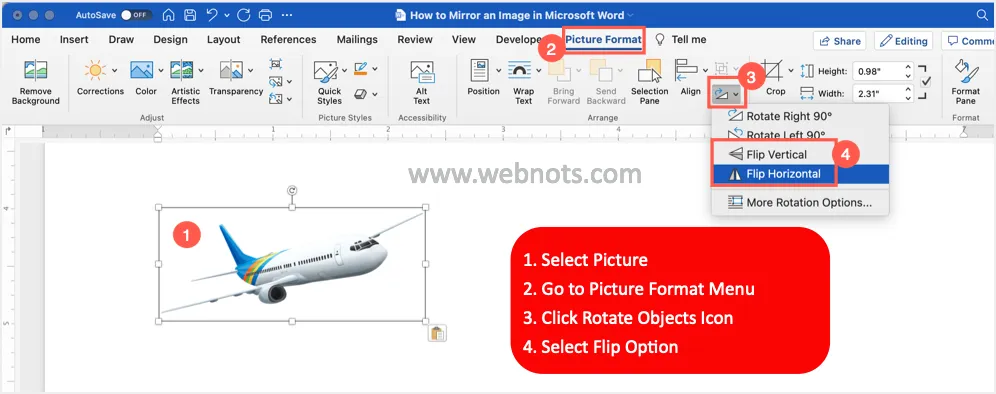
Note: For viewing additional rotation options, click on “More Rotation Options…” and manually choose the rotation angle. Alternatively, double click on the image to open the “Format Picture” sidebar. Go to “Effects > 3-D Rotation” section to set custom rotation angle.

Dragging and Flipping Vertically or Horizontally
This is a cool trick to flip image in Word without going through menus.
- Hold and drag either right or left edge of the image till it touches the other side. When you continue to drag, you will see Word start flipping the image horizontally.
- Similarly, you can hold and drag top or bottom side to touch other side and flip the image vertically.

CSS Image Flip Widgets
You can also create image flipping effect using CSS as shown below. Learn more on how to create and insert horizontal image flipping and vertical image flipping widgets in webpages.

Search engine optimization is a technique of making your site search engine friendly. Download free SEO guide here to improve your site's ranking...

Here is the short description to show on the flip. Adjust the content according to your image height to look uniform and aligned.
Final Words
As you can see, it takes hardly few seconds to flip an image horizontally or vertically in your Word document. If you want to retain the original image, you can copy the image (Control + C) and paste it beside (Control + V). In this way, you can flip the duplicated image and retain the original beside to it.