
Some iPhone browser apps like Firefox Focus offers a delete button and pressing it will automatically delete your browsing history. However, there are no options in Safari app to automatically delete or schedule clearing of browsing history periodically. You have to manually delete the history every time when needed. In most situations, you will forget to do that and the alternate option is to use private browsing mode. Safari will NOT store your history in private mode and here we will explain how to use private browsing mode in Safari iPhone.
Why to Use Private Browsing Mode?
The problem with browsing history is that the sites you visited once will appear in various places.
- You can find the site icon appears under “Frequently Visited” section on the start page.
- Safari will suggest the site address from history when start typing in the address bar.
- Your iPhone browsing history will be synced across devices when using same iCloud account unless you disable iCloud sync.
To avoid all these privacy problems, private mode is the option you should use. This is especially needed when you frequently access private sites and you do not want to leave the history on your devices.
Before Using Private Mode
Remember, private browsing will ONLY avoid storing the site data you visit after enabling the mode. However, you will still find suggestions from previous history when using private mode. The site icons from the history will also appear on the start page from your history. So, the first thing you should do is to delete your previous browsing history completely or remove specific sites that you do not want to appear in the suggestions/start page. It is also possible to disable the suggestions without deleting the history or remove the sections from start page.
1. Enable Private Mode By Tapping and Holding Tabs Icon
This is a quick way to enable private browsing mode in Safari.
- Open Safari app.
- Tap and hold on the tabs icon showing at the bottom right corner.
- You will see a list of menu items appears and select “Private” option.
- This will turn on the private browsing mode in Safari. Enter the site address and visit anonymously without storing history on the device.
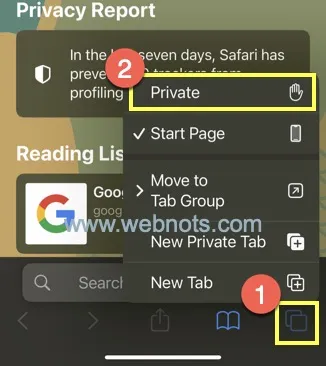
- To open a new private tab, again tap and hold the tabs icon. Now select “New Private Tab” option. Alternatively, you can also select “New Private Tab” option first time itself.

- Safari will continue to work in private mode and will automatically remove the history when you close the private tabs.

You can toggle to normal browsing mode by tapping and holding on tabs icon again and selecting “Start Page” option.
2. Enable Private Browsing Mode When Tab Switching
If tapping and holding is difficult for you, then follow this method:
- Simply tap on the tabs icon showing at the bottom right corner.
- This will show all open tabs along with few options at the bottom section and tap on “Start Page”.

- Now select “Private” to enable private browsing mode.

- Tap on + icon or “Done” showing at the bottom section to open a new private tab.

- You can anytime toggle back to normal browsing mode by tapping on “Private” option from bottom and selecting “Start Page”.
3. Creating Private Tab Group
You can also group multiple private tabs and create a group.
- When you have multiple private tabs, tap on the tabs icon.
- Select “Private” option from the bottom.
- Now tap on “New Empty Tab Group” option.

- Provide a name for your group and tap “Save”.

- You will see the private tab group name appears along with “Start Page” and “Private” options.

- In this way, you can directly toggle to your private tab groups when needed.
- For deleting private tab group, swipe left on it and select the delete button.

3. Other Private Options
In addition to private mode, there are few additional options you can use in Safari app to improve your privacy.
- Stop Suggestions from History – to stop seeing the automatic suggestions while typing site address, go to “Settings” app. From there, navigate to “Safari” settings page and disable “Safari Suggestions” option under “Search” section.
- Delete Icons from Start Page – if the site icons showing on start page annoys you, simply tap and hold on it. This will show a menu items and select “Delete” from the list to get rid of that site. This will actually delete the particular site from the history and will not appear again.

- Removing Sections from Start Page – if you want to remove the Favorite, Frequently Visited or Reading List sections, scroll down to bottom and tap on “Edit” button. You will see a pop-up and disable the sections that you want to remove.


- Disable iCloud Tabs Section – when editing the start page, you can disable “iCloud Tabs” item. This will remove the section on start page showing tabs from your Mac and other devices.
- Disable iCloud Sync – if you want to completely disable Safari syncing history, bookmarks, etc. across devices then you need to disable iCloud sync for Safari. Go to “Settings” app and tap on your Apple ID showing on the top. Navigate to “iCloud > Show All” section and disable “Safari” item from the list. When prompted, select “Delete from My iPhone” option to delete existing history already synced in your iPhone.

Final Words
Privacy is one of the biggest concerns when using Safari browser in iPhone for surfing the internet. Apple offers a privacy report and automatically block the trackers profiling you. However, the browser app by default saves all the webpages you visit in the history. Though this helps to speed up your browsing, it may create lot of privacy problems especially when you share the phone with others. The simple solution is to use private mode to protect your privacy.


