
Many of us use Outlook for sending and receiving emails on daily basis. Therefore, being more productive and efficient with Microsoft Outlook will help to save plenty of time that you can use for other work. In this article, we will explain some useful tips to improve productivity on Microsoft Outlook. Learn more tips for Word, PowerPoint and Excel in our earlier articles.
Outlooks Tips to Work Like a Pro
You will be aware of functions like adding signatures, setup out of office reply, recalling emails and sending confidential email. Here are some Outlook tips that you may not know or use. We explained here with the latest Outlook New app. So, the screenshots and processes will be different if you are using the old classic Outlook app.
1. Organize Emails in Folders
In any daily office activity, you need to streamline email management and operation. However, if you already have an overflowing inbox with thousands of emails, it can be a daunting thing to do. No one wants to spend hours looking for important emails that you have received few months ago hidden among thousands of other emails.
A well-managed folder system will make everything easy for you. This can be time consuming, but you may spend fifteen minutes a day to do that. In a week, you may organize or delete hundreds of emails that are no more required. Simply click on the three dots icon at the end of your email account and select “Create new folder” option to add a folder to your account.
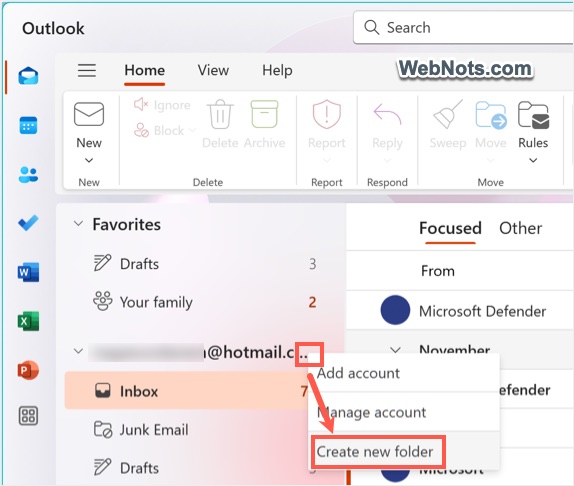
You can also create subfolders under inbox and drag emails to the right folders.

2. Sweep Email from a Sender
Sweep option allows you to take a quick cleaning action against the sender of an email. Select an email and click the “Sweep” button under “Home” tab. On the pop-up that appears, you can select one of the actions and then the “Move to” folder.

3. Put Essential Emails, Notes and Calendar Events on Desktop
Outlook allows you to setup reminder, flag and categorize emails to prioritize the tasks. However, most of these functions work only when you open the Outlook app. Let’s say you get an urgent task on Friday evening and you want to get notified on Monday morning. The simple and effective way is to put the email on your desktop. Simply drag emails, notes and calendar entries on to the Windows desktop to create a copy.
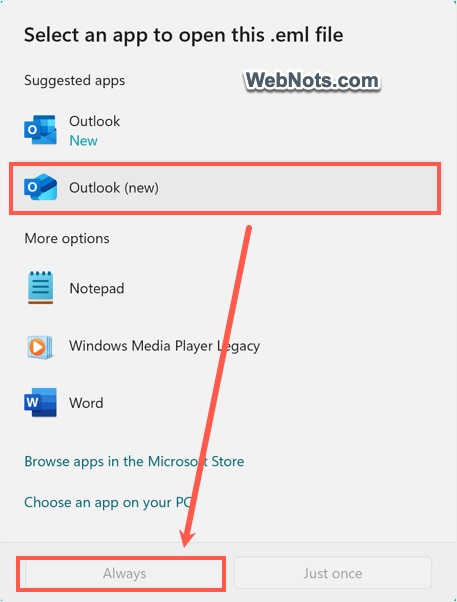
Outlook may show a warning that the file will harm your computer, click “Keep” to download the email to your desktop. Double-click on the email and Outlook will open automatically (for the first time, you may need to select Outlook and click “Always” option).
4. Schedule Email Delivery
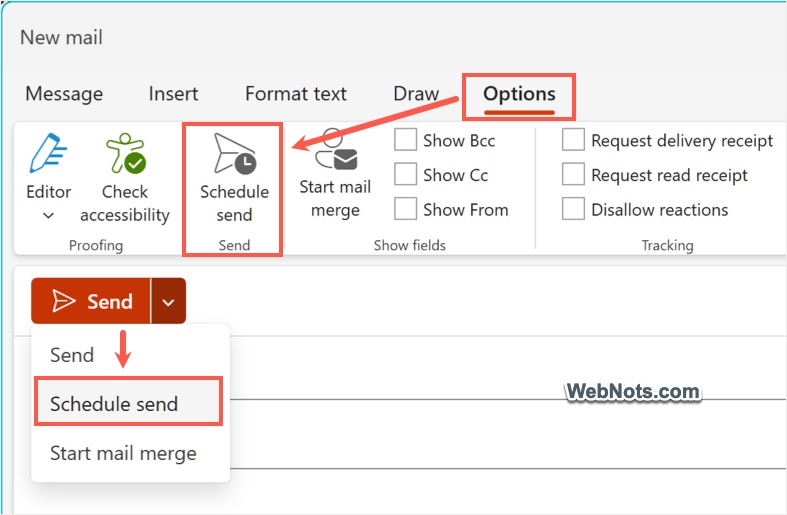
Sometimes, you want to compose the email but want to send later point of time. After you have completed preparing the email message, go to “Options” tan and click the “Schedule send” button. Alternatively, click on the drop-down arrow on the “Send” button and select “Schedule send” option. Select the suggested date / time or click “Custom time” link to choose any date / time from the calendar.
If you are using Gmail, learn how to schedule emails in Gmail.
5. Show Email Messages as Conversations
There are many different ways you can view the emails in Outlook. However, viewing the emails in sequential conversation will help you to understand the previous communication quickly.
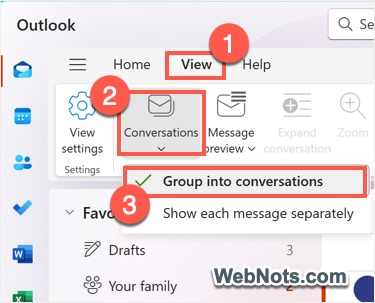
This will also make your email messages to look like instant messaging platforms, that’s far easier to read and understand. You can arrange the emails in conversational view by:
- Go to “View” tab.
- Click on the “Conversations” option under “Messages” group.
- Select “Group into conversations” option.
6. Block Unwanted Emails
Each day, you may get a dozen or more unwanted emails from various sources. In order to block junk, unwanted emails, select the email and go to “Home > Report > Report junk” option.
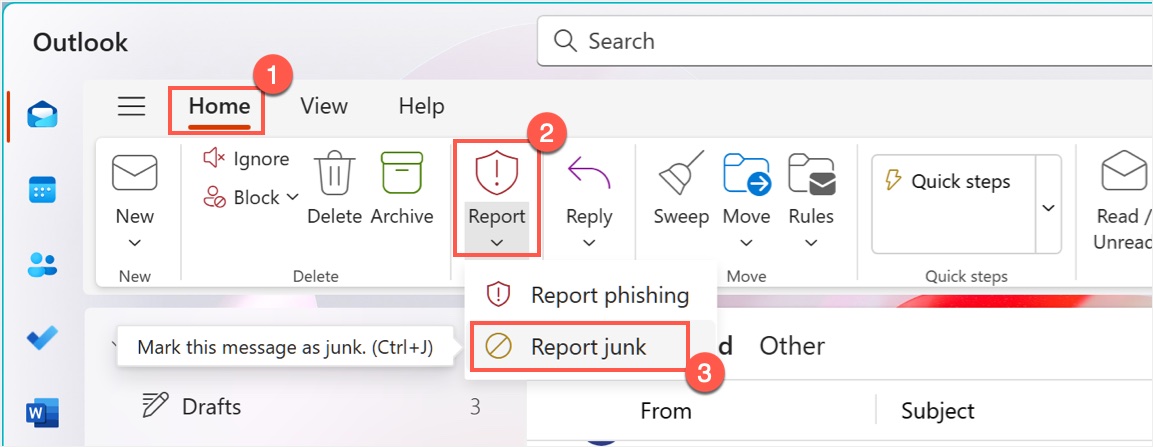
Alternatively, you can simply drag and drop emails to “Junk Email” folder or press “Control + J” keys. Outlook will automatically send any further emails from the sender to junk.
7. Use Sticky Notes
Keeping the reminder or important emails on your desktop will make your desktop clutter. In such situations, it’s easy to use Sticky Notes app for quick reminders. Good thing is that all your Outlook notes will be automatically synchronized in Sticky Notes app and vice versa. So, you can either manage the notes within Outlook or use keep on top other app window from Sticky Notes app.
- Go to “Notes” folder in your Outlook account.
- Click on the “New note” button.
- Add your content in the note and change the color if needed (to visually identify important items).
- Now, search and open Sticky Notes app and you will find all your Outlook notes there.
- Open a note and click the pin icon to keep it always on top.

This is useful if you want to do multiple tasks each day, because entering routine tasks in your calendar is actually quite inefficient.
8. Get Notifications Only for Important Emails
Getting notifications for each incoming email would be terribly distracting. You should limit notifications only from favorite people who generally send important emails to avoid distractions.
- Go to “Home > Rules > Manage rules”.
- In the Settings pop-up, navigate to “General > Notifications” section.
- Turn on “Only from favorite people” under “Mail” section.

To add a sender to your favorites – hover over any email sender, click “More options” (three dots icon) and select “Add to favorites” option.
9. Setup Folder for CC Emails
This happens quite often, your email address is added in the CC field of a seemingly endless emails chain. As a result, your inbox will be quickly weighed down, making it bloated and less manageable. A good practice is to divert these emails into a special CC folder.
- Go to “Home > Rules” section, and click on the “Mange rules” option.
- On the popup, click on “Add new rule…” button.
- Enter the name for your rule and click on the “Add a condition” dropdown.
- Select “I’m not on the To line” option under “My name is” heading.
- Now, click on the “Add an action” dropdown
- Select “Move to” option under “Organize” heading.
- A new dropdown box will appear, click on it and select the folder where you want to move the emails.
- Click “Save” button to create a rule. You can also check “Run rule now” option to cleanup already received emails in your inbox.
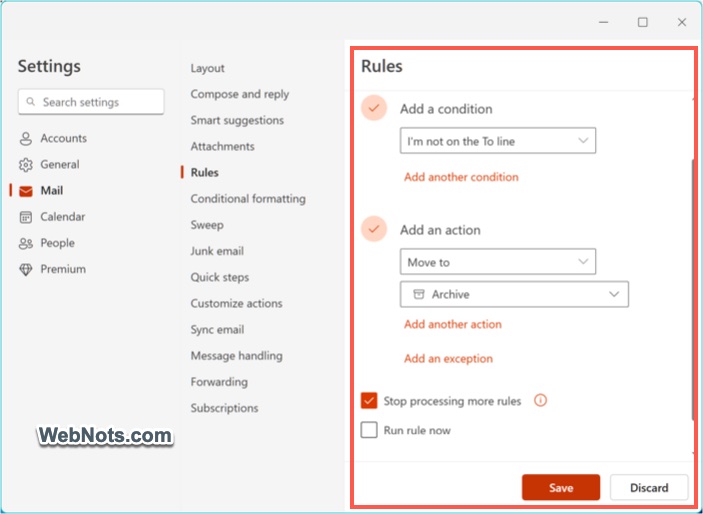
You can also create a rule for email you are in CC from particular sender to send to specific folder.
10. Use Cleanup Function
Many people are working in email-intensive workplaces where it’s common to receive thousands of emails every month. It will be time consuming and unproductive to search among these huge number of emails. This Outlook tips help you to clean up inbox and reduce the amount of email that you need to manage each day.
- Go to “Settings > Accounts > Storage” section.
- Under “Manage storage” section, you can find the folders along with their sizes.
- Click on the “Empty” button and select the time frame to delete those emails.

You can also archive emails and empty deleted items folder to fix slow loading Outlook problems.
11. Automatically Sort Emails in Folders
There are different types of emails that you may get each day, such as computer-generated notifications, emails from clients, emails from managers and fun emails from co-workers. You can use Outlook rules to sort the emails.
- Go to “Home” tab and click on “Rules” button and select “Manage rules” option.
- This will take you to “Settings > Mail > Rules” section and click on the “Add new rule” button.
- Name your rule, select “From” option for “Add a condition” and then add a contact.
- Under “Add an action”, select “Delete” or any specific folder you want to move the emails.
- Save your changes to create a rule.
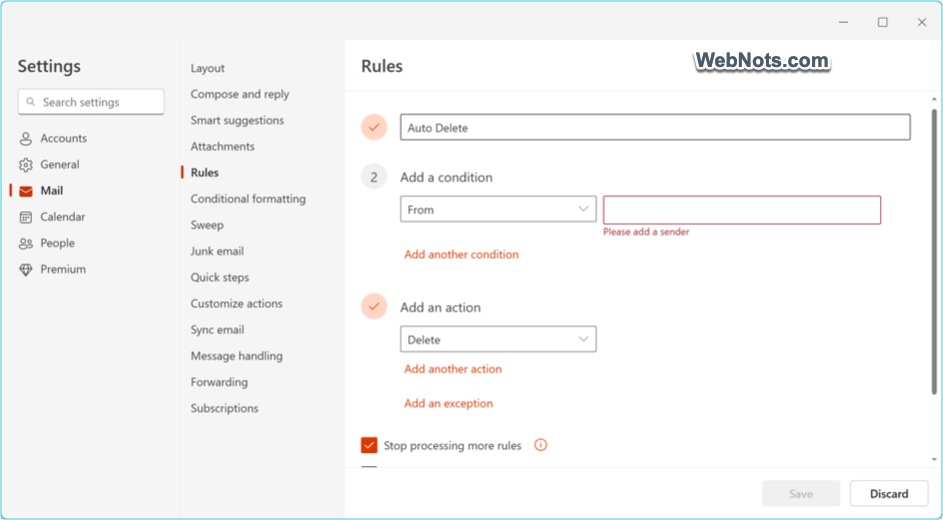
This is useful to classify computer-generated emails and emails from managers or clients. It is also possible to select message containing specific words in the subject to classify emails from senders who send both work-related and fun emails. You may directly send emails from public groups that you don’t want to read to the “Deleted” folder.
12. Use Quick Parts to Send Common Replies
This Outlook tips help you to handled repeated tasks like a pro. For example, if you are a marketer or customer service staffs, you will get the same questions all over the time repeatedly. Outlook offers feature called Quick Parts, using this you don’t need to type the same reply over and over again.
- Highlight the text in an email that you want to use as a generic answer and go to “Insert > Quick Parts”.
- Choose “Save Selection to Quick Part Gallery”.
- Type in the name of the new Quick Part and click OK.
- When you want to make replies, open a reply email and go to the “Insert > Quick Parts”.
- Choose the appropriate Quick Part. The prewritten text should appear in the email body, edit it if you want before sending.

Learn how to use Quick Parts in Microsoft Word documents.
13. Use Quick Steps to Do Specific Actions
Quick Steps is a versatile feature, because you can do a long string of actions depending on the triggers. As an example, each time you get an invoice from supplier, you may want to forward it to the accounting department and follow it up a few days later. Quick Steps can do this automatically for you.
- Go to “Home” and check the “Quick Steps” group. You may find some default actions from Outlook like sending a “Team Email” and “ “To Manager”.
- Click on small down arrow and select “Manage quick steps” option.

- You can create a custom Quick Steps by clicking on the “Add quick step” button.
- Type in the name of the Quick Steps and choose an action, such as “Forward to”.
- You may add multiple actions in each Quick Steps, such as “Categorize message”.
- Optionally type the description you want to show and select a keyboard shortcut to trigger.
- Click “Save” button to save your item.

Now, you can find the created item under “Home > Quick steps” menu. Be imaginative and creative with Quick Steps, you may speed up any repetitive email management tasks.
Conclusion
Doing the repetitive tasks on Outlook will kill your productivity. We hope some of the above-mentioned tips can really help you to save your work time.


