
PowerPoint is one of the apps that many of us use on daily basis. In many situations, you may want to insert date and time on your slides to show when it was prepared. Sometimes, dynamically updating the date is also required to always show the current date. Good thing is that you can easily insert date and time in PowerPoint both inside slide content and in header / footer areas. Also, learn how to insert date in Word and Excel.
PowerPoint with Microsoft 365
This article explains the steps in PowerPoint app that comes as part of the latest Microsoft 365 pack. It works exactly same on Windows and Mac versions though the interfaces look different. Windows version also has an additional option for changing language and calendar type.
Insert Current Date and Time Inside Slide Content
- Open you presentation and click on the position where you want to insert the date.
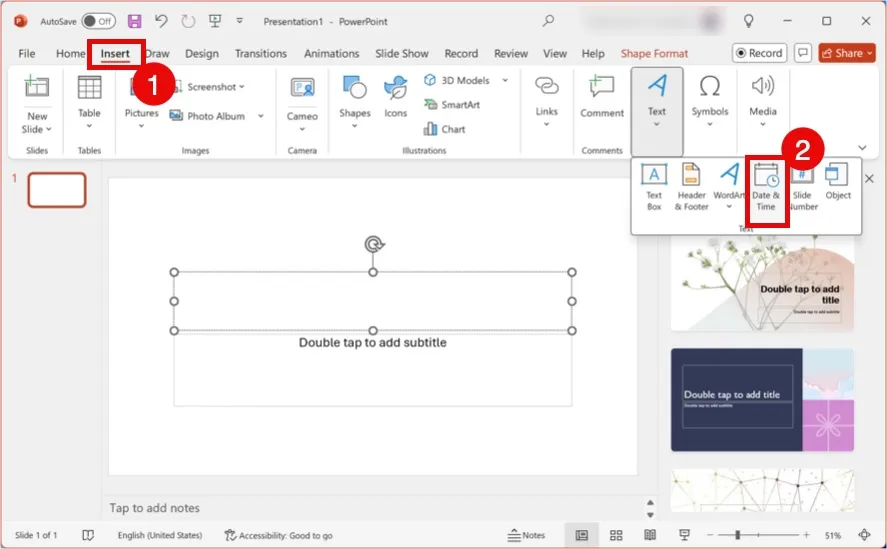
- Go to “Insert” menu and select “Date & Time” option under “Text” group.
- This will open “Date And Time” pop-up. Select the date and time format under “Available formats” and click on the “OK” button. If required, click on the “Language” and “Calendar type” drop-downs and select different options.
- If you want the date to get automatically updated as per the current date, check “Update Automatically” option.

Clicking on the “Default…” button will allow you to set the selected format for the language. After inserting, the date / time will look something like below in the slide.

Inserting Date and Time in Footer
- Open your presentation, go to “Insert” menu and select “Date & Time” option. Make sure the cursor is not inside any blocks of the content area.
- This time you will see a “Header and Footer” pop-up opens. Go to “Slide” tab and check “Date and time” option under “Include on slide” heading.

- For inserting current date with auto update, select the “Update automatically” option. Now, select your date / time format from the dropdown.
- For inserting a fixed date, select “Fixed” option and type your date in the box.
- By default, this will insert the selected date/time on the left side of the footer as you can see in the preview box.
- Click “Apply” to only insert date in the current slide or click “Apply to All” button to insert on all the slides in your presentation.
If required, you can check “Don’t show on title slide” option to ignore the title (first) slide on your presentation deck.
Insert Date and Time in Header
You can only insert date / time in Notes and Handouts header which will not be visible on the header section of the normal slide view.
- Go to “Insert > Date & Time” menu in your presentation.
- In the “Header and Footer” pop-up that appears, go to “Notes and Handouts” tab.
- Check “Date and time” option under “Include on page” heading.
- Select “Update automatically” and choose the date format from the dropdown.
- Otherwise, select “Fixed” option to manually type the date.
- By default, date / time will be shown on right section of the header.
- Click “Apply to All” button to save your changes.

If you want to view the date / time in header, go to “View” menu and select “Notes Page” or “Handout Master” option. Check the top right corner of the slide area to find the date / time is inserted.

Inserting Date in PowerPoint Mac
As mentioned, you can follow the same steps by navigating to “Insert > Date & Time” menu in PowerPoint Mac versions. Below is how the “Date and Time” and “Header and Footer” pop-ups will look like on Mac.


Points to Note
- When selecting “Date & Time” menu after clicking inside a box will open “Date And Time” while the same menu will open “Header and Footer” pop-up if you haven’t positioned the cursor inside any text box.
- You can also go to “Insert > Header & Footer” menu to open “Header and Footer” pop-up.
- While the date / time inserted in footer will be printed on your slides, header date / time will not.
- Date formats, language and calendar type will appear from your Windows operating system’s regional settings. For example, if the regional format is in MM/DD, then you will see the same format in PowerPoint also.


