Web browsers like Google Chrome use caching to make websites load faster. Most of the time, Chrome’s cache works quietly in the background and improves your browsing experience. However, cached files can sometimes cause problems, especially when a website has been updated but Chrome continues to load an older version of its files. Also, if you are developing a website or troubleshooting a web page and trying to view the latest version of a site, temporarily disabling Chrome’s cache can be useful. There are several ways to do this, including using Chrome Developer Tools, browser extensions, and other troubleshooting techniques.
What is Browser Cache?
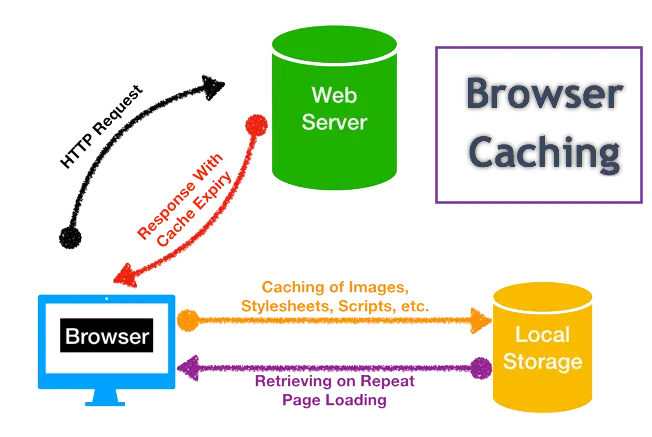
A browser cache is a temporary storage area where Chrome saves copies of files downloaded from websites. These files can include images, CSS stylesheets, JavaScript files, fonts, and other resources. For example, when you visit a website for the first time, Chrome may download its logo, stylesheet, and JavaScript files. When you visit the same website again or visit another page on the site, Chrome can reuse some of these files instead of downloading them all over again. This makes websites load faster and reduces the amount of data that needs to be downloaded.
Why Can Chrome’s Cache Cause Problems?
The problem is that the cached version may not always be the latest version. Suppose you update a website’s CSS file. The new CSS may be correctly uploaded to the server, but Chrome could still use an older copy stored in its cache. As a result, you may not see your changes even though the website itself has been updated. Common cache related problems include:
- An updated website still displays an old design.
- Changes to CSS do not appear.
- New JavaScript code does not seem to run.
- Images appear outdated.
- A website looks broken after an update.
- A web application behaves differently from the latest version.
- Developers see an older version of a page while testing.
- A page repeatedly displays an error caused by an outdated resource.
In many cases, clearing the cache or forcing Chrome to download fresh files solves the problem. However, follow one of the below methods if you really want to disable the cache in Chrome.
Method 1: Disable Cache Using Chrome Developer Tools
Chrome includes a built-in option that prevents caching while Developer Tools is open. This is particularly useful for web developers because you do not have to repeatedly clear the entire browser cache.
- Open the website where you want to disable caching.
- You can open Chrome Developer Tools by pressing F12 or Ctrl + Shift + I keys in Windows and Command + Option + I keys on Mac. Alternatively, right-click on the page and select “Inspect” option.
- In Developer Tools, go to the “Network” tab where you will see network requests generated as the page loads.
- Look for the “Disable cache” option near the top of the Network panel and select it.
- Reload the webpage while Developer Tools remains open by pressing Ctrl + R in Windows and Command + R in Mac.
- Chrome will request the page resources again instead of relying on the browser cache.
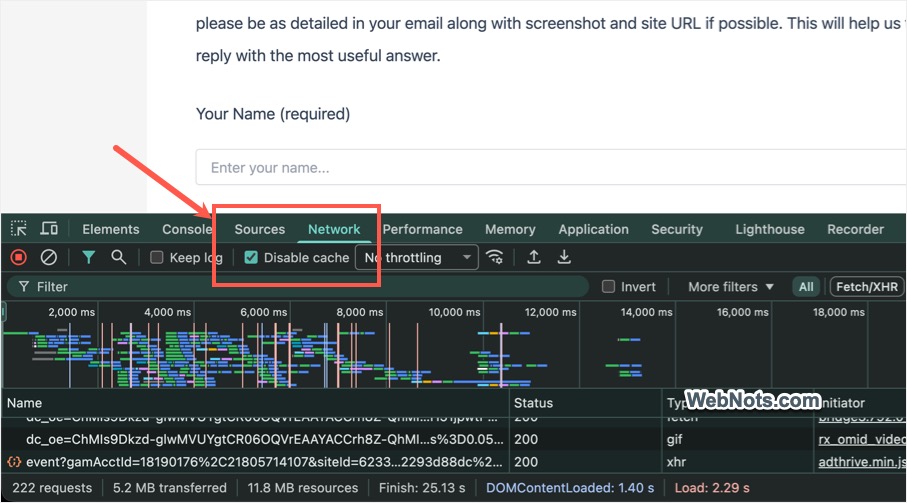
An important point is that this setting applies while Developer Tools is open. If you close Developer Tools, Chrome can return to its normal caching behavior. This makes the method convenient for testing without permanently changing your browser configuration.
Method 2: Perform a Hard Reload
If you do not want to disable caching for an extended period, you can perform a hard reload. A hard reload tells Chrome to request fresh resources rather than simply using the normal cached version.
- First, open Developer Tools. Then right-click the browser’s Reload button.
- You will see options like Normal Reload, Hard Reload, and Empty Cache and Hard Reload.
- Selecting Empty Cache and Hard Reload is particularly useful when you suspect that outdated cached resources are causing the problem.
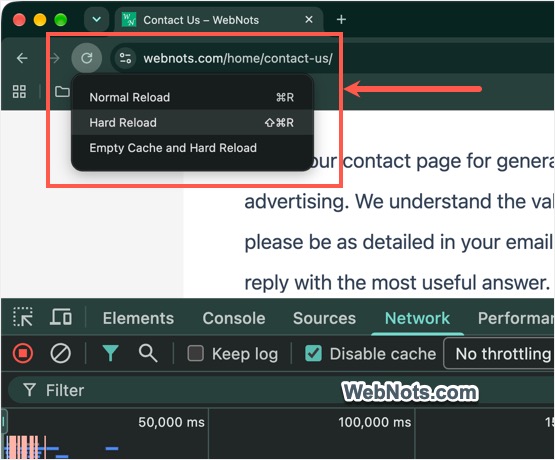
Keep in mind that this is a troubleshooting technique, not a permanent cache disable setting. Also, the right-click context menu on the refresh/reload button works only when the Developer Tools is open.
Method 3: Clear Cached Files
Another approach is to delete Chrome’s existing cached files.
- Open Chrome and go to “Settings > Privacy and security > Delete browsing data”.
- Select the appropriate time range and select “Cached images and files”.
- Then click “Delete from this device”.
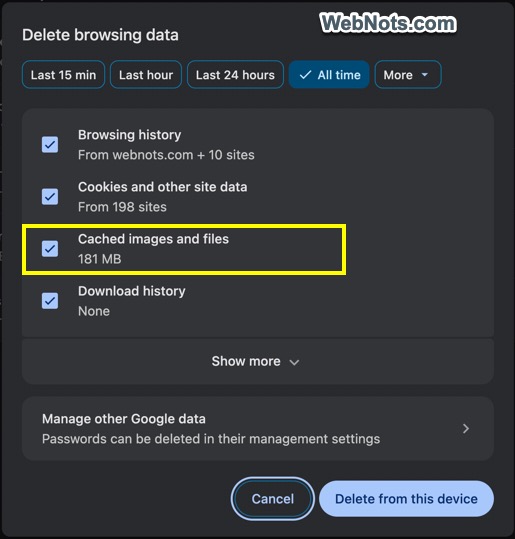
This removes cached files that Chrome has stored. However, clearing the cache is different from disabling caching. Chrome will start creating new cached files as you browse after the existing cache has been removed.
Method 4: Use a Chrome Extension
Some extensions are designed specifically for developers and can help with tasks like automatically deleting cache, automatically refreshing pages, or clearing cached resources. This can be convenient if you frequently need cache related controls.
- Open Chrome and click the three dots “Customize and control Google Chrome” icon on top right corner.
- Go to “Extensions > Visit Chrome Web Store” to open the extensions store.
- Search for “disable cache” to find and install the Cache Disabler extension.
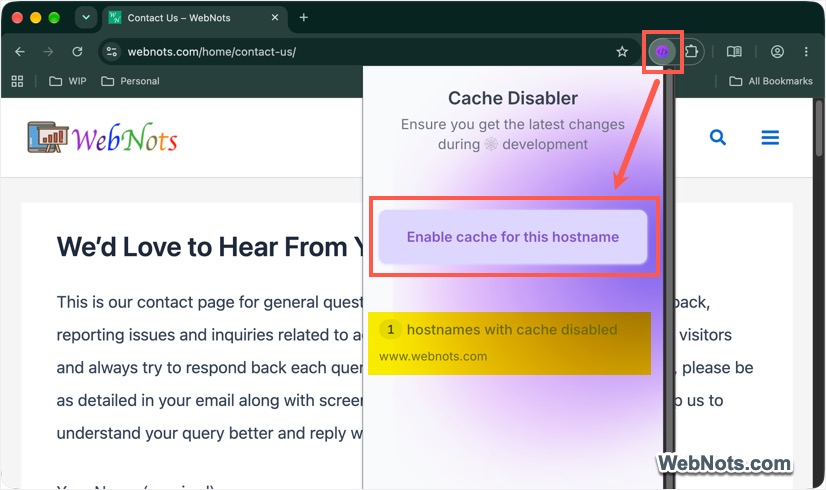
- Open the site you want to disable cache and click the Cache Disabler extension icon next to right side of the address bar.
- Click the “Enable cache for this hostname” button (don’t get confused with this label) to add the domain to cache disabled list.
- You can add multiple domains, which will appear in the list, to permanently disable caching for those domains. The extension remembers the domains you add, so you can restart Chrome without losing your settings.
You can also try the following Chrome extensions:
- Cache Buster – Disables cache for individual websites to force load content from the sever.
- Localhost No Cache – Bypasses Chrome cache only for localhost and 127.0.0.1.
- Clear Cache – Automatically deletes the cached content in scheduled interval.
Frequently Asked Questions
No. Incognito mode should not be treated as a way to completely disable caching. Chrome’s private browsing mode is primarily designed to avoid retaining certain browsing data after the private session ends. It does not mean that every website resource is automatically fetched without caching.
If disabling the browser cache does not solve the problem, the browser cache may not be the source of the issue. Other types of caching may exist between your browser and the website, including server-side caching, WordPress caching plugins, and CDN caching. For example, if a WordPress website uses a caching plugin or CDN, Chrome may request the latest file but the server or CDN could still return an older version. In that situation, clearing Chrome’s cache alone will not solve the problem. You may need to purge the website’s server or CDN cache as well.
It is useful to understand the difference. Chrome cache is stored locally on your computer, which is controlled by the browser. Website or server cache is stored on the website’s infrastructure, which may be controlled by a hosting provider, caching plugin, CDN, reverse proxy, or web application. Therefore, if you update a website and still see an old version, check both sides.