The default cursor on a Mac is clean and simple, but if you want to personalize your experience or make the cursor more visible, you might want to change its appearance. While macOS doesn’t offer the same level of cursor customization as Windows by default, there are still ways to modify the size, colors, and icons of your Mac cursor.
Changing Cursor in Mac
By default, Mac uses an arrow cursor with white outline and black fill colors. The cursor will change to different shapes based on the actions like when typing in a document, clicking on a link, resizing windows, etc.
In this article, we will explain two methods to change the cursor on your Mac.
1. Use macOS Settings to Change Cursor Size and Color
macOS offers a built-in way to change the cursor size and color, which can help make the cursor easier to see.
- Click the Apple Menu in the top-left corner of your screen.
- Select “System Settings…” option (or “System Preferences…” in older macOS versions).
- This will open Settings app and go to “Accessibility” section from the sidebar.
- Under the “Vision” section, select “Display” option.
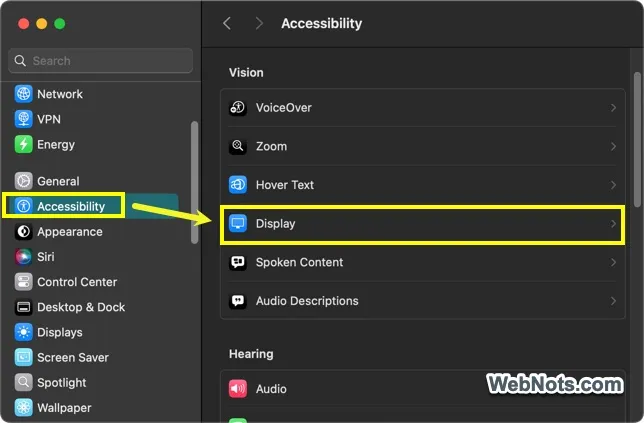
- Scroll down to “Pointer” section.
- You will see an option for “Pointer size” with a slider. Drag the slider left or right to make the cursor smaller or larger according to your preference.
- Below the pointer size, you will see options for “Pointer outline color” and “Pointer fill color”.
- Click on the color boxes next to these options to choose new colors for your cursor’s outline and fill. This allows you to make your cursor stand out with a custom color combination.

Once you have adjusted the size and colors, the changes will take effect immediately. You don’t need to restart your Mac or do anything else.
2. Using Third-Party Apps for Advanced Cursor Customization
Default settings allow basic customization, but if you want more advanced changes like changing the cursor shape or using a custom image for your cursor, you will need to use third-party apps. Unfortunately, there are not many apps available like Windows. We will explain here with the free Mousecape app. This app allows you to change the cursor for different actions, such as when hovering over a text box or a link.
It works with cursor image sets called Capes. You can download the sample cape from the GitHub page or download any cursor images (PNG or JPEG) from online and create your own cape in the app.
2.1. Installing Mousecape App
- Go to GitHub release page and download the latest stable version of Mousecape app.

- You will get the ZIP file and double click on it to get the app file. Drag the app file to “Applications” folder and open it. If you are stopped by macOS, click “Open Anyway” to open the app. Go to “Mousecape > Install Helper Tool” menu to install the tool.

2.1. Using Default Capes
- For using the downloaded cape from GitHub, simply extract the images and open them (select all and open).
- This will import the images to Mousecape app.
- Right-click on any set and select “Apply” to start using that cursors.

2.2. Creating a Custom Cape
- For creating a new cape, go to “File > New Cape” menu.
- This will create an empty cape, right-click on it and select “Edit” option.
- Fill out the cape’s detail like name, author, etc. and click the + icon showing on bottom left corner to add images.
- Drag and drop images into the Mousecape window and then select the type (for example – Arrow), from the dropdown.
- Go to “Capes > Dump Cursors” menu to import and preview the cape.
- If required, you can edit the cape and save the changes to replace the default macOS cursors with your custom designs.
It is also possible to use animated images as your cursor using Mousecape app.
Reverting to the Default Cursor
If you decide later that you want to go back to the default macOS cursor, it’s simple to revert your changes.
- Default Option – Go to “System Settings > Accessibility > Display > Pointer” section. Set the pointer size back to normal and click the “Reset Colors” button to reset the colors to the default black and white.
- Mousecape – Simply disable / delete the cape or uninstall the app to restore original macOS cursors.