User Account Control (UAC) is a security feature in Windows 11 designed to prevent unauthorized changes to your system. This will show a prompt for administrator approval before allowing certain actions. While UAC enhances security, you may find the frequent pop-ups annoying, especially if you are the only one using the computer. If you are still using Windows 10, learn how to manage UAC settings in Windows 10 PC.
UAC Pop-up
Right-click on the Start Menu icon and select “Terminal” option to open the Terminal app. However, if you select “Terminal (Admin)” option, Windows will show a UAC pop-up as shown below even when you are using an administrator account. It will ask your permission for allowing Terminal app to make changes to your device. Clicking on “Yes” will open the app and “No” will stop the app launch.
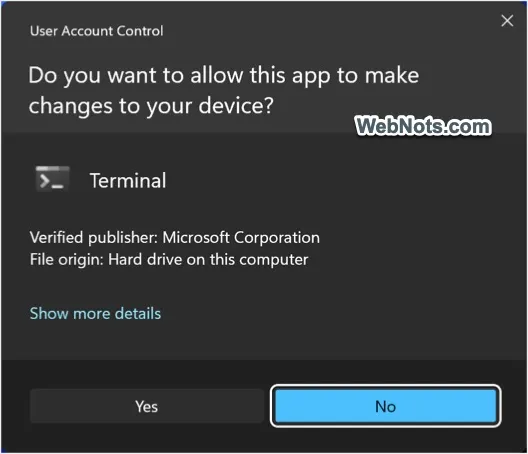
As mentioned, these pop-ups will be annoying to see when opening known apps like Terminal (Admin), Command Prompt (Admin), Registry Editor, etc. However, it will be useful when you open an unknown third-party app installed on your system to check the app’s publisher, file origin and location before allowing the app to launch. If you want to disable UAC pop-ups in Windows 11, follow one of the below explained methods.
Method 1: Disable UAC Directly from the Pop-up
Whenever you see the UAC pop-up, click the “Show more details” link. This will show the program location and an additional option “Change when these notifications appear”. Click on that link.

This will open “User Account Control Settings” dialog box. There are four levels of notification settings for UAC to select by adjusting the vertical slider:
| Level / Notification | Install App | System Changes | Settings Changes | Freeze Other Tasks |
|---|---|---|---|---|
| Always notify | Yes | Yes | Yes | Yes |
| Default level | Yes | Yes | No | Yes |
| When desktop dimming takes longer time | Yes | Yes | No | No |
| Never notify | No | No | No | No |
Simply move the slider to the bottom to “Never Notify” and click “OK” button. You will see the UAC pop-up and click “Yes” to confirm the changes.

Though this is not a recommended setting, it will completely stop the UAC pop-ups.
Method 2: Disable UAC via Control Panel
Next option is to use the old Control Panel app to access the UAC settings dialog.
- Search and open Control Panel app and go to “User Accounts” section (Control Panel\All Control Panel Items\User Accounts).
- Click on “Change User Account Control settings” link.
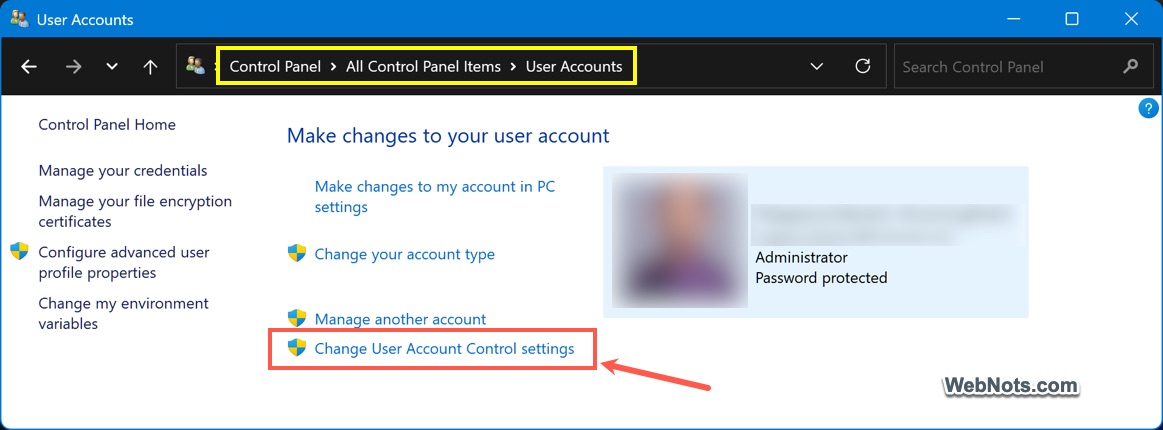
- This will open the same UAC settings dialog as explained in method 1. Drag the slider down to “Never notify” to disable UAC completely.
- Click “OK” and confirm the UAC pop-up one last time.
Note: You can also search for “UAC” in Windows Settings app and select “Change User Account Control settings” from the result.
Method 3: Disable UAC via Registry Editor
It is also possible to disable UAC pop-up through Registry settings. Since editing the Registry can cause system instability if done incorrectly, proceed with caution. Always take a backup before making such changes.
- Search and open Registry Editor app.
- Copy paste the below path in address bar and press enter to navigate to that location. HKEY_LOCAL_MACHINE\SOFTWARE\Microsoft\Windows\CurrentVersion\Policies\System
- Find EnableLUA name on the right-pane and double-click on it to open.
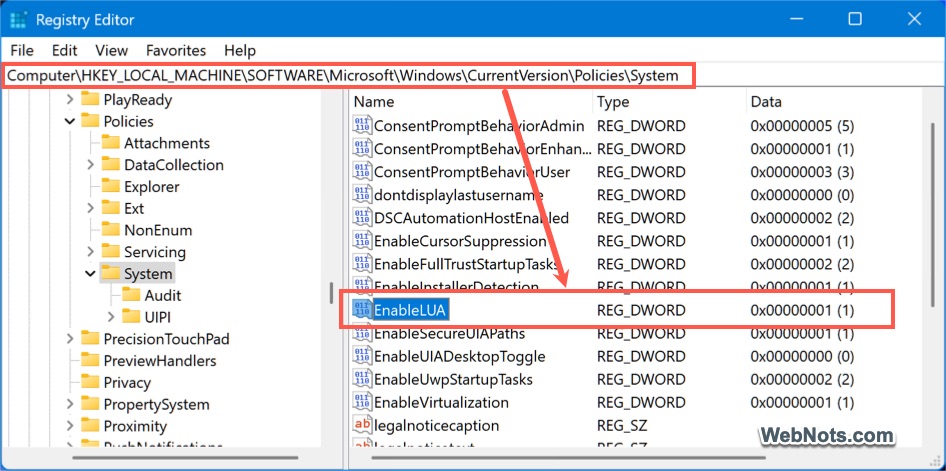
- Change its “Value data” from 1 to 0 and click “OK” button.
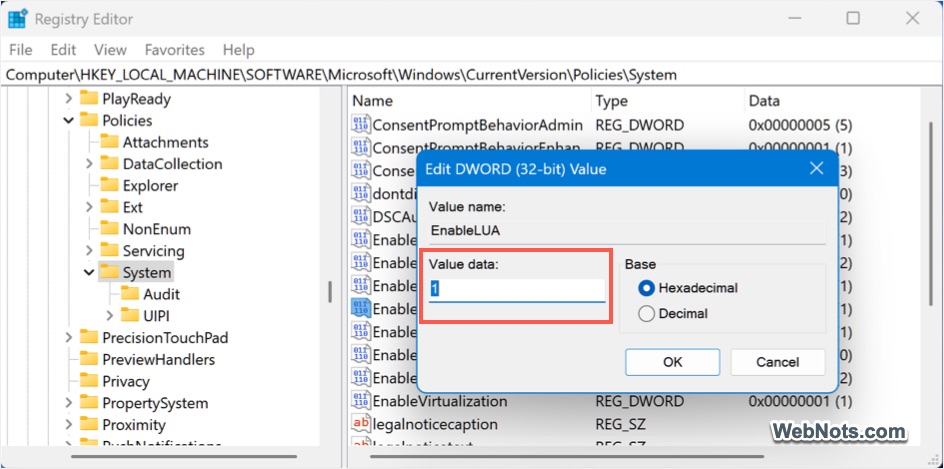
- Close Registry Editor and restart your PC for the changes to take effect.
Method 4: Disable UAC via Group Policy
This is the best option is you have multiple users on the system or managing multiple users as an administrator. You can tweak a system policy to disable the UAC pop-up for all users and re-enable it whenever needed using Local Group Policy Editor app. However, this app is only available in Windows Pro, Student and Enterprise editions and not part of Home edition.
- Search for “policy” in Windows Search box and “Edit group policy” option from the results.
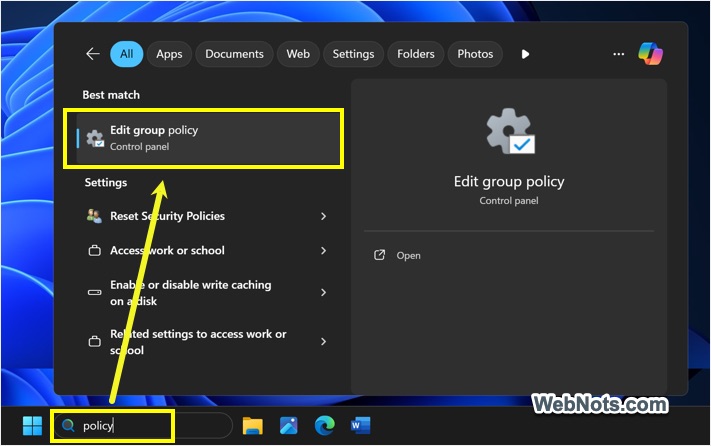
- This will open Local Group Policy Editor app and go to “Computer Configuration > Windows Settings > Security Settings > Local Policies > Security Options” location.
- Find and double-click on “User Account Control: Run all administrators in Admin Approval Mode” policy.
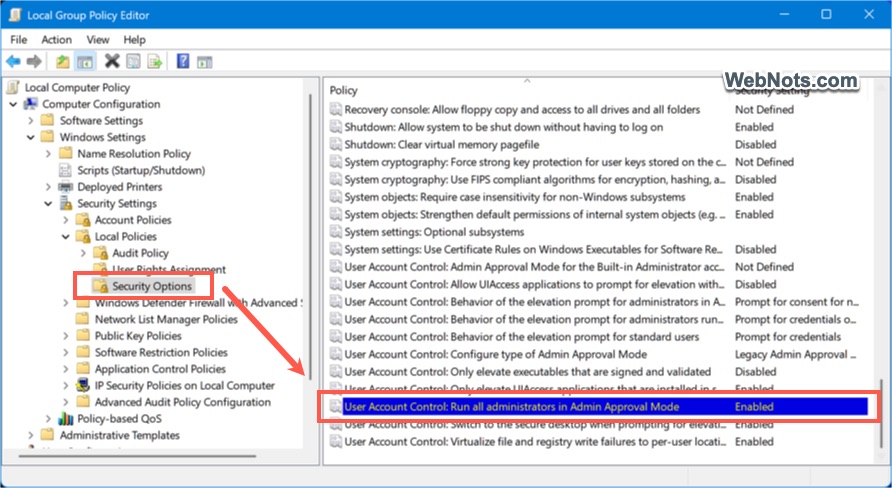
- The policy is enabled by default, set it to “Disabled” and click “OK” button. You can also go to “Explain” tab and read what happens when you disable this policy.


- Close Group Policy Editor and restart your PC for the changes to apply.
Should You Disable UAC?
Disabling UAC reduces security by allowing apps to make changes without your permission. So, only disable it if:
- You are the sole user of the PC.
- You trust all installed software.
- You understand the security risks.
For better security, consider keeping UAC at a lower setting instead of disabling it entirely.
Conclusion
Disabling UAC in Windows 11 can be done via Control Panel, Registry Editor, or Group Policy. However, doing so weakens your system’s defenses against malware. If you still want to proceed, use one of the methods above and ensure you have a reliable antivirus installed.