Preview is one of the default apps supplied with macOS by Apple. This app helps to view PDF and images and allows to edit the files easily. For example, you can simply drag and drop the pages in a PDF document to rearrange them. However, you can improve the productivity by using available keyboard shortcuts in Preview app. In addition, you can also create custom menu shortcuts to speed up your work.
Complete Keyboard Shortcuts for Preview App
Below table shows the complete list of keyboard shortcuts for Preview app in Mac along with their purposes.
| Shortcut | Purpose |
|---|---|
| Command – | Zoom out to reduce the size |
| Command ; | Check the document for spelling and grammar error |
| Command : | Open spelling and grammar dialog box |
| Command [ | Move back to previous view |
| Command ] | Move forward to next view |
| Command * | Zoom to selection |
| Command + | Zoom in to enlarge the document |
| Command 0 | Set the document zoom to actual Size |
| Command 1 | Enable continuous scroll view |
| Command 2 | Enable single page view of the document |
| Command 3 | Enable two pages view |
| Command 9 | Zoom to fit the content |
| Command A | Select all the content in a file |
| Command Delete | Move the selected portion on an image to trash |
| Command C | Copy the selected content |
| Command Comma | Open Preview app’s settings or preferences dialog |
| Command D | Bookmark the current page |
| Command E | Search and find the selected content |
| Command F | Open the search box to find text in a document |
| Command G | Go to next highlighted searched text |
| Command H | Hide Preview app and keep other apps open |
| Command I | Show document inspector |
| Command J | Jump to selection when finding text |
| Command K | Crop an image to retain only the selected portion and remove outer area |
| Command L | Rotate the current page 90 degrees left |
| Command M | Minimize the current window to dock |
| Command N | Create new document from clipboard’s content |
| Command O | Open an existing document |
| Command P | Open Print dialog box to print the document or save it as a PDF |
| Command Q | Completely quit Preview and the app will not remember windows when you open again |
| Command R | Rotate the current page 90 degrees right |
| Command S | Save the document |
| Command V | Paste the content from clipboard on an image |
| Command W | Close only the current document window |
| Command X | Cut the selected content |
| Command Z | Undo last action |
| Control Command A | Insert an arrow for annotation |
| Control Command H | Highlight selected text as part of annotation |
| Control Command I | Insert a line for annotation |
| Control Command L | Insert a loupe to zoom and view the content |
| Control Command N | Insert an expandable note |
| Control Command O | Add oval shaped box for annotation |
| Control Command R | Add rectangle box for annotation |
| Control Command S | Apply strikethrough on selected text |
| Control Command T | Insert a text box as part of annotation |
| Control Command U | Underline selected text |
| Down Arrow | Move down a line in a document or move to next item in sidebar |
| Function or Globe E | Open Character Viewer to insert emoji and symbols. You can also use Control Command Space. |
| Function or Globe F | Toggle full screen mode on or off. You can also use Control Command F shortcut to toggle full screen mode. |
| Option Command – | Zoom out all images |
| Option Command + | Zoom in all images |
| Option Command 0 | Zoom all images to actual size |
| Option Command 1 | Hide the left sidebar |
| Option Command 2 | Show thumbnails in sidebar |
| Option Command 3 | Show table of contents in sidebar |
| Option Command 4 | Show Highlights and Notes in sidebar |
| Option Command 5 | Show all bookmarks in sidebar |
| Option Command 6 | Show Contact Sheet view |
| Option Command 9 | Zoom all images to fit |
| Option Command B | Show background of the document |
| Option Command C | Adjust the color |
| Option Command G | Open “Go to Page” box where you can enter the page number and press enter to reach that page |
| Option Command H | Hide all other open apps and keep Preview open |
| Option Command M | Minimize all open windows to dock |
| Option Command Q | Quit Preview but remember open documents to open all of them when you relaunch the app |
| Option Command W | Close all document windows but keep the app open |
| Option Down Arrow | Go to next page of the document |
| Option Page Down | Go to next document in the window |
| Option Page Up | Go to previous document in the window |
| Option Shift Command S | Save as the document as a new file |
| Option Up Arrow | Go to previous page of the document |
| Page Down | Move one screen down or view next image in window |
| Page Up | Move one screen up or view previous image in the window |
| Reversed Prime (`) | Show or hide magnifier |
| Shift Command \ | Show all tabs |
| Shift Command A | Toggle top markup toolbar |
| Shift Command F | Start slideshow mode (press Esc to exit) |
| Shift Command G | Go to previous highlighted searched text |
| Shift Command I | Invert image selection |
| Shift Command K | Remove the background |
| Shift Command S | Duplicate the document as a new file |
| Shift Command W | Only close the selected PDF document |
| Shift Command Z | Redo last action |
| Up Arrow | Move a line up in the document or move to previous item in sidebar |
Points to Note
Below are some of the important things to understand when using keyboard shortcuts with Preview app in Mac:
- Some annotation shortcuts work after pressing the shortcut keys. For example, you should first press “Control Command H” keys and then select the text to highlight.
- Some keyboard shortcuts will work only on images and not in PDF documents. For example, you can select a portion of an image and delete it using “Command Backspace” shortcuts. However, this will not work to delete selected text in a PDF.
- In addition to the above list, all system wide macOS keyboard shortcuts will also work in Preview. For example, you can press “Shift Command 5” keys to capture the screenshot of the selected window.
- Some keyboard layouts will have Function (fn) key on bottom left corner while some models show it as a Globe (🌐).
- Menu items in Mac will only show the key’s symbol used in shortcut instead of the name. Here are some of the keys with their names – Command (⌘), Control (⌃), Option (⌥), Shift (⇧), Delete (⌫) and Function (fn).
Create Custom Menu Shortcuts for Preview App
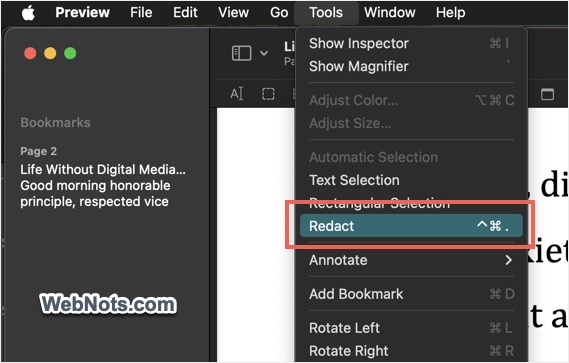
Unfortunately, Apple does not offer shortcut key combination for all menu items in Preview app. For example, you should go to “Tools > Redact” menu if you want to redact the selected content. This will be annoying if you frequently want to use that function. What you can do here is to create a custom keyboard shortcut for that menu item so that you can use it within Preview app.
- Go to “Apple menu > System Settings…”.
- Scroll down to bottom of the left sidebar in Settings app and navigate to “Keyboard” section.
- Click on “Keyboard Shortcuts” button showing below “Keyboard navigation” section on right pane.

- On the pop-up that appears, go to “App Shortcuts” section and click on the + icon.

- Select “Preview” app from the “Application” dropdown, enter the menu title as exactly you see in the Preview app (for example – Redact) and then press the key combinations to input the “Keyboard shortcut”. Make sure not to use any existing Preview app or system shortcut to avoid conflict.
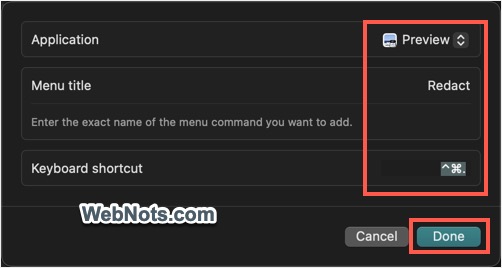
- Click “Done” button and you will see a new custom keyboard shortcut is added for Preview app.

- Again click “Done” button and close the Settings app.
- Now, go to Preview app and click “Tools” menu. You should see the custom shortcut appears against “Redact” menu. Henceforth, you can simply press the custom shortcut keys to use the function within Preview app without going to the menu item.