Apple announced the Journal app as part of iOS 17 and the app is finally available for public with iOS 17.2. So, don’t be surprised with the new Journal app on the home screen if you have updated iOS. Journal as the name indicates is an attempt from Apple to trigger the forgotten diary writing habit. If you have time or planning to jot down your daily memory, here is how you can use the Journal app in iPhone for that purpose.
Installing iPhone Journal App
The app is part of default iOS installation from version 17.2. if you do not find it on your iPhone, go to App Store and install in manually.

You can do the following with Journal app.
- Create your own journal entry from scratch or use the recommendations from Photos and other apps.
- Protect your entries by locking with Face ID.
- Schedule a reminder to notify about creating entries.
Journal App Initial Setup
When launching first time, the app will prompt you to accept the usage terms and show you some basic details about what you can do.

It will also prompt you to enable suggestions to use the data from Photos, Music, Podcast, Contacts and Health apps. Apple claims the data is used only within the device and not send to any third-parties. However, disable the items that you do not want to include in the automatic suggestions like your private photos or contacts. Because there are no options to control which photos will appear as suggestions in Journal app.

Creating First Journal
Follow the below steps when you are done with initial settings.
- Tap on the + icon on the Journal app and then tap “New Entry” button.

- Start writing your entry and tap on “Done” link showing on top right corner to save it.
- You can insert a photo, take video, add location, record voice using the toolbar available just above the keyboard.

- In addition, tap on the first icon (Journaling Suggestions) in the toolbar to view “Recommended” and “Recent” items. Tap on the suggestions you want to include and give permissions to add those items in your entry.

Creating Entry from Suggestions
When tapping on the + icon, Journal app will also show moments from the allowed categories. So, instead of creating a new entry and insert suggested items, you can tap on the memory or activity from the recommended / recent items list and then start adding your content on top of that.

After selecting a moment, you can restrict the items to be include in the journal entry (like unnecessary photos).

Note: Though you can restrict the photos to be inserted in a journal entry by selecting only required pictures, you can’t control which memories are shown in the suggestions. As mentioned, you can disable Photos to be used in Journal app during initial setup or lock the app with Face ID.
Deleting and Bookmarking Journal Entries
When you launch the app, it will show all previously created journal entries date/time wise. Tap on the three horizontal dots icon or long press on an entry to reveal additional menu items.
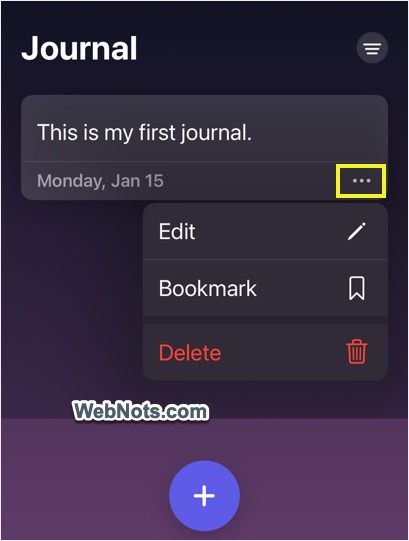
- Edit – modify the journal entries content.
- Remove Bookmark – when creating an entry, you can bookmark it by tapping on the bookmark icon (showing top left corner). This will help you to filter the items on the app’s initial screen. Remove Bookmark menu helps to remove the selected item from the bookmarked list.
- Delete – select this and confirm your action to permanently delete an entry. There are no options to recover the deleted journal entries in iPhone.
Lock Journal App in iPhone
The app is primarily meant for personal memory collection. So, you can lock the app with Face ID or passcode if you do not want anyone accidentally seeing your entries.
- Tap on “Settings” app and go to “Journal” section.
- Scroll down and tap on “Lock Journal” option.
- Unlock the screen with passcode if prompted and turn on “Lock” option.
- Tap on “Require Passcode” and select the time after which you want the app to prompt for passcode.

Scheduling Journal Action
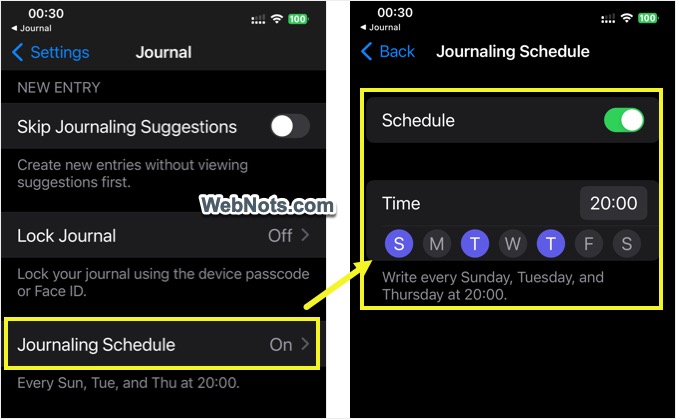
If you want to schedule your journal writing, go to “Settings > Journal” section. Tap on “Journaling Schedule” and turn on “Schedule” option. select the days and set the time you want to write. The app will send a notification and remind you as per the schedule so that you can keep up the journaling habit.
Other Journal Settings
In addition to locking and scheduling, Journal app settings has few other options:
- Skip Journaling Suggestions – turn off this to remove recommendations when you tap on the + icon in Journal app. However, you can still be able to view and insert from suggestions when creating an entry from scratch.
- Change the access permissions for microphone, notifications, Siri and disable background app refresh.
- Change your preferred language and allow Journal app to save media files to your Photos stream.
Final Words
Though the app is a good initiation to rekindle the journaling habit within you, it lacks lot of features and controls. For example, you can’t sync entries across devices or share an entry if you like to do that. iPhone users are primarily of youngsters focusing on content sharing. So, at this point it’s a doubt whether people will really take time to write a personal note which can’t be shared.