
FileZilla is one of the most popular file transfer software used to access the web server remotely from your desktop. As with any software, it is recommended to keep the latest version of the FileZilla for safe and secure transmission. But things will work differently on Mac compared to Windows based PCs. So, in this article we will explain the simple process of how to update FileZilla to latest version in macOS. If you are also using MAMP, learn how to update MAMP to latest version in Mac.
1. Manual Update
Follow the below step by step instruction for manually updating FileZilla.
1.1. Downloading the Latest FileZilla Version
- Open FileZilla from the “Finder > Applications” folder. For a quicker access, press “Command + Spacebar” to open spotlight search and look for FileZilla.

- Click on the “Check for updates…” option under the “Help” menu (it used to show as ? in older versions).

- The latest version of FileZilla will start downloading. You can see the change log and the progress percentage of the download completion.

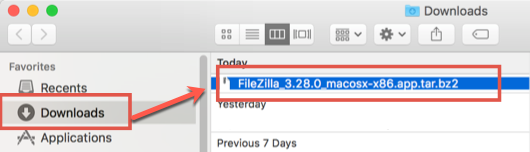
- The downloaded file can be seen under “Downloads” folder in Finder. Generally, the downloaded file will have an extension like “.app.tar.bz2”.
1.2. Installing the Latest Version
Double click on the downloaded tar file. You will see the FileZilla application file is extracted on the same “Downloads” folder.

Remember, the tar file downloaded as an update is not an installer package like many other software updates. It contains the actual application file. So, when you unzip the content, the application will be extracted in the same “Downloads” folder.
2. Automatic Download
Whenever there is an updated version available, FileZilla will also automatically show the new menu item as “New Version Available”.

FileZilla will also automatically download the new version in background when you are working. You don’t need to check for manual updates in this case. There will be a popup prompting you to install the new version as below:

Click on the button to start installing the new version on your Mac.
3. Replacing Old Version with New Version
Now that you have installed the latest FileZilla version, but the old version is still available on your Mac. Both the apps can be opened and used for server connection. But let us make the things in proper manner:
- Delete the old FileZilla file available under “Applications” folder.
- Move the latest FileZilla version file from “Downloads” folder to “Applications” folder.
- Delete the installation zip file from “Downloads” folder.
That’s it!!! Now you have installed the latest FileZilla version on your Mac. All site manager settings will be copied to the new version automatically, so you don’t need to worry about deleting the old application file.
3.1. Check Installed App Version
When you open the latest version for the first time, a welcome message like below will be shown. This will help you to ensure you have installed the latest version correctly. Otherwise, go to “FileZilla > About…” menu to find the current installed app’s version.

Wrap Up
FileZilla is one of the popular and easy to use FTP software. Generally, upgrading an app will overwrite the existing application in “Applications” folder. However, FileZilla will download the upgrade every time as a new application. Hence, you need to install the new application and delete the old version separately. Though this is confusing, good part is that all site manager settings will be copied to the new version automatically. You can connect to the servers on new version instantly without any additional setup.




“All site manager settings will be copied to the new version automatically, so you don’t need to worry about deleting the old application file.”
For real? Then why did all of my sites settings disappeared after the update?
We update every version and automatically all settings will be copied to the new version. If that does not happen, you completely delete and reinstall FileZilla to try from next version.