FTP is a file transfer protocol helps you to connect your local mac or PC to the remote hosting server. As a WordPress user you need to have FTP access to your hosting server. This helps in many situations like backing up the content and editing core files. Especially when you can’t access WordPress admin dashboard then the only way of bulk processing is through FTP access. Though there are many FTP software available, FileZilla is one of the very easy to use and popular FTP client software. In this article we will discuss 6 FileZilla tips to improve your FTP skills.
FileZilla Beginner Tips
Here are the quick tips. If you are looking for more details on FTP, check out the complete FileZilla guide for beginners.
#1 – Show Hidden Files
Some servers by default hide the files like .htaccess when viewing from FTP clients. Fortunately you have an option to make the hidden files visible using FileZilla. As shown in the below picture, choose the option “Force showing hidden files” under “Server” menu to enable this.
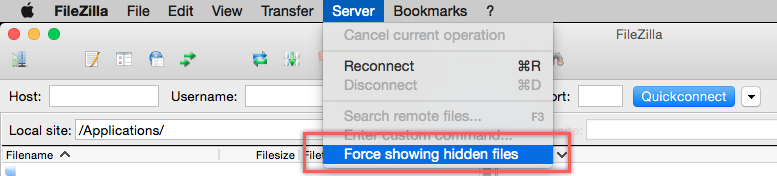
You will see a warning message that the control is on the server side though you can enable viewing hidden files on FTP client. Click ok to continue and in most cases you will see all hidden files on the server.

Also check out our article on how to view .htaccess file on Mac.
#2 – Processing Terminated File Transfers
When downloading content through FTP, it is a common scenario that the file transfer may get terminated in-between due to poor Internet or network connection. In such scenarios, you don’t need to get panic, just click on the “Process Queue” option available under “Transfer” menu. This will immediately enable the processing of the piled up queued files.

Note: When you start the download, FileZilla will start queuing the files which can be seen under the “Queued files” tab on lower left corner.
#3 – Limiting Maximum Simultaneous Connections
By default FileZilla will restrict the simultaneous connections to server as 1. You can change this option under “Site Manager. Go to “File > Site Manager” and then navigate to “Transfer Settings”. Either remove the checkbox “Limit number of simultaneous connections” or increase the “Increase the maximum number of connections” to the desired value.

Warning: Besides what so ever the settings on client side, generally number of simultaneous FTP connections is controlled from server site by your host.
#4 – Processing Failed Transfers
The next FileZilla tips is about handling failed file transfers. You can view the filed failed during transfer under “Failed transfers” queue on lower left corner. Right click and select “Reset and requeue all” to move all the files to “Queued files” tab and start processing. You can also select “Remove all” to cleanup the failed transfer queue.

#5 – Reconnect to Server
When you open FileZilla or disconnected from the server, just click on “Reconnect” option available under “Server” menu. This will connect to the FTP account configured under “Site Manager”.

Learn how to connect FileZilla to Bluehost server.
#6 – Edit from Local File
When you open the same file which was edited and uploaded previously, FileZilla will ask you with two options. One is to select the local file for editing and other is to discard the local file and edit the server file again. You can choose the “Reopen local file” option to open the file quicker from local mac or PC for modification.

When you want to edit a file, FileZilla will first download the file to local and then allow editing it. This will ensure the editing process quicker. But after uploading also there will be a local copy of the file available on your computer. If you don’t want the file to be left on your local computer then choose the option “Finish editing and delete the local file” when uploading the file back to server.

If your filetype associations are missing, you need to change the settings in FileZilla app.
Bonus Tip – Migrating to Another Host
Here is a bonus FileZilla tip – if you are migrating to a different host then just create the FTP account with the same name and password like your previous host. When the nameservers and DNS propagation is completed, open FileZilla to connect your new host without any modifications.