In the past, trimming a video clip required downloading third-party software or paying for an expensive editor. Windows 11 simplifies this by offering built-in ways to trim videos in seconds. Whether you want to remove long silences, cut out mistakes, or shorten a file for sharing, here’s how to do it in Windows 11.
Note: Trimming and cropping are two different processes. Check our separate article on how to crop videos in Windows 11.
1. Video Trimming Using Photos App
Windows 11 offers a revamped Photos app that allows video trimming and an option to save a frame from videos.
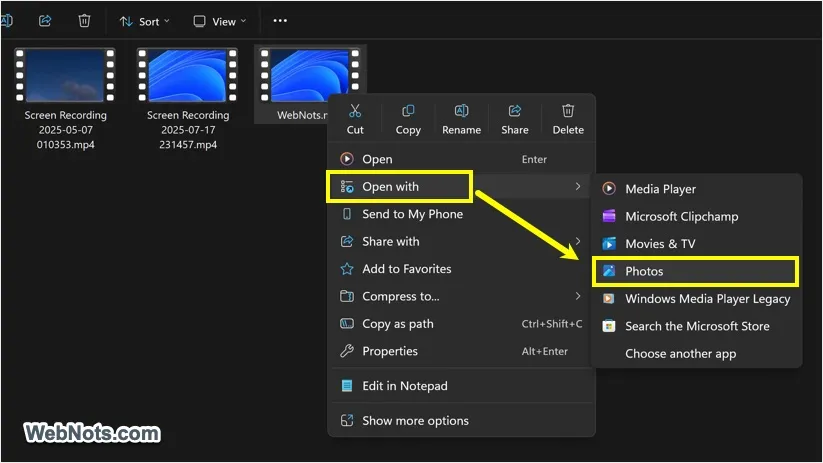
- Right-click your video file and select “Open with > Photos”.
- Once the video opens, click the “Trim” button on top left corner or press Control + E keys.

- Adjust the slider’s positions and select the portion of the video you want to remove (from the beginning and ending).
- Click the “Save a Copy” button to get the copy of your trimmed video.
- If you want to extract a single image frame from the video, click the “More options” icon next to the slide and select “Save a frame” option.

2. Trim Screen Recorded Video with Snipping Tool
Snipping Tool allows you to record your screen and trim the captured video to remove unwanted portions at the beginning and end.
- Open Snipping tool and select recording option. Choose either rectangle or window area for capturing.
- Alternatively, press Windows + Shift + R keys to start a recording.

- Start the recording with or without the audio as you need.

- When you click the stop button, Snipping Tool will open it with an in-built editor and click the “Trim” option on the toolbar.

- Move the slide to adjust the start and end portions. Click the “Apply” button to trim the unwanted portions.

- Click the “Save” button, select the location and save your trimmed video.
3. Trimming Videos with Clipchamp
Recognizing the increasing demand for robust video editing tools, Microsoft has integrated Clipchamp into Windows 11. This is a free app and you can easily trim, crop, split, fit and apply filters to videos.
- Right-click on your video file and select “Open with > Microsoft Clipchamp”.
- The app will show your video with editing tools on the right sidebar and the timeline on bottom. If you don’t see the timeline, click the “Collapse timeline” icon showing on the bottom right corner or press Control + Alt + 3 keys.
- Drag the sliders at the start and end to select the required video’s portion and trim the outside area.

- If you see a patched area at the start, right-click on it and select “Delete all visual gaps” to delete the gaps in the video.
- Click the scissor icon (showing just above the timeline) to split your video. You can use this feature to remove any middle portions of a video.
- Click the crop icon showing just above the video and adjust the area to crop the video. You can also use the fit and fill option to adjust the frame in the canvas.

- Preview your changes and apply filters / colors / effects if required.
- Click “Export” button and Clipchamp will show in case of any errors in the video (like a visual gap not deleted). Click the “Fix” button and select “Delete all visual gaps” option.

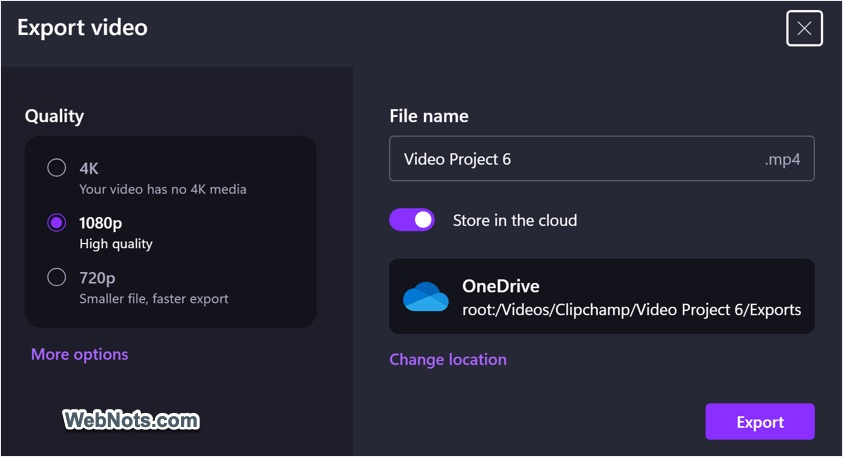
- Select the quality as 4K, 1080p, or 720p depending on your need, choose the location to store in OneDrive or in local computer, and click the “Export” button.
- It will take couple of minutes depending on the video size and the final video will be automatically downloaded to selected location (local “Downloads” folder, if you have turned off OneDrive).
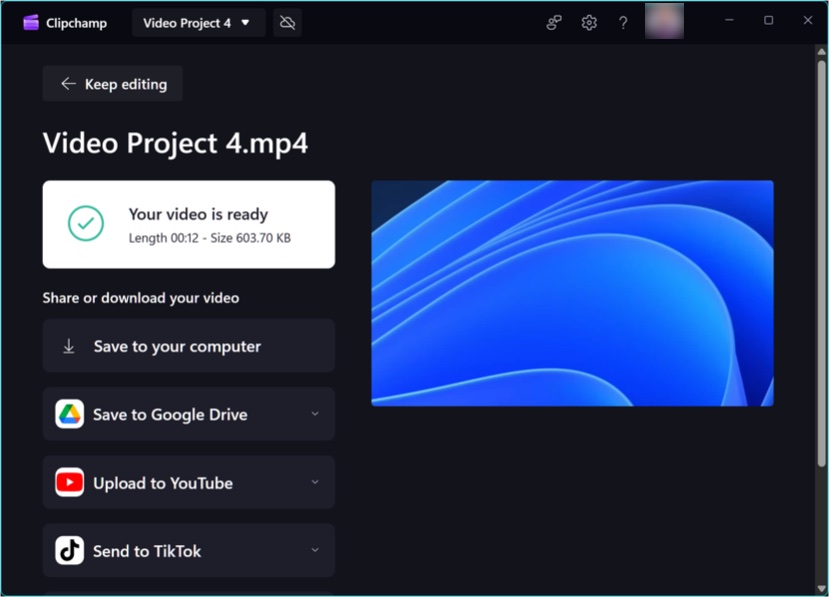
- You can save another copy by clicking the “Save to your computer” to save locally or directly upload to YouTube, Google Drive, LinkedIn, Dropbox, or TikTok. It is also possible to copy the OneDrive link and share with others.
The only problem is that the app is very slow and also you need to login with your Microsoft account for using it.
4. Using Online Video Trimming Tools
If the built-in apps are not sufficient and you prefer not to install an additional software, several online tools allow trimming videos directly in your web browser. Since privacy is important when uploading your videos online, we strongly recommend avoiding unknown AI tools and using a professional platform like Adobe Express.
- Go to Adobe Express website and create an account. You can simply login if you already have an Adobe account.
- Click the ⨁ icon on the left sidebar, go to “Quick actions > Video” section.
- You can find various video editing tools including Trim Video, Resize Video, and Crop Video.
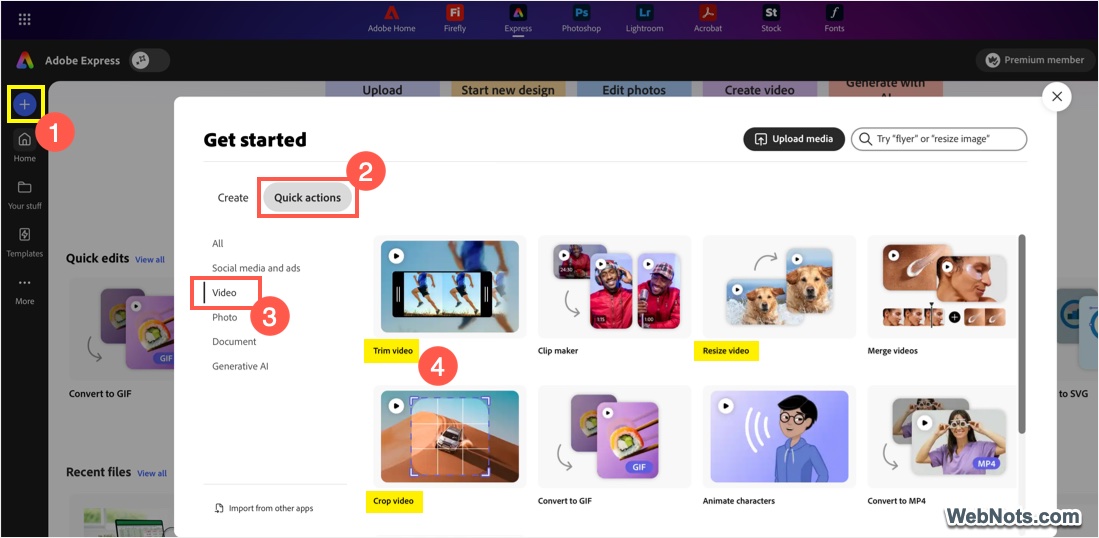
- Select “Trim Video” tool, you can drag & drop or upload the video from your computer.

- Wait for the uploading to finish and drag the sliders on the timeline (shown below the video) to adjust the start / end time. You can also directly type the start and end time for trimming the video precisely.
- Select one of the layouts like Landscape (16:9), Portrait (9:16), or Square (1:1) to adjust the size of the video.
- Finally, click the “Download” button to get your trimmed video.

- If you want to edit the video, click the “Open in editor” button.
- You will have numerous options for adding text effects, split video, remove background, adjust the audio with AI, etc.

- After applying the effects, you can download the video and use the “Resize Video” tool to adjust the scale. In this way, you can easily convert a single video and post on multiple social platforms without distortion.

The advantage of Adobe Express is that you don’t need to install any app, quick and accessible from anywhere, and is free for the basic features. You can also upload 1GB video size and sync with the mobile app for quick sharing.
Final Words
Although trimming is generally safe since it only removes the beginning and end portions, it is always a good idea to keep a backup of your original footage before making any edits. Repeated trimming can reduce video quality, so use high-resolution source files and export with minimal compression whenever possible. The built-in Clipchamp editor is sufficient for basic trimming and applying filters to your videos. However, online tools like Adobe Express offer complete solution with advanced scaling and editing features.