Yoast SEO in one of the top free SEO plugins for WordPress users. It integrates a meta box in the Gutenberg editor to add meta description, title and do SEO / readability analysis inside the editor. Additionally, premium users will get many other features like finding orphaned content, Zapier integration and redirects manager. In our earlier article, we have reviewed Yoast SEO premium plugin. Here, we will explain how to setup redirects in WordPress using Yoast SEO premium plugin.
What is URL Redirection?
A redirect or URL redirection is a setup in WordPress to forward users and search engines from one page to another page. This is an essential step in the following scenarios:
- You have updated the content and changed the slug of a post
- Deleted a page permanently
In both situations, users landing on the old or deleted page will see 404 page not found error page. You need to setup a redirect to forward the users to the correct page. This helps to provide better user experience as well as search engines can crawl and index correct page in search results. If your old page is ranking high, you can carry forward the ranking to your new page by setting up redirects.
Related: How to setup 301 redirects in Weebly site?
How to Setup Redirects in WordPress?
Redirection is the popular free plugin for monitoring 404 errors and setup redirects in WordPress. However, you can also setup redirects in WordPress using Yoast SEO premium. Remember, you should have purchased the premium version and the free version will not support redirect option. You can either setup a new redirect or import existing entries from your old plugins. We will explain both options in detail.
Redirects Manager Setup
Before we explain how to import redirects, first you have to check the plugin’s settings are fine for your need. Go to “SEO > Redirects > Settings” section.
- Redirect method – select PHP
- Generate a separate redirect file – select disabled
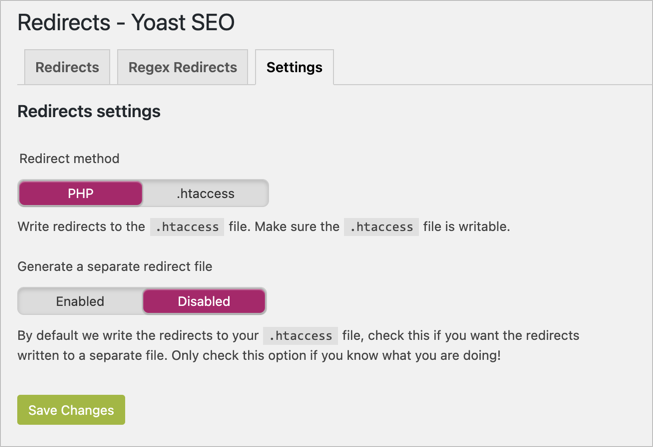
With these settings, Yoast SEO plugin will use PHP method to create redirects and will not create separate file for adding redirects. Save your changes to apply the settings.
Import Redirects from Other Plugins
Let’s say, you are using Redirection plugin to setup redirects. Now that you have purchased Yoast SEO which also offers redirects option. In this scenario, you need to have two plugins on your site doing the same function. Fortunately, you can simply import all your existing redirect entries to Yoast SEO by following the below steps.
- Login to your WordPress admin panel and go to “SEO > Tools” section.
- Click on “Import and Export” link and go to “Import redirects” tab to see available options.
- You can import redirects from the following plugins:
- Redirection
- Safe Redirect Manager
- Simple 301 Redirects

- Select the plugin you are using and click on “Import redirects” button.
- Finally, you will see a success message showing the number of entries imported out of total entries.

Import from CSV and htaccess
Plugins like Redirection allows you to export all entries in CSV file or in a .htaccess directives format. If you have the downloaded file, you can import the file in Yoast SEO instead of importing from the plugin.

Important: After successfully importing, make sure to delete all the entries in your old plugin and delete the plugin from your site.
Setup New Redirects in Yoast SEO Premium
If you have a new site or want to setup a new redirect on your existing site, then follow the below steps.
- Go to “SEO > Redirects” menu and click on “Redirects” tab.
- Select type (generally 301), type old URL and new URL.
- Click on “Add Redirect” button.

Redirects Examples
You can setup redirects with single URL as well as regular expressions (regex). The old URL should be in a relative format from your site and the new URL can be either relative or an external URL. In this way, the plugin handles redirection within your site as well as to external domain. Here are some examples of single and regex type redirects. In these examples, yoursite.com is your website URL on which you have WordPress and Yoast SEO premium installed.
| Category | Old URL | New URL | Type | What it Does? |
|---|---|---|---|---|
| Plain internal redirect | /old_url | /new_url | 301 | Permanently forward yoursite.com/old_url to yoursite.com/new_url |
| Plain external redirect | /old_url | someonesite.com/new_url | 302 | Temporarily forward yoursite.com/old_url to someonesite.com/new_url |
| Regex internal redirect | ^/(.*)\/amp | /$1 | 301 | Redirect all AMP pages to corresponding non-AMP pages on the same site |
Change or Delete Redirects
You can find all existing redirects under “Redirects” and “Regex Redirects” sections. Yoast SEO keeps the plain and regex redirects separately under these two sections for easy handling. You can edit or delete the redirect whenever needed. In addition, you can search, bulk select the entries and delete them with single click.

WordPress SEO: Optimize WordPress site with free WordPress SEO guide.
Type of Redirects in Yoast
Yoast allows to setup the following redirect types. in all general cases, you should be using 301 redirects as your type.
- 301 – permanent redirect
- 302 – temporarily found
- 307 – temporary redirect
- 410 – content deleted
- 451 – unavailable for legal reasons

Useful Redirect Reminders
Yoast SEO plugin shows very useful reminders when you modify existing URL of a post or page. For example, you will see a reminder when changing the permalink slug in post editor. Similarly, you will see a notification when deleting a post or page in admin panel. You can instantly provide a new page and setup a redirect to avoid 404 errors.
What You Can’t Do with Yoast SEO Premium?
Though the plugin does very good job, there are few problems you will face:
- Since the plugin handles relative URL for the old URL, you can’t setup a redirect with subdomains. For example, you will not be able to setup blog.yoursite.com/old_url to yoursite.com/new_url.
- When you manually change the slug in post index page, the plugin will not suggest you to setup a redirect.
- Unlike Redirection plugin, Yoast SEO will not setup automatic redirect when changing the slug.
- You have no option to track the traffic from old to new URLs.
Conclusion
Yoast SEO premium is undoubtedly very useful plugin to improve your SEO strategy. You can easily setup different types of redirects in WordPress using the plugin to avoid 404 page not found errors. Though Yoast redirects manager has limited options, you can manage all SEO related stuff with single plugin instead of installing additional plugin.