
Windows 11 comes with an in-built and robust security protection with Microsoft Defender Antivirus. However, no system is immune to malware, which can range from viruses and ransomware to spyware and trojans. If you are downloading apps online and browsing without restrictions, it is important to scan the system routinely and remove the malware if infected. This is required for safeguarding your personal data, maintaining optimal system performance, and ensuring your device’s longevity. This article explains identifying, scanning, and removing malware from your Windows 11 PC.
What is Malware?
Malware, short for malicious software, is an umbrella term for a variety of harmful programs designed to infiltrate, damage, or steal information from your device without consent. Common types of malware include:
- Viruses: Programs that attach themselves to legitimate files and replicate when the file is run.
- Worms: Standalone software that self-replicates and spreads across networks.
- Trojans: Malicious software disguised as legitimate applications.
- Spyware: Software that secretly monitors user activity and collects information.
- Ransomware: Programs that encrypt files and demand payment to restore access.
- Adware: Unwanted software that displays intrusive ads.
- Rootkits: Tools that allow unauthorized users to gain control of a system.
Understanding these threats provides context for why regular scanning and removal are important.
Signs Your PC May Be Infected
Detecting malware early can prevent extensive damage. Look out for the following symptoms:
- Sluggish performance or frequent system crashes.
- Unexpected pop-ups or ads.
- Programs opening and closing automatically.
- Unfamiliar icons or files appearing on your desktop.
- Changed browser homepage or search engine without your input.
- Frequent error messages or system warnings.
- High network activity when you’re not using the internet.
If you notice any of these signs, it’s time to scan your system for malware.
Step 1: Update Windows 11 and Software
Before beginning a malware scan, ensure your operating system and all security software are up-to-date. Updates often include security patches that close vulnerabilities exploited by malware.
- Right-click on the Start button and select “Settings”.
- Navigate to “Windows Update” section.
- Click “Check for updates” button to download and install any available updates.
- Restart your PC if required.

Keeping your software current is your first line of defense.
Step 2: Use Windows Security (Defender) to Scan for Malware
As mentioned, you can use the built-in antivirus protection in Windows 11 using the Windows Security app.
Running a Quick Scan
- Click the Start button and type “Windows Security” in the search box.
- Find and open the Windows Security app.
- Navigate to “Virus & threat protection” option.
- Click the “Quick scan” button to start scanning your system.

A quick scan checks the most vulnerable areas for infections and usually completes in a few minutes.
Running a Full Scan
If you suspect a deeper infection, a full scan is recommended:
- In Windows Security app, go to “Virus & threat protection” section.
- Click “Scan options” link (showing below the “Quick scan” button).
- Select “Full scan” and click “Scan now” button.
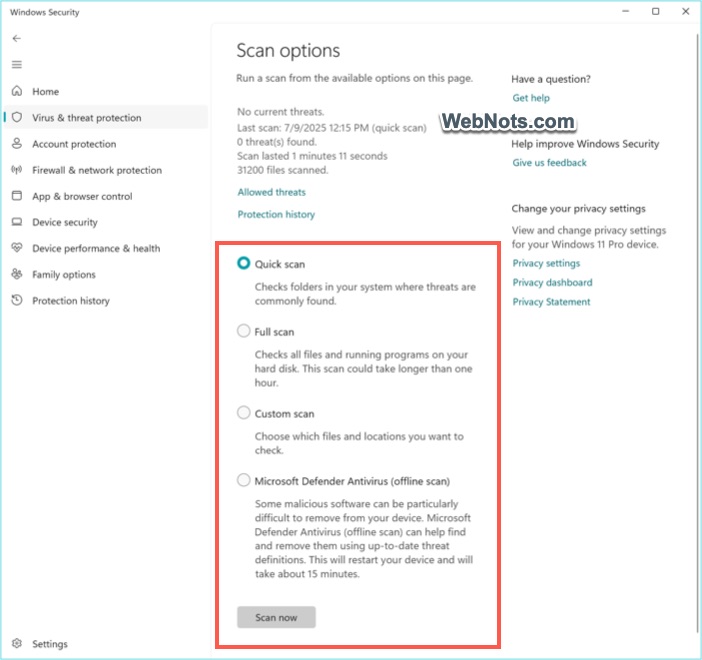
A full scan examines all files and running programs on your hard drive. This process may take an hour or more, depending on your storage size.
Custom and Defender Offline Scan
- Use “Custom scan” option to scan a specific folder received via email or an executable file downloaded from a website.
- Sometimes, quick, full, or custom scans may not help when the malware is a latest threat. In this case, use the offline scan option to find the malware using the latest threat definitions.
Reviewing Threat History
After the scan, review the “Protection history” section to see detected items and actions taken.

Step 3: Remove Detected Malware
If malware is found, Windows Security will quarantine or remove it automatically. Follow the prompts to complete the removal. In some cases, you may need to:
- Restart your computer to finish the cleanup process.
- Manually delete files flagged as threats.
Always ensure suspicious items are removed or quarantined to prevent further infections.
Step 4: Use a Secondary Malware Scanner
If Windows Security is not helping, you can try with a reputable third-party malware scanner. There are popular antivirus apps like Norton, AVG, Avast, Malwarebytes, etc. In most cases, you may need to purchase the premium version for getting the complete features.
Always make sure to purchase / download from official websites and install the app. You may need to update the threat definitions and run a full system scan to catch threats that might evade Windows Security.
Step 5: Remove Malware in Safe Mode (If Needed)
Sometimes, persistent malware can block security programs. In such cases, you can use the Safe Mode to fix the problem.
- Open Settings app and navigate to “System > Recovery” section.
- Under “Advanced startup”, click “Restart now” button.
- After reboot, select “Troubleshoot > Advanced options > Startup Settings > Restart”
- Press 4 or F4 to enter Safe Mode.

Once in Safe Mode, run your antivirus and malware scanners again. Safe Mode loads only essential processes, making it easier to remove stubborn threats.
Final Words
If malware cannot be removed, you can consider restoring your system to a previous state. However, you should have created a system restore point before the infection so that you can revert the system to that point. Use this feature only if other methods fail, as it can result in loss of recent files or installations. It is also a good idea to prevent the infections following these best practices to minimize your risk:
- Keep Windows and all software updated regularly.
- Create robust, distinctive passwords and activate two-factor authentication whenever feasible.
- Be cautious with email attachments and links from unknown sources.
- Download software only from official websites.
- It is advisable to back up important data regularly to an external drive or cloud service.
- Consider using a firewall for extra protection.
- Educate yourself and others about phishing scams and common online threats.


