
Safe Mode is sort of a diagnostic tool in Windows that helps to recover your system when you run into trouble. This is very useful when Windows shows BSOD (Blue Screen of Death) errors due to malware infection or unsupported drivers. Sometimes Safe Mode is the only way to access desktop screen and check your files. If you have messed up something on your system, here is how to open Windows 11 in Safe Mode for troubleshooting the problem. The steps explained here will also work on Windows 10 PCs though the screenshots may differ a bit (like the Start menu).
Windows Safe Mode
In Safe Mode, Windows will be running with minimum necessary drivers without any third-party software. All your settings like wallpaper and screen saver will be temporarily disabled and you will see a black screen with “Safe Mode” labels on all four corners. This allows to access the system in safer environment where you can troubleshoot and roll back incompatible drivers if necessary.

There are several ways of booting Windows in Safe Mode depends on your computer model. Below are the 5 most commonly used methods to try out and check which one works on your PC.
1. Use System Configuration Tool
First option is to use the in-built “System Configuration” tool in Windows 11.
- Press “Windows Logo + R” shortcut keys and open “Run” dialog box.
- Type msconfig in the text box and click “OK” button.
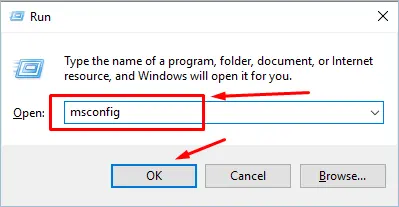
- This will open “System Configuration” tool and go to “Boot” tab.
- Check “Safe boot” option under “Boot options” section.
- Select one of the modes like Minimal, Alternate shell, Active Directory repair or Network.
- Click “Apply” button and then “OK” button.
- Restart your system to boot in Safe Mode.

To disable Safe Mode, just uncheck the “Safe boot” option in “System Configuration” tool and restart your PC, Windows will now boot up in normal mode showing your wallpaper and other custom settings.
Note on BitLocker: If you have enabled BitLocker protection, you should enter the recovery key to apply Safe Mode.

2. Shift + Restart Shortcut
This method allows you to boot your Windows PC in Safe Mode using “Shift + Restart” shortcut keys.
- Click on the “Start” button in Taskbar and then click the “Power” button.
- Then press and hold one of the Shift keys and click on “Restart” option.

- Now, Windows will restart and boot up in recovery mode.
- You will see a list of options and click on “Troubleshoot”.

- From the list of “Troubleshoot” options, choose “Advanced options”.

- In “Advanced options” screen, choose “Startup Settings”.

- Windows will show you the list of settings that can be changed during startup including “Enable Safe Mode” option and click on “Restart” button.
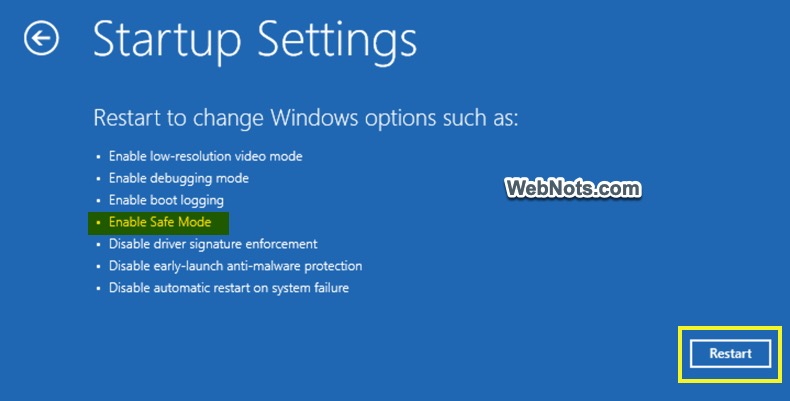
- System will restart and show you the list of “Startup Settings” along with the keys to be pressed to access each setting. You can start the system in Safe Mode using one of the three options – “Enable Safe Mode”, “Enable Safe Mode with Networking” or “Enable Safe Mode with Command Prompt”. Press one of the F4, F5, F6 or simply 4, 5, 6 keys to access the corresponding Safe Mode.

Here is what happens with the three Safe Modes:
- Enable Safe Mode: It allows you to simply boot in Safe Mode with a basic low set of drivers.
- Enable Safe Mode with Networking: this enables network settings which means you can access the internet while using Safe Mode.
- Enable Safe Mode with Command Prompt: this is to access Safe Mode in command line using Command Prompt with no Graphical User Interface (GUI) and internet connection.
3. Using Shift + F8 while Booting
This method is useful if you are not able to login to your computer. It is not widely used because it only works on some PCs depending on the manufacturer. It may also not work when you have UEFI BIOS and SSD laptops. Follow the steps given below:
- Restart your PC.
- When system boots up, press “Shift + F8” keys.
- Now, Windows will show Recovery Mode options and select “Troubleshoot > Advanced options > Startup Settings > Restart”.
- You will see list of options and press F4 (or number 4) key to start your computer in Safe Mode.
As mentioned in method 2, you can also press F5 or F6 (or number 5 or 6) key to open Safe Mode with networking or Command Prompt. Note that on some laptop models, you can simply press F8 without holding Shift key to access Recovery Mode.
Note on BitLocker: If you have setup BitLocker, Windows will prompt you to enter the recovery key. You can find the key from your Microsoft account using the Recovery Key ID showing in the prompt.


4. Safe Mode from Windows Settings
Next method is to use the Windows Settings app and access Recovery Mode from where you can choose to boot Windows in Safe Mode.
- Press “Windows + I” keys to open Settings app.
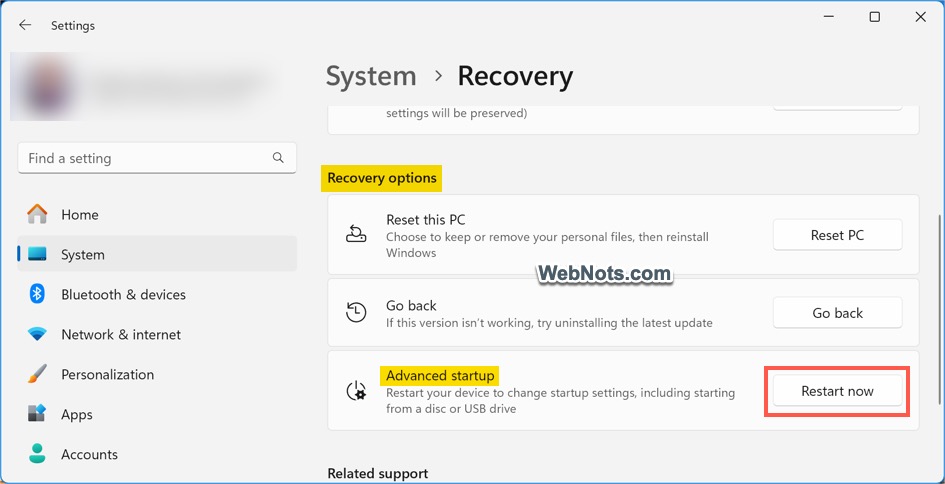
- Go to “System” section and select “Recovery” option.

- Scroll down on the next screen and go to “Recovery options” section.
- Click “Restart now” button showing against “Advanced startup” heading.
- Click “Restart” button to boot the system in Recovery Mode.
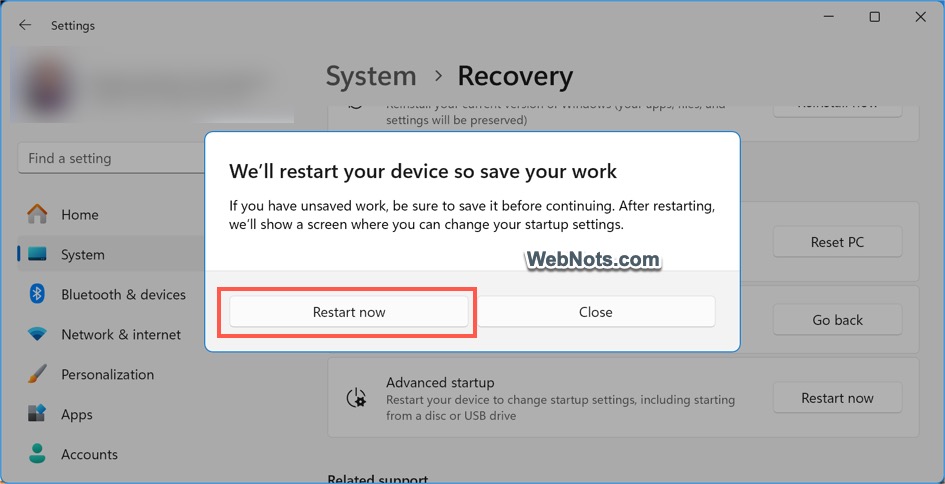
- Go to “Troubleshoot > Advanced options > Startup Settings” and then click “Restart” button.
- When you see list of options, press F4 or F5 or F6 to boot your system in corresponding Safe Mode.
5. Access Safe Mode from Command Prompt
If none of the above methods work, try this one for accessing Safe Mode using Command Prompt. Make sure you are the system administrator and follow the below steps after saving all your work.
- Right-click on the Start menu and select “Terminal (Admin)” option.

- Make sure Terminal app opens in Command Prompt. If it opens with PowerShell, press “Control + Shift + 2” keys to open a Command Prompt tab.
- Copy and paste the following command in the prompt and press enter for minimal Safe Mode with no internet access.
bcdedit /set {current} safeboot minimal- For Safe Mode with internet access, use the following command instead.
bcdedit /set {current} safeboot network- You will see a success message and use the following command to restart your system.
shutdown /r
- Windows will show a prompt that system will be restarted in one minute. Click “Close” button and wait for the restart.
- System will boot in Safe Mode and you will NOT see any recovery settings in this way.
- For disabling Safe Mode, search “cmd” in Windows Search box to find and open Command Prompt app. Type the following command and press enter.
bcdedit /deletevalue {current} safeboot- Restart system with the same
shutdown /rcommand and you can now log in with normal mode.
Remember, Terminal app will not be available in Safe Mode and you need to use the Command Prompt. Also, you should type the commands manually in the prompt as copy paste will not work.
Conclusion
These are the 5 different ways to boot Windows in Safe Mode. Except System Configuration tool and Command Prompt, all other methods use Windows Recovery Mode which appears in Startup settings. If you do not want to go through the lengthy Startup settings, then Command Prompt is the powerful option.




Oh, so it’s actually possible to get into safe mode even if you can’t boot into the OS. That’s what I was looking for. Thanks!