Most of us use apps for every task. However, iPhone has lot of hidden functions that often overlooked. Sound recognition is one such function and your iPhone has an ability to recognize a wide range of sounds. In this article, we will explore how to recognize any sound on your iPhone, using both built-in features and also touch upon third-party applications.
Sound Recognition on iPhone
Here are some of the points you should understand before start using the feature:
- It is basically an accessibility tool introduced in iOS 14 that uses on-device intelligence to listen for certain sounds.
- When the sound is detected, iPhone will send a notification and trigger an alert.
- It can be customized to recognize various sounds such as alarms, sirens, doorbells, a baby crying, running water, appliances and more.
- This feature does not require an internet connection, ensuring privacy and fast response times.
Note: Do not confuse Sound Recognition feature with the Background Sound function. That is meant for playing a nice background music for focusing or while sleeping.
Enable Sound Recognition
To activate Sound Recognition on your iPhone, follow these steps:
- Open the Settings app, scroll down and tap on “Accessibility” option.

- Under the “Hearing” section, tap on “Sound Recognition” (this is turned off by default).

- Toggle the “Sound Recognition” switch to the ON position.
- Tap “Sounds” option which will appear only after your enable the recognition.

- Select which sounds you want your iPhone to listen for. You can turn on as many as you like from the available list.

- For example, tap on “Fire” option and then toggle it to ON position. You will be prompted to allow notifications and confirm by tapping “Allow” option.

- You can select the “Alert Tones” to your preferred sound.

Once enabled, your iPhone will continuously listen for the selected sounds, even while locked, and send you a notification with alert whenever a match is detected. You can customize the notification style by going to “Settings > Notifications > Sound Recognition” section.

Supported Sounds
The built-in Sound Recognition feature supports around 15 sounds, such as:
- Alarms – Fire, Siren and Smoke.
- Animals – Cat and Dog.
- Household – Appliances, Car Horn, Door Bell, Door Knock, Glass Breaking, Kettle and Water Running.
- People – Baby Crying, Coughing and Shouting.
It is also possible to add custom sounds for alarms and household appliance or doorbell (supported from iOS 16). This allows you to add sounds unique to your environment that may not be included in the default list. For example, you can train your iPhone to recognize your microwave’s beep or a specific doorbell. To set up custom sounds:
- Go to “Settings > Accessibility > Sound Recognition”.
- Tap “Sounds” and then tap on “Custom Alarm” link (under Alarms section) or “Custom Appliance or Doorbell” link (under Household section) depending on your need.

- Follow the on-screen instructions to continue with the welcome screen, adding sound name and recording 5 samples of the sound as it occurs in your environment.


After setup, your iPhone will monitor for that unique sound and notify you when it is detected.
Using Sound Recognition from Control Center
When you first time enable Sound Recognition option, iPhone will show a notification that it is added in Control Center.

Otherwise, you can also manually add it to Control Center and use the feature directly from there.
- Swipe down from the top right and open Control Center.
- Long press on the empty area and select “Add a Control” link that appears.
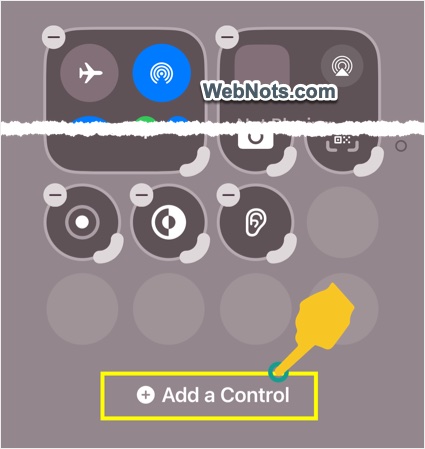
- Search for “sound” and tap on “Sound Recognition” icon under “Hearing Accessibility” section.

- This will add Sound Recognition control at the bottom.

- Now, tap on the added icon and select the sounds you want to monitor.
- Tap on “Settings” to access the settings page for further customizations (like setting alert tone).

Using Third-Party Apps for Sound Recognition
While Apple’s built-in feature is robust, you may have unique needs that demand more flexibility or advanced recognition. Several third-party apps leverage machine learning and audio analysis to recognize and label sounds. Here are some of the recommended apps:
- Shazam – Official Apple app and best known for music identification. Shazam can quickly recognize songs and provide details about the track and artist. Just tap to listen and get instant results. You can also add Shazam option in iPhone’s Control Center for quicker access.
- SoundPrint, Find a Quiet Place – Primarily used for measuring ambient noise levels in public places like restaurants. This app can also log and categorize various sounds for reference.
- Hearing Aid Volume Booster – Designed for users with hearing loss, this app amplifies and recognizes environmental sounds, providing notifications and sound enhancements.

Each app has its own method of operation, and some may require an internet connection for advanced processing.
Practical Uses of Default Sound Recognition Feature
Though categorized as an accessibility feature, Sound Recognition can be incredibly helpful in daily life for a variety of users:
- Receiving visual alerts when a baby cries, a doorbell rings or an alarm sounds is super useful for people with hearing loss.
- Parents and babysitters can monitor for specific sounds around the house, like a child waking up or an appliance finishing its cycle.
- You can use recognized sounds to trigger smart home actions via Shortcuts or other automation apps.
Integrating Sound Recognition with Shortcuts and Automation
The iPhone’s Shortcuts app allows you to automate actions based on various triggers, including sound recognition notifications. For example, you can set up a shortcut that, when your iPhone detects a car horn, sends a text message. To do this:
- Open the Shortcuts app, tap “Automation” and select “New Automation”.

- Scroll down to the bottom and select “Sound Recognition” option under “Personal Automation” section.

- Choose your sound (available for certain sounds), select “Run immediately” and turn on “Notify When Run” option.

- Tap “Next” to add the shortcut to your automation section and then tap on it.
- Choose the action you want the iPhone to take when the sound is recognized. For example, select “Send Message” action and add the recipients.


This integration opens up endless possibilities for making your environment more responsive and accessible.
Final Words
As you can see, it is possible to recognize almost any sounds using iPhone’s default Sound Recognition feature without a third-party app. Many users may miss to notice this feature as it is hidden under accessibility settings. As a word of caution, use Sound Recognition for informational purposes like getting notified with a baby crying and do not rely on it for emergency usages.