Smooth integration between hardware and software is one of the major reasons behind the success of Apple’s products. It’s not just about what happens within a single device, it’s about the integration across all Apple products. You can easily connect an iPhone, iPad, Apple Watch, and Mac wirelessly without hassle. If you are using an iPhone and a Mac together, connecting these two devices wirelessly helps you share files and manage your data across both devices with ease.
Wireless Connection of iPhone and Mac
The latest iPhone and Mac models come with the USB-C cable, which you can use for wireless connection (iPhone and iMac come with USB-C and Mac laptop models come with USB-C to MagSafe cable). Though this cable is used for charging your iPhone, you can also update iPhone (update iOS) and transfer files from Mac to iPhone. Here are some of the preconditions for a wireless connection (some may not be required depending on the method you choose as explained below):
- Both devices are connected to the same Wi-Fi network.
- Bluetooth is enabled on both devices.
- Logged in with the same Apple account on both devices.
1. AirDrop
AirDrop lets you send photos, documents, and videos without cables. It uses Bluetooth to locate nearby devices and Wi-Fi for fast transfer.
- Make sure both devices have “Wi-Fi” and “Bluetooth” turned on.
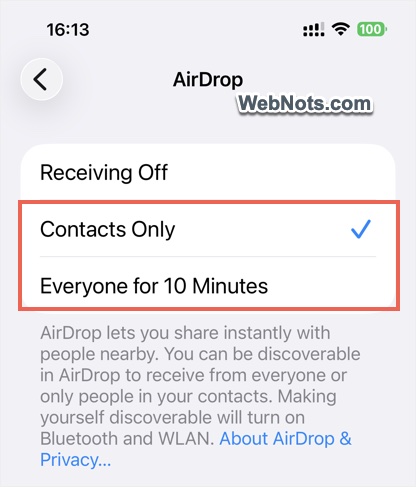
- Go to “Settings > General > AirDrop” on your iPhone and select “Contacts Only” or “Everyone for 10 Minutes” as you need.
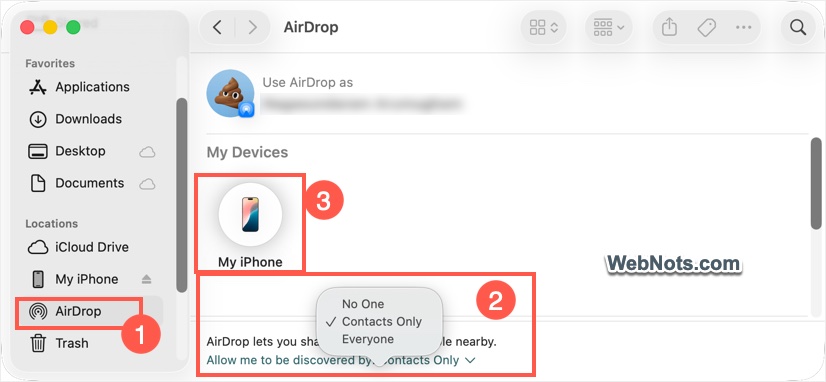
- On your Mac, open “Finder” and go to “Finder > Settings” menu. When you are in Finder Settings, go to “Sidebar” tab and check “AirDrop” under “Locations”. Now, you can select AirDrop option from Finder’s sidebar. Click the “Allow me to be discovered by:” option showing on the bottom and select “Contacts Only” or “Everyone”.
Select the file on your iPhone, tap the share icon, choose “AirDrop”, then pick your Mac’s name to transfer the files. You can transfer any type of files like pictures, PDFs and documents. The transfer will use Bluetooth and continue through Wi-Fi if the devices are moved away from Bluetooth’s range.
2. iCloud
iCloud helps to automatically synchronize your data in the background on your devices. This helps to access files from iPhone to Mac and vice versa when the devices are connected to stable internet connection.
- Sign in with the same Apple account on both devices.
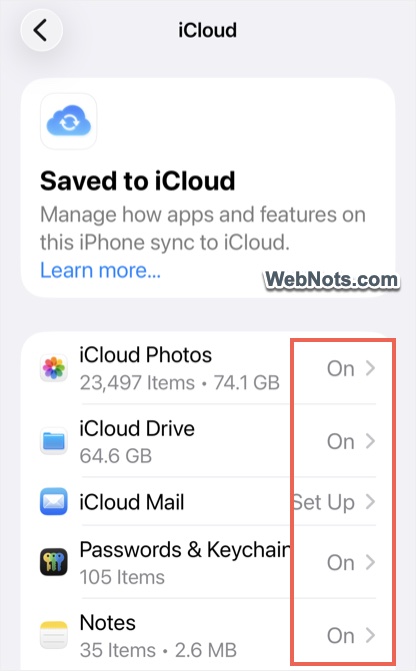
- On your iPhone, open “Settings” and tap your account’s name (showing on top). Select “iCloud” and goo to “Save to iCloud” section.
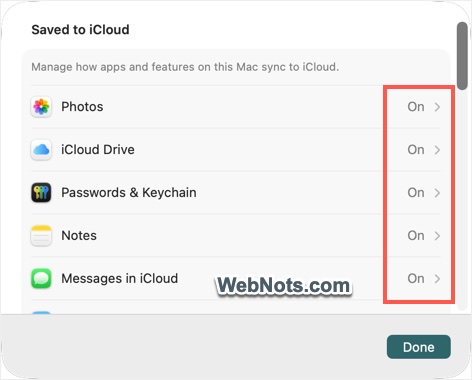
- On your Mac, go to “Apple Menu > System Settings” and click on your Apple account, name. Go to “iCloud > Save to iCloud” section.
- Enable services like “Photos”, “Notes”, “Contacts”, “Safari”, and “iCloud Drive” to keep them synced wirelessly.
3. Handoff
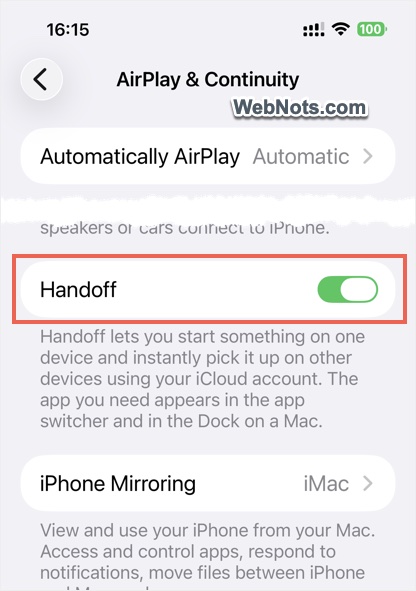
Handoff allows one device to continue a task started on the other. It works for apps like “Safari”, “Mail”, “Pages”, and “Maps”. For example, you can open a webpage on iPhone Safari app and then continue reading the same page on Mac Safari.
- On the iPhone, go to “Settings > General > AirPlay & Continuity”, and turn on “Handoff”.
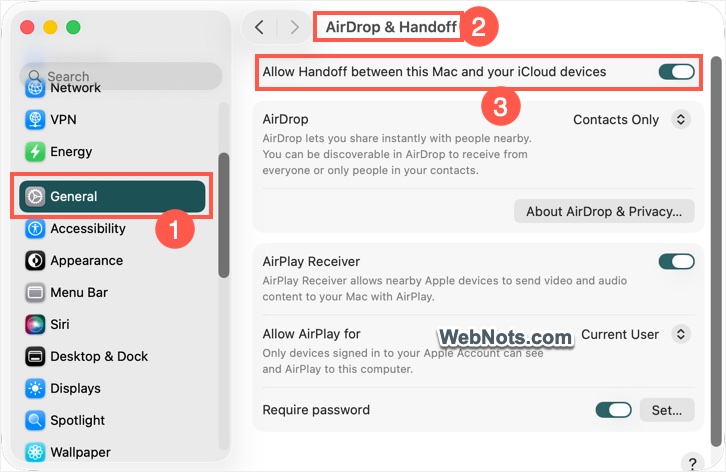
- On the Mac, go to “Apple Menu > System Settings > General > AirDrop & Handoff” and turn on “Allow Handoff between this Mac and your iCloud devices” option.
Now, start using an app on one device and look for the app icon that appears on the other device in the dock (Mac) or app switcher (iPhone).
4. Personal Hotspot
Hotspot lets the Mac use the iPhone’s mobile data without touching any cables.
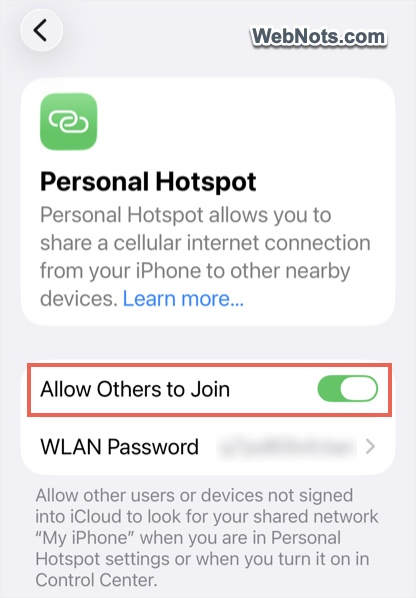
- On the iPhone, open “Settings”, select “Personal Hotspot”, and turn on “Allow Others to Join”.
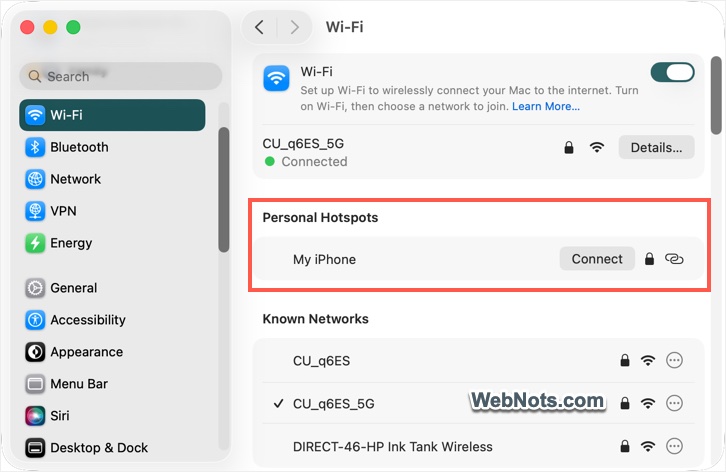
- On your Mac, go to “Apple Menu > System Settings > Wi-Fi” section and connect to the iPhone showing under the “Personal Hotspots” section.
- Enter the password shown on the iPhone if required.
5. iPhone Mirroring
Mac comes with an iPhone Mirroring app which lets your Mac display the iPhone’s screen.
- Make sure both devices are on the same “Wi-Fi” network.
- Search and open iPhone Mirroring app on your Mac. use Touch ID or Mac’s password to unlock the app.
- Click “Connect” button and unlock the screen on your iPhone.
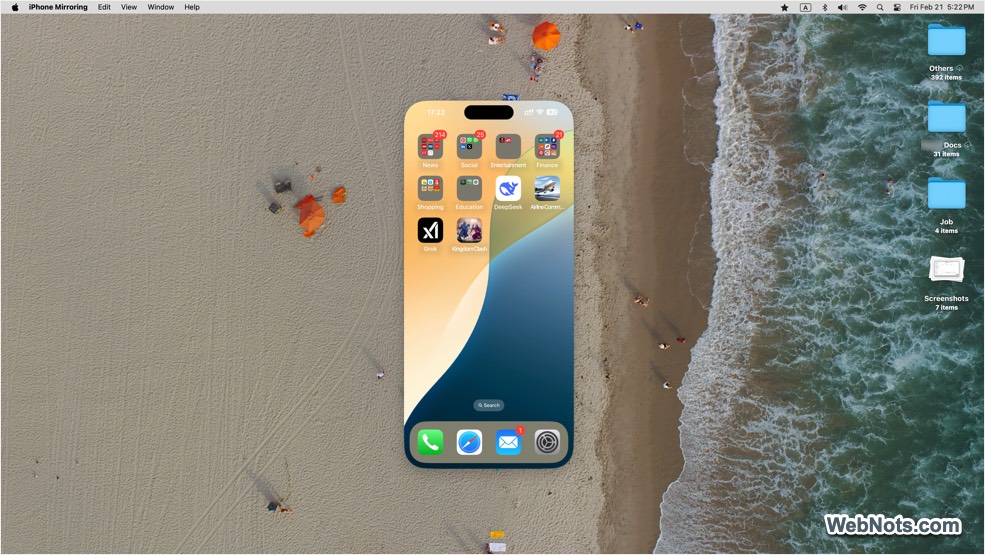
Now, iPhone screen will show on the Mac allowing you to do all the activities without physical connection. Go to “Settings > General > AirPlay & Continutiy > iPhone Mirroring” section on your iPhone to find how long the iPhone was connected from Mac.
6. View in Finder
As mentioned, you can connect your iPhone with Mac using USB-C cable and do iOS update, manage backups, etc. However, it’s also possible to do all those activities wirelessly.
- First, connect your iPhone and Mac with the cable.
- Now, open Finder and click the iPhone’s name from the sidebar (under “Locations”).
- You will see the iPhone details and go to “General” tab.
- Scroll down to “Options” section and check “Show this iPhone when on Wi-Fi” option.
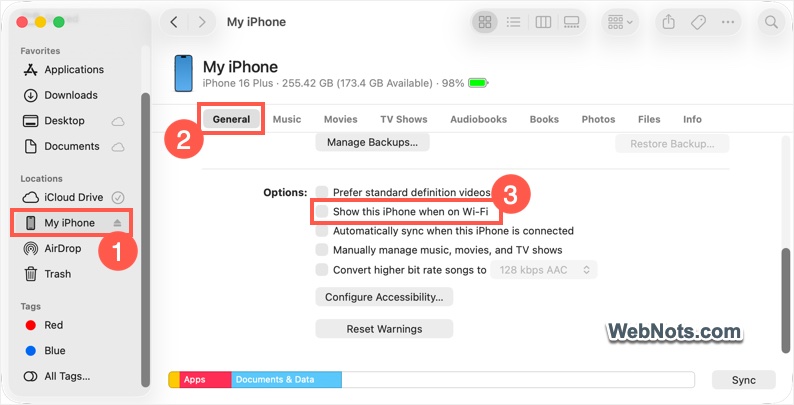
Hereafter, Finder will automatically show your iPhone in the sidebar when the devices are nearby and on the same network.
Final Words
These wireless options offer different ways to combine the capabilities of both devices without searching for the connection cable. Choose the one that matches the task you want to accomplish and you can switch between your iPhone and Mac with ease.