Large files can quietly take over your Mac’s storage even when you don’t remember saving anything huge. They may be scattered across different folders and belong to many file types, which makes them easy to overlook. Over time, these files can consume dozens or even hundreds of gigabytes of space. This article explains how to find large files on Mac and safely remove the ones you no longer need to free up storage.
Why is My Mac Full When There’s Nothing on It?
Even if you do not store many personal files, your Mac can still run out of space because of hidden system data, backups, caches, wallpapers, and automatically generated large files. These items often accumulate quietly across different folders, which makes them difficult to notice. Here are some common examples.
- System and Temporary Files: Time Machine backups, iPhone or iPad backups, stored Mail attachments, and temporary cache files created by apps can occupy large amounts of space, especially if there is no external backup drive connected.
- Large Application Files: Virtual machines (created for purposes like running Windows on your Mac), large games, video or music editing software, and programs from Adobe can create or store very large files that may take tens or even more than 100 GB of storage.
- Hidden Personal Files: Old downloads, items left in the Trash, leftover update files, and unused language resources can gradually build up and consume tens of gigabytes.
- Purgeable Storage: Locally stored iCloud files and downloaded TV shows or movies can easily use 50 to 100 GB of space on your Mac.
Finding Large Files on Mac
Finding large files on a Mac may seem challenging at first, but it is actually quite manageable. Here are four methods you can use to locate the largest files on your Mac, using both built-in features and third-party tools.
1. Using Finder Search
Using Finder is the free and built-in option on Mac to find larger files, and it functions well for quick searches in specific folders. You can use custom size filters to help locate the biggest files.
- Open “Finder” from Dock and press Command + F keys to start a search.
- Set the filters “File Size”, “is greater than” and enter the size (for example – 500 MB).
- If you don’t find any files, make sure you have selected “This Mac” tab for searching and you can also add additional filters like “last modified date before a year”.
- Sort the files by size, name or application to quickly find the larger files in a convenient manner for you.
- Now, select and delete the unwanted files by moving them to “Trash” (make sure to empty the Trash also).
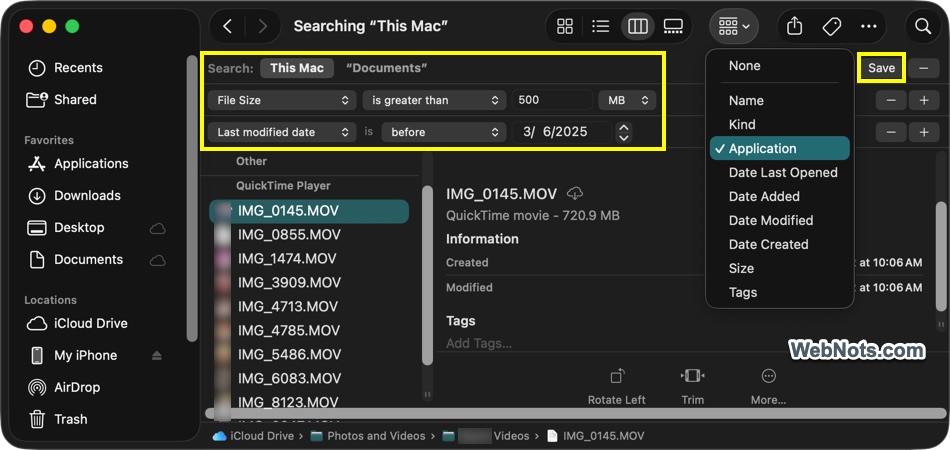
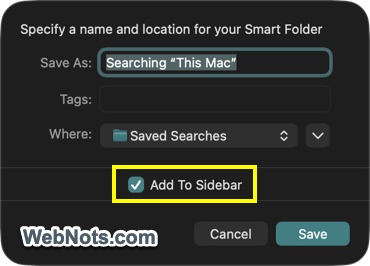
- If you want to frequently do this task, click “Save” button on top right corner of the Finder screen. On the pop-up, make sure to check “Add to Sidebar” and save the search to add a Smart Folder to your sidebar for easier access.
Though this is an easy method, Finder can be slow when there are lots of files, can’t easily show hidden system or cache files, and only lists results without visuals. Its search is basic, and you need to find the size the delete the files manually.
2. Using a Third-Party App
Manually searching for and removing large files can be time consuming, prone to mistakes, and it may also miss hidden system files. Here is where a third-party cleaning app can help you. An automatic Mac Cleaner tool like Tenorshare Cleamio can simplify the process by finding large files along with junk files, cache data, unnecessary apps, duplicate files, and similar photos in a single scan. It also allows you to apply filters to sort files by size and preview them before removing them.
- Download and install the app from their official website.
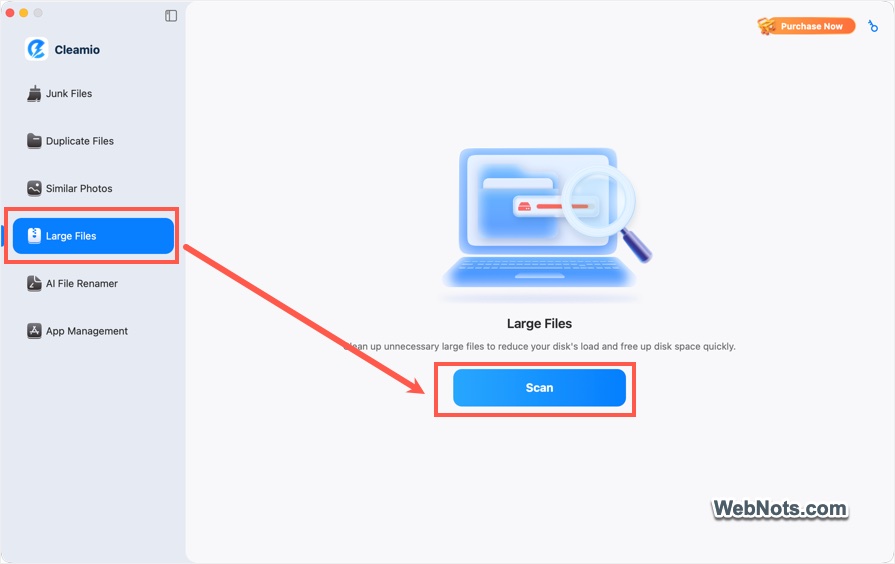
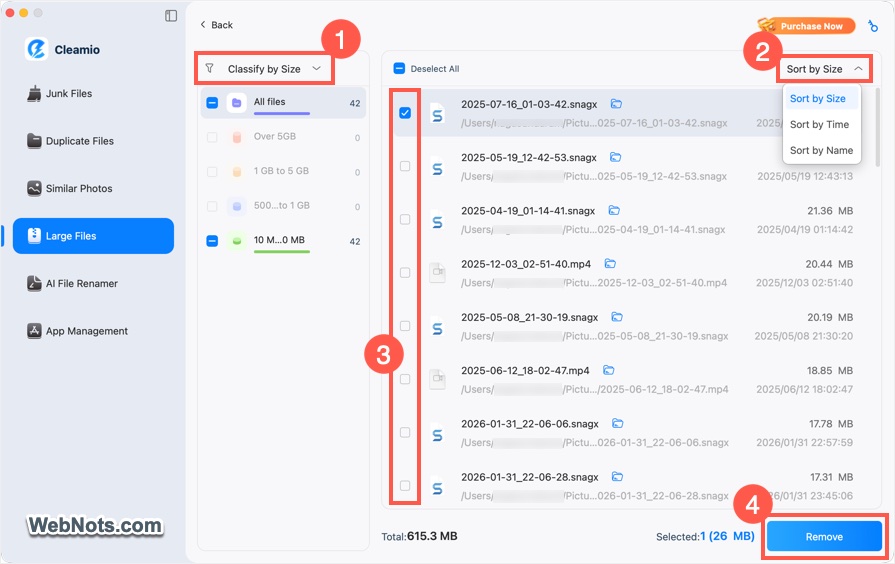
- Launch the app and go to “Large Files” section from the sidebar.
- Click the “Scan” button to initiate the system scan for files.
- The app will ask you to provide permissions for accessing Desktop, Documents, and Downloads folders. Provide the necessary permissions to scan files from that location, otherwise, the app will ignore the locations. The best option is to enable full access from “Apple Menu > System Settings… > Privacy & Security > Full Desk Access” section for the app.
- After the scan is finished, you will find a list of all large files on your Mac.
- Use the “Classify By” and “Sort by” options to arrange the files by “Size,” “Time,” or “Type” to find the bigger size files based on type or date.
- Select files that you want to delete from the list and click “Remove” button.
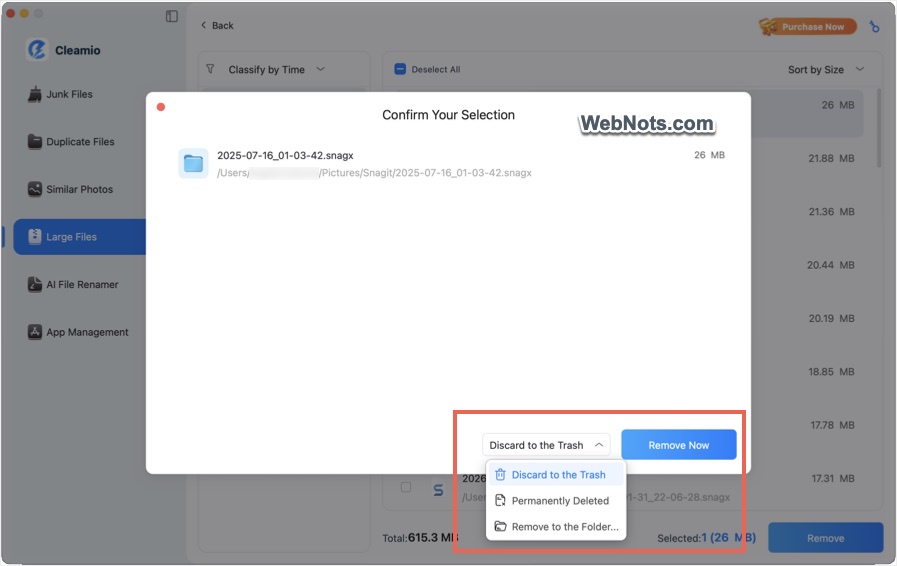
- Choose whether you want to send the deleted items to Trash, permanently delete, or delete the complete and click “Remove Now” button.
- You will see a success message once the selected files are deleted.
You can re-scan for larger files to confirm and the app will show your system is clean with no larger files. You can also use the AI File Renamer to bulk rename files with ease. The free version of the app comes with one week trial and then you can either purchase with one-time payment or buy a subscription.
3. Using Terminal Commands
If you are comfortable with command-line tools, you can also find large files using the Terminal app on macOS. It is fast, precise, and capable of revealing hidden system files, which makes it useful for advanced users.
- Launch “Terminal” app from “Finder > Applications > Utilities” folder.
- Input the following command to find 10 biggest files on your Mac.
- Grant necessary access to folders you want to search if prompted.
find ~ -type f -exec du -h {} + 2>/dev/null | sort -hr | head -n 10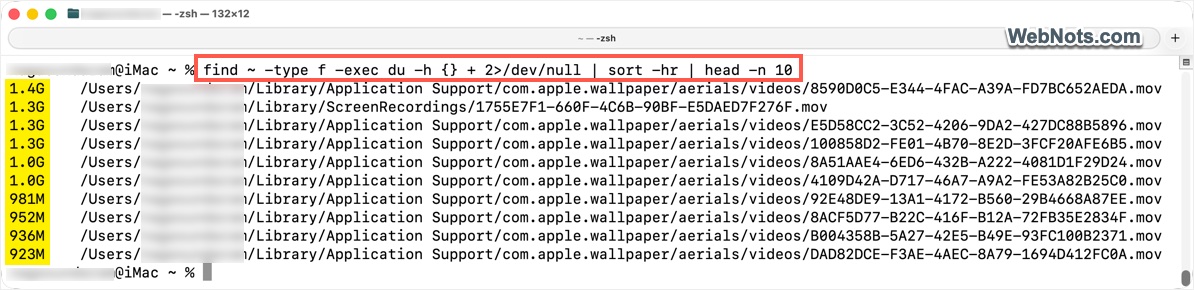
- Use the following command to check for 10 larger files in a specific folder like “Downloads”.
du -sh ~/Downloads/* | sort -hr | head -n 10- To delete a file permanently, use:
rm /file_pathYou can get the file_path form the Terminal output or drag the file from Finder to add the path.
Remember that this method doesn’t provide an undo option and displays results only as text without a visual overview. As a result, the cleanup process is mostly manual and carries a higher risk of deleting the wrong files.
4. Using Storage Settings
The built-in Storage tool can help you to search for large files on your Mac. It provides a clear, categorized overview of your storage, making it easier to locate and remove large user files. It also includes suggestions that can help you optimize storage space.
- Click the Apple menu icon in the top-left and navigate “System Setting… > General > Storage” section.
- You will see different file categories and double-click “Documents” (or click the ⓘ icon).
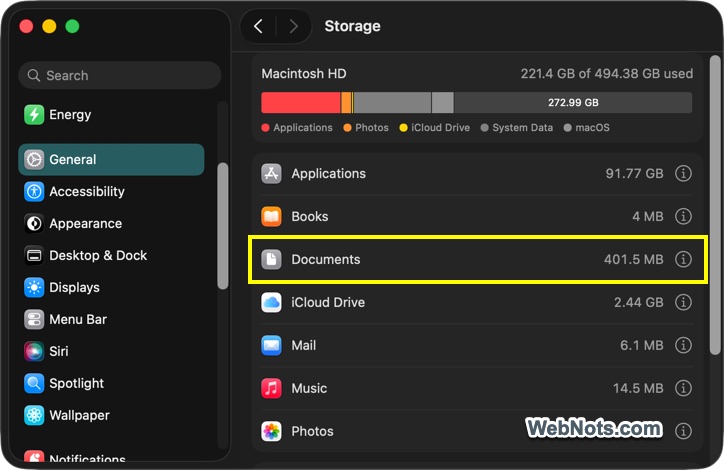
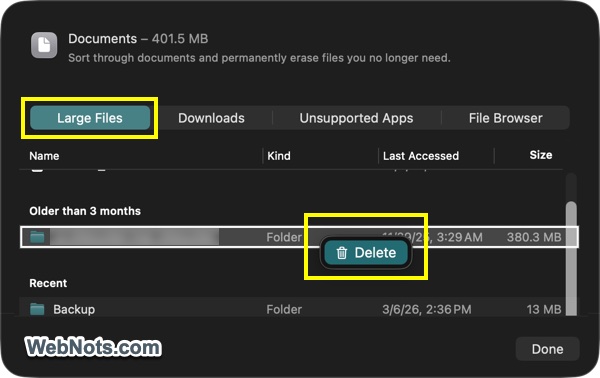
- Go to “Large Files” tab and sort the files based on “Size”. Right-click on a file and select “Delete” option.
- Use “File Browser” tab to navigate through different folders like “Downloads” or “Desktop” to check the file size and delete them.
- Similarly, go to “Applications” category to find and delete large application files that you don’t use at all.
The problem with this method is that it does not display hidden system data and offers only a limited overview of where space is being used.
Final Words
Large files like system backups, cache files, old downloads, applications, and media libraries can quietly take up a significant amount of space on your Mac. Built-in tools like Finder search, Terminal, and the Storage feature can help you locate these files. However, these methods often overlook hidden system files and usually require manual cleanup. For regular maintenance and faster removal, a third-party tool like Tenorshare Cleamio can help to identify and delete large files in just a few clicks. If you don’t want to delete the files permanently, it’s also a good idea to move them to an external drive or iCloud to retain them without affecting your Mac’s storage.