
Windows 11 has a new “Home” section in the File Explorer’s sidebar. This section makes it easy to access recently opened files under various sections. Though this is convenient, it can be a privacy problem especially on shared computers. It’ll also be a concern if someone accidentally viewed the file name or opened it from the list. So, if you don’t want to show your activities on display every time you open File Explorer, here’s how to disable recent files.
File Explorer Home Tab
Home tab shows the following items:
- Quick Access – shows pinned folder like Desktop, Downloads, Documents, Pictures, Music, and Videos.
- Recent, Favorites, and Shared files.
Here is how the File Explorer in Windows 11 looks:

Follow one of the below options to remove that “Recent” button thus hiding the recent files.
1. Using Folder Options
- Open File Explorer from Taskbar or by pressing “Windows Logo + E” keys.
- Under the “General” tab, find the “Privacy” section at the bottom.
- Uncheck the boxes against “Show recently used files in Quick access”, “Show frequently used folders in Quick access”, and “Show files from Office.com” options.
- Click the “Clear” button next to “Clear File Explorer history” to wipe out current recent file records.
- Click “Apply” and “OK” buttons to save your changes and close the window.

This will remove the “Recent” button in “File Explorer > Home” tab.
2. Using Settings App
- Press “Windows Logo + I” keys or right-click on the Start Menu and select “Settings”.
- Navigate to “Personalization > Start” section in the Settings app.
- Turn off “Show recommended files in Start, recent files in File Explorer, and in Jump Lists” option.

3. Using Local Group Policy Editor
If you’re using Windows 11 Pro, Enterprise, or Student version, you can enforce the setting via Local Group Policy Editor.
- Press “Windows + R” to open Run dialog, type gpedit.msc, and press “OK” button.
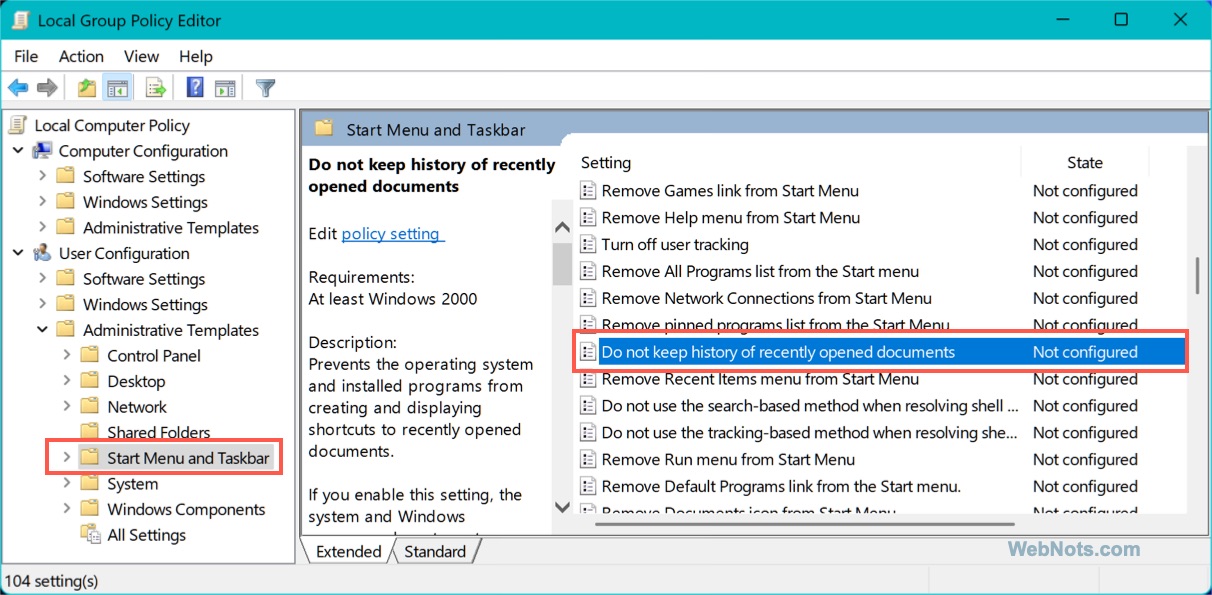
- Navigate to “User Configuration > Administrative Templates > Start Menu and Taskbar” section.
- Double-click on “Do not keep history of recently opened documents” item.
- Set it to “Enabled” and click “OK” button.
- Restart Explorer or Your PC.
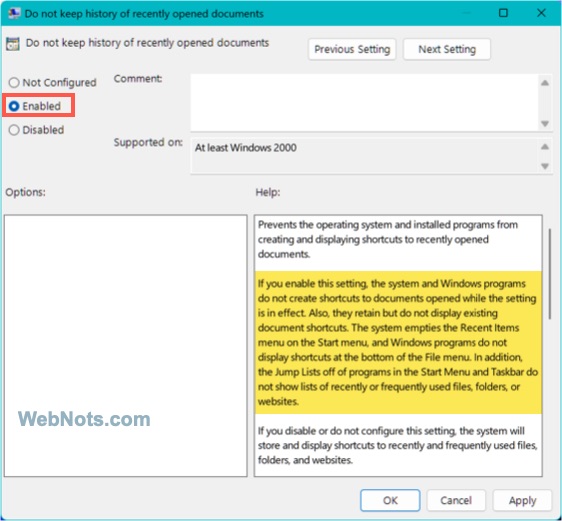
This prevents recent documents from being saved or displayed across Windows, not just in File Explorer (like in Start Menu).
4. Using Registry Editor
You can use the Registry Editor, if you are using Windows Home edition which does not come with Group Policy Editor.
- Search and open Registry Editor app.
- Copy and paste the following location in the address bar and press enter key.
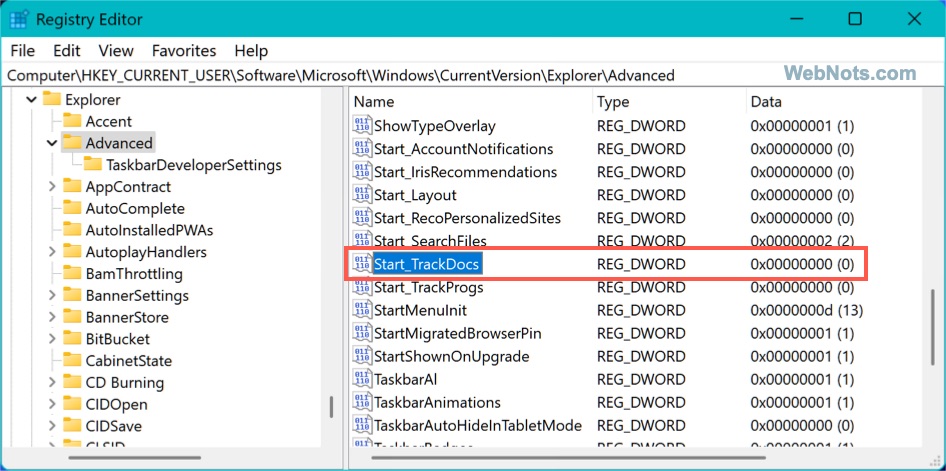
HKEY_CURRENT_USER\Software\Microsoft\Windows\CurrentVersion\Explorer\Advanced
- On the right pane, find Start_TrackDocs item under “Name” column.
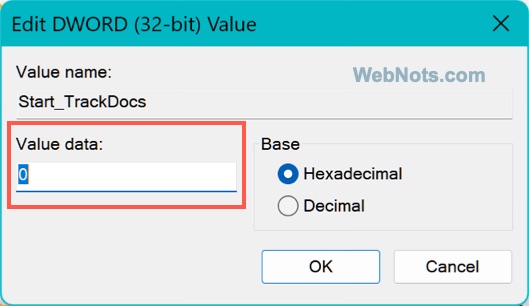
- Double-click on it to edit and set its “Value data” to 0 to disable tracking of recent documents.
- Check the changes are reflecting in File Explorer or restart the system and then check.
⚠️ Caution: Always back up your registry before making changes.
Final Notes
Disabling recent files in File Explorer boosts privacy, especially on shared or work computers. Choose the method that fits your comfort level – Folder Options or Settings app is the recommended way. Edit Group Policy for controlling multiple users on your system and editing Registry should be your last option.


