WooCommerce offers many blocks for the Gutenberg editor; you simply need to insert a block and customize its settings to showcase your products. However, before the Gutenberg editor was introduced, the only option was to use shortcodes. Most users also do not know that the same old shortcodes can be used in the Gutenberg editor, and sometimes using shortcodes is simpler than using the blocks. For shop owners, understanding and mastering the available WooCommerce shortcodes provides flexibility and saves time.
What are Shortcodes?
A shortcode, as the name indicates, is a shortened code snippet enclosed in square brackets. Though you will not visually see the result in the editor, it will trigger the embedded function on the published page. For example, you can insert a list of all popular products on shop using a simple WooCommerce shortcode.
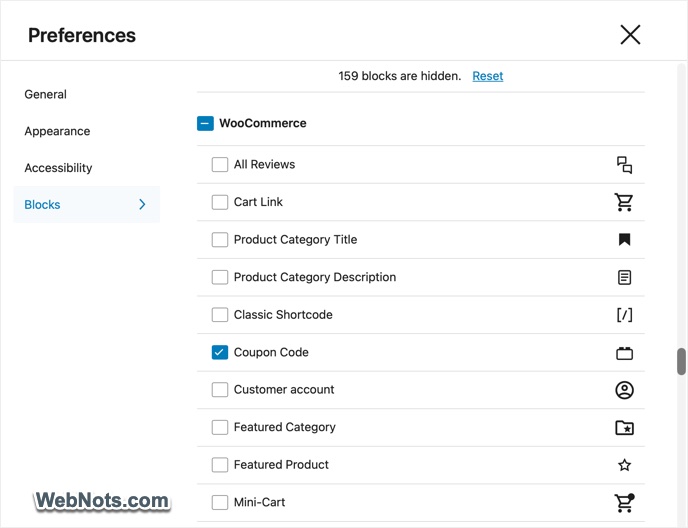
- If you are using the Classic Editor, simply type the shortcode between open and close square brackets like
[……]. - Gutenberg offers a Shortcode block, which you can use.
1. The All-Purpose Product Display
By default, WooCommerce store shows your product archives on the Shop page. However, you can use the [[products]] shortcode to show your products anywhere on the site. This shortcode (and a few others explained in this article) accepts optional parameters to refine its output. These follow the pattern parameter="value" directly inside the brackets. For example, use the shortcode below to dynamically fetch and display a grid of the eight most popular products.
[products limit="8" columns="4" orderby="popularity"]You can also customize it to display featured items, best-sellers, or everything from specific categories.
[products limit="8" columns="4" orderby="popularity" category="services" visibility="featured"]Use the shortcode below to automatically showcase every product currently on sale.
[products limit="8" columns="4" orderby="popularity" category="services" on_sale="true"]Some commonly used attributes include limit, columns, category, tag, orderby, ids, and skus. Check the full list of supported attributes in the official WooCommerce documentation.
2. Streamlined Cart Display
The latest WooCommerce plugin will automatically create Shop, Cart, Checkout, and My Account pages during the initial setup wizard. However, you can also manually create a cart page or insert a shopping cart on any existing page using this shortcode.
[woocommerce_cart]It will display the current items, quantity controls, a coupon field, and the order total with a prominent checkout button. You can insert it on a sidebar, allowing customers to easily view the added items in the cart.
3. Flexible Checkout Forms
It works similarly to the cart shortcode to insert the checkout process on a new page or anywhere you need it.
[woocommerce_checkout]This shortcode embeds a checkout form in your WooCommerce checkout page. Customers can use the form to submit their billing and shipping information, choose a payment method, and review their order before placing it.
4. Customer Account Dashboard
Use this shortcode to add a complete customer account dashboard to any page, allowing users to manage their orders, addresses, and payment methods from a single location.
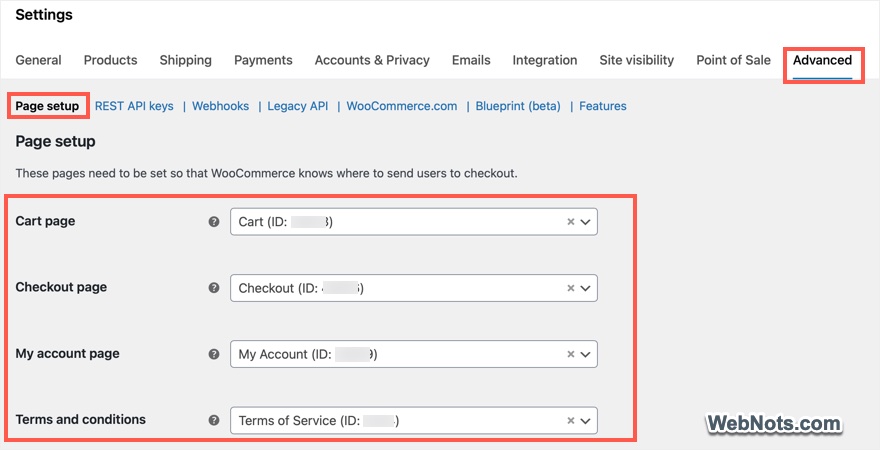
[woocommerce_my_account]Important Note: You should assign the Cart, Checkout, and My Account pages by going to “WooCommerce > Settings > Advanced > Page setup” These pages will be used as a base for your shop to send users to the corresponding sections.
5. Visual Category Directory
Display all your product categories (with images and names) as a browsable directory. This works beautifully for creating a visually engaging main shop page that introduces customers to your store’s different sections before they dive into specific products.
[product_categories number="12" columns="4"]Accepted attributes include ids (category ids), limit, columns, hide_empty (1 to hide and 0 to show), parent, orderby (name, id, slug, or menu order), and order (asc or desc).
6. Category-Specific Product Grid
Showcase your products from a single category in a grid display, perfect for category landing pages, targeted promotional sections, or sidebar widgets that highlight a specific product line. To ensure it only shows products from the intended category, you need to specify either the numeric ID or the category “slug” as the value.
[product_category category="services" limit="12" columns="4"]You can use attributes like limit, columns, orderby, and order with this shortcode.
7. Hassle-Free Order Lookup
This shortcode adds a self-service order tracking page where customers can instantly check their order status by entering their Order ID and Billing Email with no login required.
[woocommerce_order_tracking]8. Display a Full Product Page Anywhere
Need to feature a specific product outside your standard store pages? The [[product_page]] shortcode embeds the complete, fully-functional single-product page content anywhere on your site.
[product_page id="99"]You can also reference the product using its SKU, which is often easier to remember:
[product_page sku="Winter-Jacket-XL"]9. A Simple Call-to-Action Button
This shortcode adds a single “Add to Cart” button with a price and quantity selector for a specific product. It’s the simplest way to create targeted product Call-To-Aactions on landing pages, blog posts, or sidebars.
[add_to_cart id="99"]10. A Direct, Linkable Add-to-Cart URL
Instead of generating a button, [[add_to_cart_url]] creates a standard URL that, when clicked, adds a specified product to the cart. This is perfect for creating custom “Buy Now” text links or buttons on promotional banners where you don’t need the full product details.
<a href="[add_to_cart_url id='99']">Click here to buy!</a>11. Essential for Custom Pages
When you use shortcodes like [[add_to_cart]] or [[product_page]] on a custom page, the confirmation messages (for example – Product added to cart!) won’t appear by default. Adding [[shop_messages]] to that same page ensures these alerts are displayed, providing crucial visual feedback for your customers.
[shop_messages]Conclusion
WooCommerce shortcodes put the power of customization directly in your hands, allowing you to build a unique and high-converting online store without writing code (even with the old Classic Editor). You can keep the below table for handy reference:
| # | Shortcode | Primary Use | Key Attributes (Examples) |
|---|---|---|---|
| 1 | [[products]] | Display products anywhere (all-purpose) | limit, columns, category, orderby, on_sale |
| 2 | [woocommerce _ cart] | Show the full shopping cart page | None required |
| 3 | [woocommerce _ checkout] | Embed checkout form on any page | None required |
| 4 | [[woocommerce_my_account]] | Add customer account dashboard | None required |
| 5 | [[product_categories]] | List all product categories with images | number, columns, hide_empty, parent |
| 6 | [[product_category]] | Display products from a specific category | category (slug / ID), limit, columns |
| 7 | [[woocommerce_order_tracking]] | Add order lookup form (no login needed) | None required |
| 8 | [[product_page]] | Show a full single product page | id or sku |
| 9 | [[add_to_cart]] | Create an “Add to Cart” button with options | id, sku, quantity, style |
| 10 | [[add_to_cart_url]] | Generate direct add-to-cart link (URL) | id or sku |
| 11 | [[shop_messages]] | Display cart/checkout confirmation alerts | None required |