Updating macOS is typically done through System Settings (or System Preferences on older versions), but the command line offers a powerful alternative. Whether you’re managing multiple Macs remotely, prefer a scriptable workflow, or simply want more control over the update process, the Terminal gives you direct access to Apple’s built-in software update tool. In this article, let’s explore how to check for updates, install them, and even handle major macOS updates, all from the command line.
Prerequisites for Updating
Before you begin, make sure:
- You have the administrator privileges on the Mac.
- Have a current backup (Time Machine or your preferred method) to restore in case something goes wrong.
- Have enough free disk space (at least 20–30 GB for major macOS updates).
Checking Updates in Terminal
- Launch Terminal from “Applications > Utilities” folder or use Spotlight to search and open Terminal app.
- The main command is softwareupdate. To list all updates that are available for your current macOS version, run:
softwareupdate -lOr use the long form:
softwareupdate --listYou’ll see the input something like below:
Software Update Tool

Finding available software
Software Update found the following new or updated software:
   * Label: macOS Ventura 13.5-22G74
     Title: macOS Ventura 13.5, Recommended
     Size: 1234567K
Or use the following command to find the available macOS versions for your Mac:
softwareupdate --list-full-installersYou’ll see output similar to:
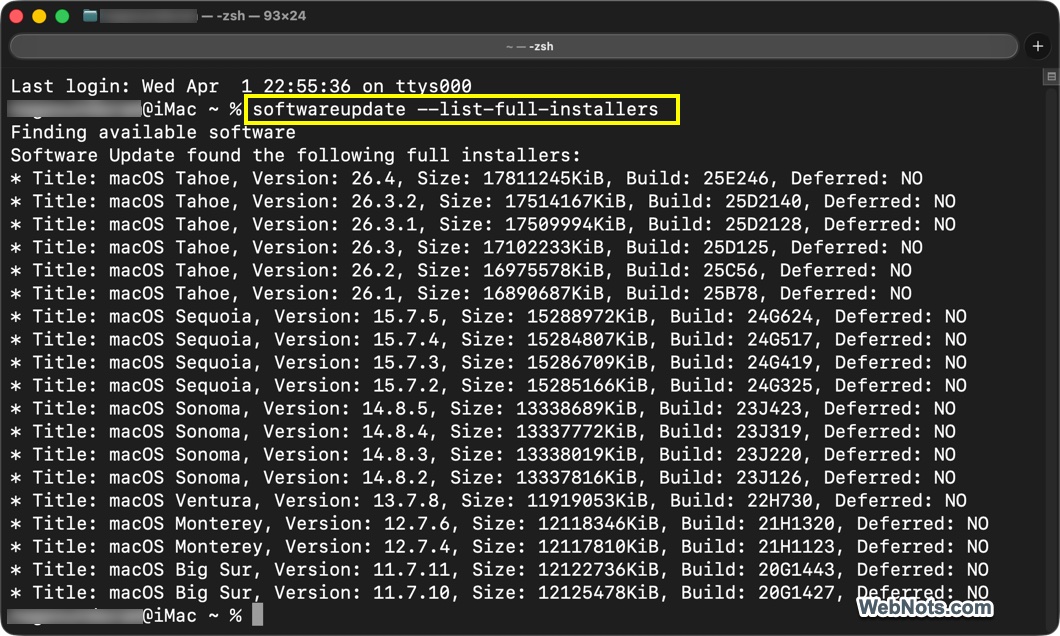
Take note of the Label for any updates you want to install. You can also find the size (you need to convert KB to MB or GB) to understand the space required.
Installing a Specific Update
To install a single update, use the -i (or --install) flag followed by the label:
sudo softwareupdate -i "LabelName"For example:
sudo softwareupdate -i "macOS Tahoe 26.5-22G74"You’ll be prompted for your password and the update will download and install.
Install All Recommended Updates
To install all updates that Apple recommends (including those that may require a restart), use:
sudo softwareupdate -i -aHere, -a stands for “all recommended updates”. This is the command-line equivalent of clicking “Update All” in System Settings. If an update requires a restart, you’ll be asked whether you want to restart immediately. You can automate the restart by adding the -R or --restart flag:
sudo softwareupdate -i -a --RNote that some updates (especially security updates) may force a restart even without the flag. Always save your work before running updates.
Install Only Required Updates (No Restart)
If you want to install updates that do not require a restart, use:
sudo softwareupdate -i -rThe -r (or --recommended) flag skips updates marked as requiring a restart.
Handling Major macOS Upgrades
Major version upgrades (for example, from macOS Ventura to macOS Sonoma) are also available through softwareupdate. They typically appear in the list when you run softwareupdate -l. However, installing them directly may not always work as expected. A more reliable method is to download the full installer and then launch it.
For downloading the full Installer, use the --fetch-full-installer option, specifying the target version:
sudo softwareupdate --fetch-full-installer --full-installer-version 26.0Replace 26.0 with the version number you want (for example, 26.0 for Tahoe, 15.0 for Sequoia). This downloads the installer app to your “Applications” folder. Once the download finishes, use the following command to run the installer from “Applications” folder:
sudo /Applications/Install\ macOS\ Tahoe.app/Contents/Resources/startosinstall --agreetolicenseThe startosinstall tool handles the upgrade. Adding --agreetolicense accepts the license automatically. You can also add --forcequitapps to close applications during the installation.
Remember that major upgrades will restart your Mac and hence save your work before running the command.
Common Issues and Troubleshooting
Here are some of the common issues you may face when trying to install macOS updates through Terminal.
- If the updates are not showing up, make sure your Mac is connected to the internet and that Apple’s servers are reachable.
- Run
softwareupdate --clear-catalogto reset the update catalog if it’s stuck. - If you’re using a proxy or firewall, ensure it doesn’t block Apple’s software update servers.
- Always prefix installation commands with
sudo. Without superuser privileges, you won’t be able to modify system files. - If Terminal shows that no updates available but you know there are updates, try refreshing the catalog using
sudo softwareupdate --reset-ignoredto clear any previously ignored updates. Then runsoftwareupdate -lagain. - If you get “not enough free space”, free up space by deleting old files, emptying the Trash, or removing large unused applications.
- If an update hangs, you can cancel it with Ctrl + C, then try
sudo softwareupdate --backgroundto force the update daemon to restart.
Steps to Check Post Update
Verify the following after installing updates (especially major ones):
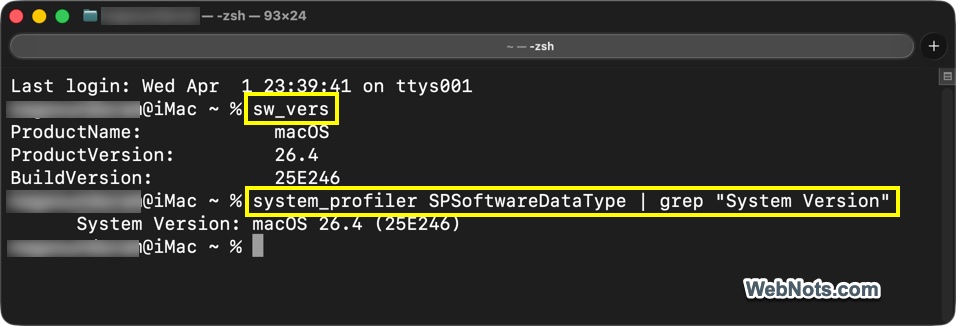
- Verify your macOS version using
sw_verscommand in Terminal. You can alsosystem_profiler SPSoftwareDataType | grep "System Version".
- Some updates may not require an immediate restart, but you should reboot soon to ensure all changes take effect.
- Review the update logs stored in /var/log/install.log. You can view them with tail
-f /var/log/install.logcommand in Terminal.
Conclusion
Updating macOS from the Terminal is efficient, scriptable, and gives you precise control over what gets installed and when. Whether you’re managing a single Mac or a fleet of them, softwareupdate is a reliable tool that complements the graphical interface. Now that you know the commands, you can keep your Mac up to date without ever touching a menu bar. Happy updating!