Most Windows users keep hundreds of files and folders on desktop for quicker access. Though this helps, the best option is to organize your file and folders in their proper locations. On other hand, there is a simple trick to hide all your desktop icons and achieve a clean and distraction-free look. This article provides an in-depth exploration into the various methods available for hiding desktop icons in Windows 11. Also, learn how to change the desktop icons size and spacing in Windows.
Why Hide Desktop Icons?
Here are some of the reasons why hiding the icons is a good idea:
- A desktop free from clutter allows your wallpaper to shine, creating a calming and personalized environment. Click the bottom left corner on taskbar (on a “Show desktop” button) to quickly view your desktop.
- Removing visual distractions can help you concentrate on your current tasks, reducing the temptation to click on unrelated files or shortcuts.
- Hiding icons can prevent others from seeing sensitive documents or applications at a glance, especially if the image file icons are showing with preview.
- Imagine how embarrassing if someone sees your personal file name on desktop while switching app windows during Teams or Zoom call? So, temporarily hiding icons is a useful step when preparing for a presentation or meeting.
1. Using the Context Menu
The fastest way to hide desktop icons in Windows 11 is through the context menu. This method requires just a few clicks and can be reversed instantly.
- Right-click on an empty area of your desktop. This will open the context menu.
- Hover over the “View” menu option.
- In the submenu that appears, uncheck “Show desktop icons”.

All icons on your desktop will disappear, leaving a clean and unobstructed view. To restore them, repeat the same steps and recheck “Show desktop icons” option.
2. Using Desktop Icon Settings
If you want to hide specific system icons like “This PC”, “Recycle Bin”, or “Network”, follow these steps.
- Right-click on your desktop and select “Personalize” option from the context menu.
- In the Personalization settings window, click “Themes”.
- Under “Related settings”, click “Desktop icon settings”.

- In the pop-up that appears, uncheck the icons you wish to hide like Computer (This PC), Network, Recycle Bin, Control Panel, and User’s Files.
- Click “Apple / OK” to confirm.

This method allows you to curate which system icons appear on your desktop without affecting other shortcuts or files.
3. Hiding a File on Desktop
Though this is not actually hiding the icons, it still works if you want to hide icons of files from your desktop.
- Select the file and press “Alt + Enter” keys. Alternatively, right-click on a file and select “Properties” menu.
- Make sure you are on the “General” tab in file properties dialog box.
- Check against “Attributes” at the bottom and check “Hidden” option.
- Now, the file will disappear from desktop.

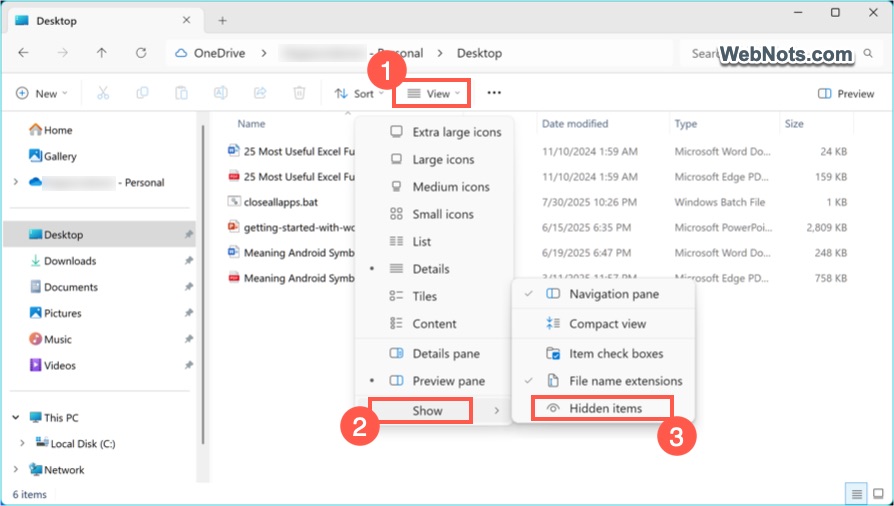
For viewing hidden files, open File Explorer and click the “View” button in toolbar. Select “Hidden items” option under “Show” menu. This will reveal the hidden file on your desktop (the icon will be dimmed indicating it has hidden attribute). Now, open the file properties and remove the “Hidden” attribute (this will show the normal icon). This method allows you to hide a specific file on the desktop; however, enabling the option to show hidden files will reveal all hidden files across the system, not just those on the desktop.
4. Using Group Policy Editor
If you’re using Windows 11 Pro, Enterprise, or Student edition, the Local Group Policy Editor app can be used for disabling desktop icons.
- Press “Windows + R” keys to open the Run dialog box.
- Type gpedit.msc and press “OK” button to open Local Group Policy Editor app.

- Navigate to “User Configuration > Administrative Templates > Desktop” section.
- Double-click “Hide and disable all items on the desktop”.

- Select “Enabled” and then click “Apply” and “OK” buttons.
- Restart your system and you will not see any desktop icons after booting.

The problem with this method is that it will also disable the right-click context menu on desktop. Instead of disabling all icons, you can only remove Computer, My Documents, or Network icons using corresponding policies.
5. Using Third-Party Applications
Several third-party software solutions exist for more granular control over desktop visibility, organization, and automation. These apps let you hide icons based on schedules, create multiple desktop profiles, or automatically sort files into folders.
Popular examples include:
- Fences: Organizes desktop icons into customizable shaded areas and lets you hide entire groups with a double-click.
- DesktopOK: Offers icon layout saving and restoration and can hide icons with hotkeys.
- AutoHideDesktopIcons: Automatically hides desktop icons after a period of inactivity.
Before installing third-party applications, ensure they are from reputable sources to avoid malware or unwanted software.
Conclusion
Hiding desktop icons in Windows 11 is a simple trick that can easily improve your workspace, privacy, and focus. If you’re familiar with macOS, it has a” Use Stacks” option in desktop right-click menu to automatically stack together similar files (like images or documents). Unfortunately, Windows does not have such a feature and you need to manually create folders and organize the items. However, you can make use of the sort (under Sort by menu) and align (under View menu) features available in right-click context menu on the desktop. You can also remove unnecessary shortcuts and pin important apps to taskbar for quick access.