
DNS or Domain Name System is the backbone of internet helping to map human readable website addresses (like webnots.com) to numeric IP addresses. Traditional DNS operates in plain text, making it vulnerable to interception by hackers, ISPs, or malicious actors who might want to monitor or redirect your web traffic. Secure DNS is an enhanced security feature that encrypts standard DNS queries to protect your online activities from eavesdropping, manipulation, and certain types of cyber-attacks. In this article, we’ll explain how to enable secure DNS in Microsoft Edge browser.
Benefits of Using Secure DNS
By default, Edge uses your system’s DNS setup for getting website addresses. When you enable secure DNS (often called DNS-over-HTTPS or DoH), Edge browser encrypts all DNS requests, making it much harder for third parties to see which websites you’re visiting or to redirect you to fake versions of websites. Here are the benefits of using secure DNS:
- Enhanced Privacy: Encrypts your DNS queries so your ISP and others can’t easily see what sites you visit.
- Improved Security: Helps prevent DNS hijacking and man-in-the-middle attacks.
- Better Performance: Some DNS providers can offer faster response times than your ISP’s default servers.
- Content Filtering: Some secure DNS services offer built-in protection against malicious sites.
Secure DNS is offered by most Chromium based browsers like Google Chrome and Microsoft Edge.
Enable Secure DNS in Microsoft Edge
There are multiple methods to make sure Edge uses secure DNS setup for browsing.
1. Using Edge’s Built-in Settings
- Launch Microsoft Edge app, click the three-dots menu icon in the top-right corner and select “Settings” option.
- Go to “Privacy, search, and services” option in the left sidebar.
- Click on the “Security” section.
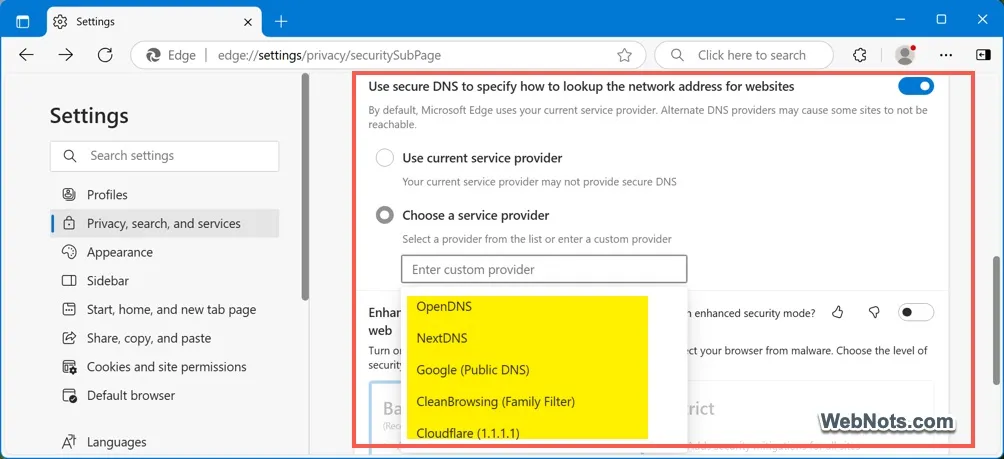
- Turn on “Use secure DNS to specify how to lookup the network address for websites” option.
- Select “Choose a service provider” option and click in the “Enter custom provider” box.
- You’ll see a dropdown and select from popular options like OpenDNS, CleanBrowsing (Family Filter), Google (Public DNS), Cloudflare (1.1.1.1), or NextDNS.
- It’s also possible to enter a custom IP address of a secure DNS setup instead of selecting from the available ones.
- Once you select or type, Edge will save the changes automatically.
Note: The setting will be greyed out if the browser is managed by your organization.
2. Configuring at Operating System Level
As mentioned, Edge uses your system’s network settings by default. So, you can also configure secure DNS at the Windows level.
- Open Windows Settings app by pressing “Windows Logo + I” keys.
- Go to “Network & internet” section and select “Wi-Fi” or “Ethernet” (the one you use).
- Click on your active network connection properties.
- Click the “Edit” button against “DNS server assignment” option.
- Click the “Automatic (DCHP) dropdown and select to “Manual”.
- Turn on “IPv4” and enter “Preferred DNS” address for a secure DNS provider like Cloudflare (1.1.1.1) or Google (8.8.8.8). For “DNS over HTTPS”, select “On (automatic template)”.
- Similarly, enter “Alternate DNS” address like Cloudflare (1.0.0.1) or Google (8.8.4.4) and select “On (automatic template)” for “DNS over HTTPS”.
- Click the “Save” button to apply your changes.
- Now, go to Edge settings page edge://settings/privacy/securitySubPage and make sure “Use current service provider” option is selected for secure DNS option.

Recommended Secure DNS Providers
If you’re only using Edge browser, then it’s a good idea to setup secure DNS from Edge settings as explained in method 1. Because you don’t need to type the IP address manually in that case. If you prefer Windows setup, then you should know the preferred and alternate DNS IP addresses to enter in the corresponding boxes. Here are some of the popular secure DNS addresses available for you:
| Provider | Preferred DNS | Alternate DNS | Benefits |
|---|---|---|---|
| Cloudflare DNS | 1.1.1.1 | 1.0.0.1 | Fast and privacy-focused |
| Google Public DNS | 8.8.8.8 | 8.8.4.4 | Reliable with good performance |
| Quad9 | 9.9.9.9 | 149.112.112.112 | Blocks malicious domains by default |
| OpenDNS | 208.67.222.222 | 208.67.220.220 | Offers content filtering options |
Note: Preferred and Alternate DNS addresses are also known as Primary and Secondary respectively.
Verifying Secure DNS is Working
Follow the below steps to confirm your secure DNS is active and working after the setup.
- Visit a DNS leak test website like dnsleaktest.com.
- Run a standard or extended test.
- Verify that the DNS servers shown match your chosen provider.

Troubleshooting Secure DNS Setup in Edge
There could be multiple reasons, if the secure DNS isn’t working on Edge.
- Ensure your selected provider is correct or you’ve typed the correct IP addresses.
- Check if your network admin or ISP blocks DoH (DNS-over-HTTPS).
- Try switching to a different provider.
- Restart your browser / system after making changes.
Conclusion
Enabling secure DNS in Microsoft Edge is an easy way to enhance your online privacy and security. By encrypting your DNS queries, you protect your browsing activity from prying eyes and reduce vulnerability to certain cyber-attacks. The setup takes just minutes but provides ongoing protection for all your web browsing in Edge.


