Most Mac users continue to use Microsoft 365 (Office) apps like Word, Excel and PowerPoint for compatibility reasons. If you are one among them, it’s time to try out the iWork package offered by Apple. Especially, Apple’s Pages app is a powerful word processor and page layout tool that often goes underappreciated. Whether you’re crafting documents for work, school, or personal projects, Pages offers a wealth of features that can help you create polished, professional content. If you’re new to Pages or want to unlock its full potential, here are 10 essential tips to elevate your experience.
Pages App on Mac
Unlike Microsoft Word, Apple Pages is a free app that comes as apart of macOS. So, you should find the app preinstalled on your Mac or install it from App Store. The app does not need a separate login, you can simply launch and start using like any other Mac app.
1. Export in Multiple Formats
Pages makes it easy to export your document in a variety of formats, including Word (.docx), PDF, and EPUB. So, you don’t need to work about the compatibility when sharing with others. Go to “File > Export To” menu and choose your desired format.

If required, you can set a password to open the exported Word document.
2. Use Templates from Library
Pages provides a variety of professionally designed templates for resumes, newsletters, posters, and more. Using a template can save time and give your documents a clean, polished look. Open Pages and go to “File > New” menu to browse the templates.
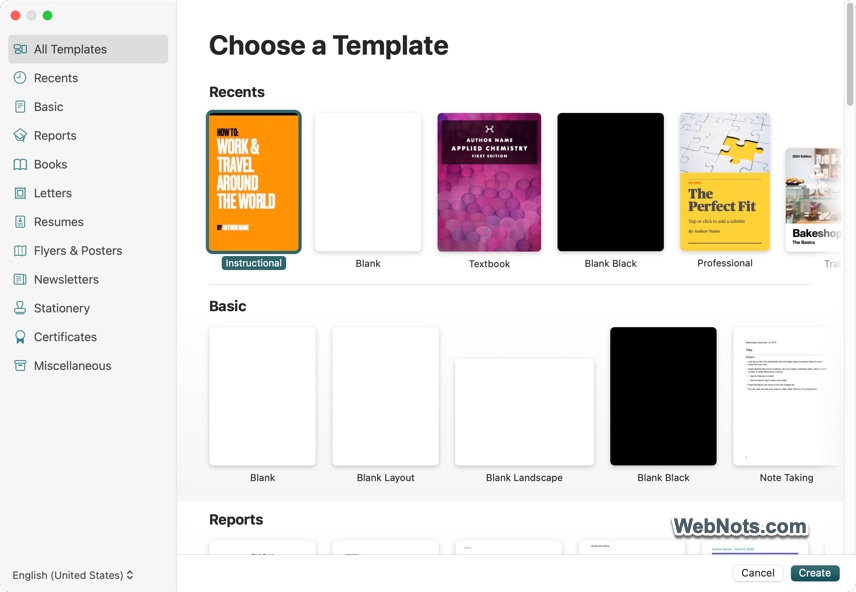
It is also possible to save your document as a template (File > Save as Template…) so that you can use it for multiple documents and save lot of time.
3. Customize Toolbar Icons
By default, Pages app will show a set of icons in the top toolbar. However, you don’t need to live with them forever. Right-click on the toolbar and select “Customize Toolbar…” option. This will open a palette and you can drag the required icons to the toolbar. Similarly, drag unnecessary icons to the palette to remove them from the toolbar.
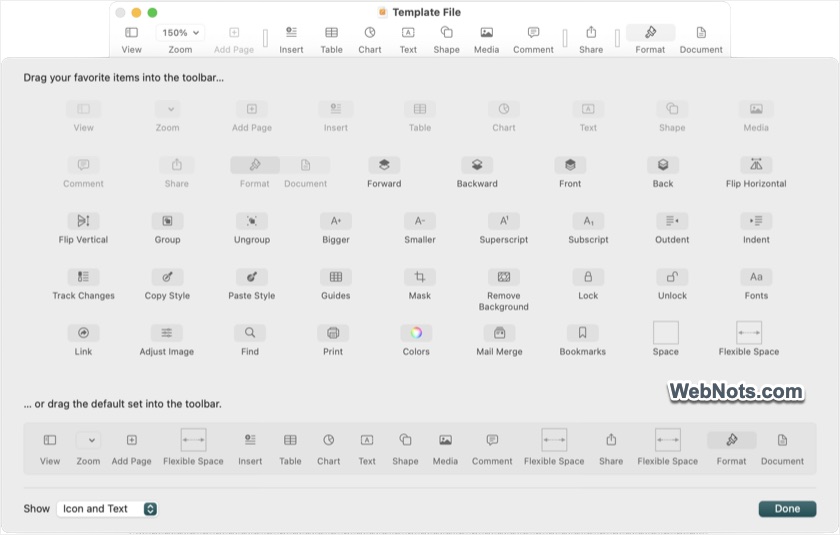
If the place is congested, you can drag the default set of icons (instead of adding / removing one by one).
4. Leverage Collaboration Tools
Pages supports real-time collaboration, making it easy to work with others on the same document. Click the “Share” button in the toolbar, select “Collaborate > Invite with Link” option and then invite others via email or link.
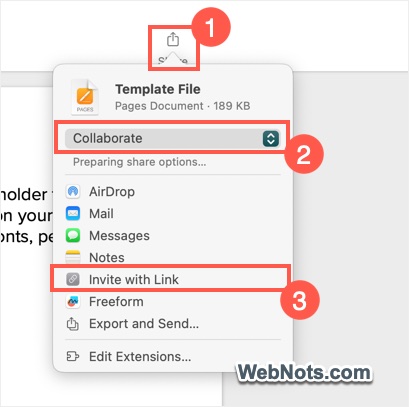
You can track document changes and comments from all users for a smooth collaboration process.
5. Master Text Wrapping
When working with images or shapes, text wrapping allows you to control how text flows around them. Simply select an object (like image), go to “Arrange” tab in the “Format” Sidebar, and choose a wrapping style.
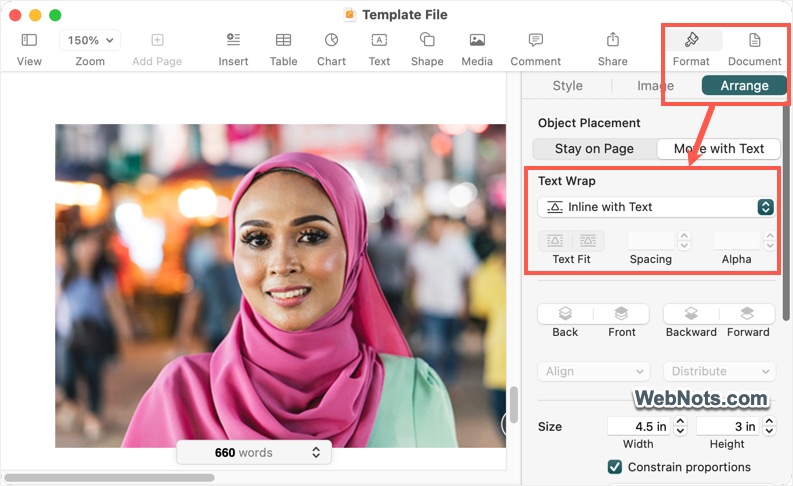
Use the “Inline with Text” option for seamless placement in documents focused on text-heavy content.
6. Take Advantage of Keyboard Shortcuts
Pages has several time-saving keyboard shortcuts. Some must-know shortcuts include:
- Command + E: Center-align text
- Command + Shift + K: Add a comment
- Command + Option + T: Show or hide the toolbar
You can check the latest shortcuts via “Help > Keyboard Shortcuts” menu.
7. Viewing Smart Annotations
You can’t add annotations on Mac, but it is possible to view, hide or remove them. On the toolbar, click on the “View” button and select “Show / Hide Smart Annotations” option.
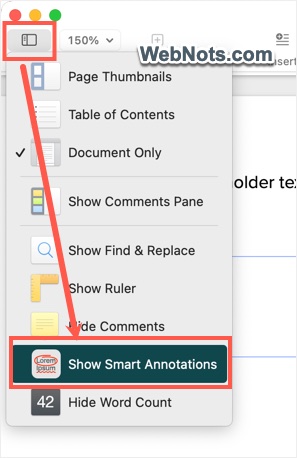
For removing them, use “Edit > Remove Smart Annotations” menu.
8. Add Interactive Elements
If you’re creating digital documents, you can add hyperlinks, audio, and video for an interactive experience. Go to “Format > Add Link > Webpage” to insert a hyperlink on text or objects or drag and drop multimedia directly into your document. Make sure to export as a PDF to preserve multimedia elements when sharing.
9. Use Table of Contents for Navigation
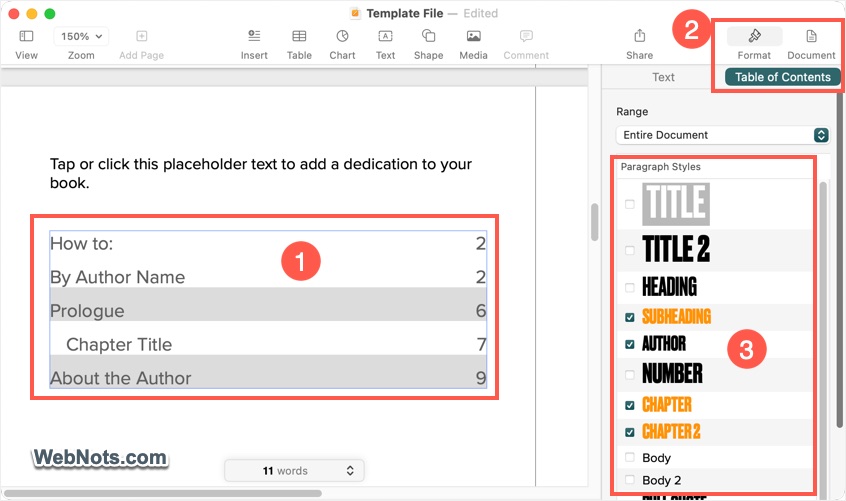
For longer documents, a Table of Contents (TOC) improves readability and navigation.
- Position your cursor and go to “Insert > Table of Contents > Document”.
- Select the inserted TOC, go to “Format” sidebar and click on the “Customize Styles” button.
- Choose the styles you want to apply and the TOC will be updated automatically based on your headings.
10. Utilize Drop Caps for a Stylish Touch
Drop caps add a professional and elegant look to your documents by enlarging the first letter of a paragraph. This feature is commonly used in books, magazines, and formal reports. Select a paragraph, go to “Format” sidebar, and check the “Drop Cap” option at the bottom. Click the preset button and select one of the styles or manually customize the text style, size, and alignment of the drop cap to match your document’s design.
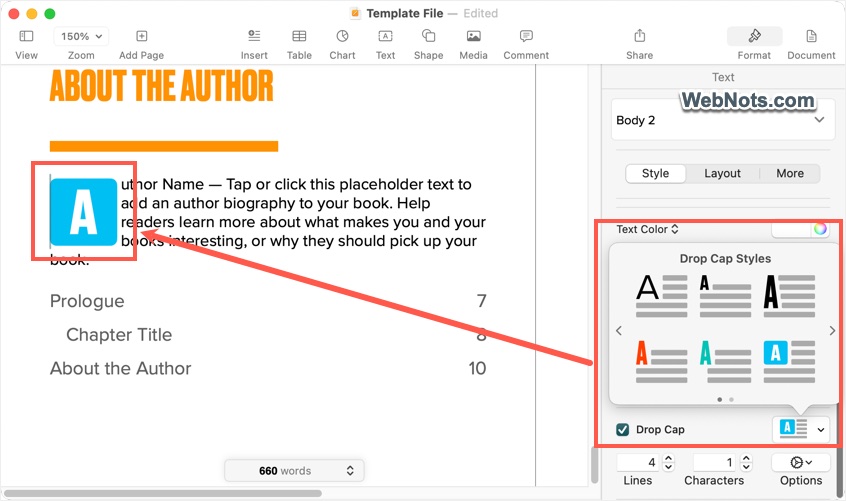
Adding drop caps can enhance the visual appeal of your content, making it more engaging and polished.
Final Thoughts
Pages is a powerful and user-friendly tool, perfect for creating professional documents – whether you’re a student, business professional, or creative designer. At first, you may find Pages on Mac a bit challenging compared to Microsoft Word, especially if you’re accustomed to certain features or fonts that aren’t available in Pages. However, by applying the tips above and spending some time practicing, you can quickly become comfortable with the app.