Taking screenshots is one of the common tasks for most of us. For example, you may want to save an image from a webpage, capture an error message, document a technical problem, or share something interesting on your screen. Windows 11 provides several ways to take screenshots of the entire screen, a particular application window, or a selected portion of the screen. In this article, we will explain all possible methods to take screenshots in Windows 11 and explain when to use each method.
If you are using Windows 10, check our separate article to learn how to capture screenshots in Windows 10.
1. Using Print Screen Key
The Print Screen key, commonly labeled PrtSc, PrtScn, or Print Scr, is one of the quickest ways to take a screenshot in Windows 11.
- Press the PrtSc key to capture the screenshot of your entire screen. The image is temporarily saved in your clipboard and press Ctrl + V to paste the screenshot in any other application.
- Press Windows + PrtSc keys to automatically capture and save the screenshot in PNG image format. You can find the captured images under “C:\Users\<Username>\Pictures\Screenshots” folder.
- Press Alt + PrtSc shortcut keys to capture the active window rather than the entire desktop. The image is copied to the clipboard, so you must paste it into another application to save or use it.
On Windows 11, the Print Screen key may be configured to open the Snipping Tool instead. You can turn off this behavior through “Settings > Bluetooth & devices > Keyboard > Use Print screen to open screen capture” option.
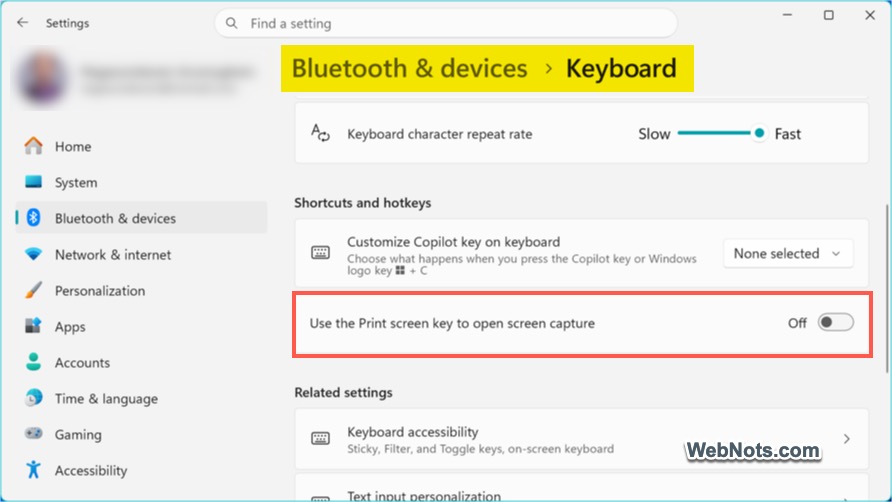
Some laptops also require you to press Fn key like Fn + Windows + PrtSc. You can also try Fn + Windows + Spacebar as an alternative for devices that do not have a Print Screen key.
2. Take a Screenshot Using Windows + Shift + S
Windows + Shift + S opens the Snipping Tool capture interface, allowing you to select exactly what you want to capture. Unlike the Print Screen shortcut, this method provides multiple capture options, including rectangular, freeform, window, and full-screen screenshots.
- Press Windows + Shift + S, the screen will dim, and a screenshot toolbar will appear.
- Choose the capture mode you need and select the area or window you want to capture, depending on the chosen mode.
- The screenshot is copied to your clipboard. Select the notification that appears to open the screenshot in the Snipping Tool editor, if you want to edit or save it.
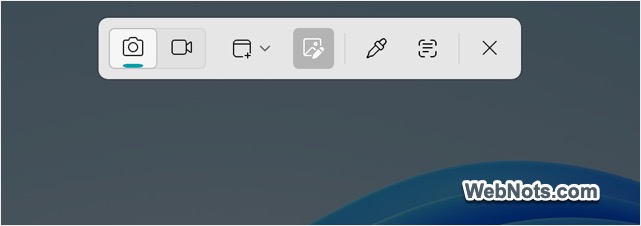
The available capture modes are explained below.
- Rectangular Snip: After selecting this mode, click and drag the mouse to draw a rectangle around the content you want to capture.
- Freeform Snip: This option allows you to draw a custom outline around the content you want to capture.
- Window Snip: The Window Snip option allows you to capture a specific application window.
- Full-Screen Snip: This is similar to using the Print Screen key to capture the entire screen. However, it works through the Snipping Tool interface and provides access to its editing features.
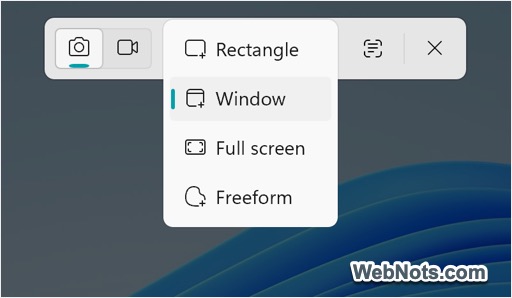
Windows + Shift + S is particularly useful when you frequently need screenshots of specific areas rather than the entire screen.
3. Take Screenshots Using the Snipping Tool
The Snipping Tool is a built-in Windows application that allows you to capture, edit, save, and share screenshots. Although you can open its capture interface using Windows + Shift + S, launching the full application gives you access to additional features, including capture delays and editing options.
- Search and open the Snipping Tool app.
- Choose the required capture mode and select “New” to begin capturing a screenshot.
- Capture the desired area or window and edit the screenshot if necessary.
- If required annotate on the screen and save your captured image.

The Snipping Tool provides several features that make it useful for everyday work.
Add A Delay Before Capturing
The Snipping Tool includes a delay option that allows you to wait before taking the screenshot. You can choose an available delay, such as 3, 5, or 10 seconds to capture the desired area. It is very useful for capturing dropdown menus, context menus, and other interface elements that are difficult to capture with an immediate screenshot.
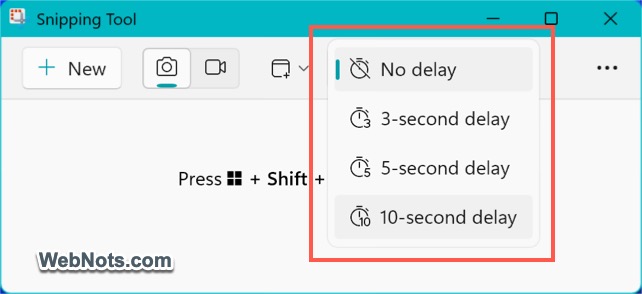
Editing Captured Screenshots
After capturing a screenshot, you can use the Snipping Tool’s editing features to improve the image. Here are the available features for editing:
- Pen and highlighter tools for marking important information.
- Cropping tools for removing unwanted areas.
- Shapes for highlighting particular sections.
- Undo and redo options for correcting annotations.
- Text actions for extracting text from an image.
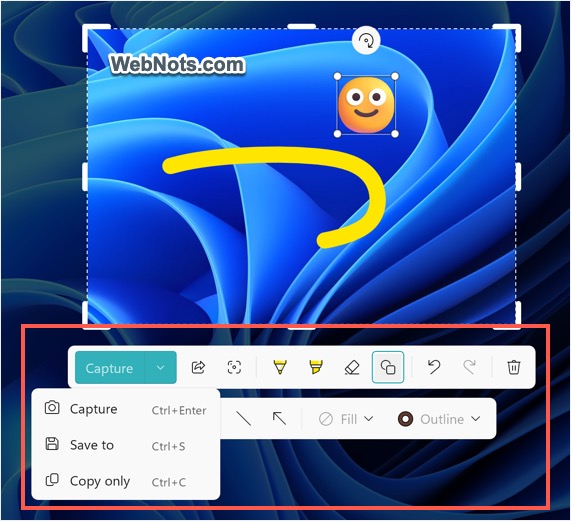
You can copy the edited screenshot to the clipboard or save it as an image file. The Snipping Tool is a good choice when you want to capture and annotate screenshots without installing additional software.
Note: You can also record your screen and extract text content from images using the Snipping Tool app
4. Take Screenshots Using Xbox Game Bar
Xbox Game Bar is a built-in Windows feature designed primarily for gaming. However, it also provides screenshot and screen-recording capabilities. You can use it to capture screenshots while playing supported games or using compatible applications.
- Open the game or application you want to capture.
- Press Windows + G to open Xbox Game Bar.
- Click the “Widgets Menu” icon and select “Capture” option.
- Select the image icon to take a screenshot.
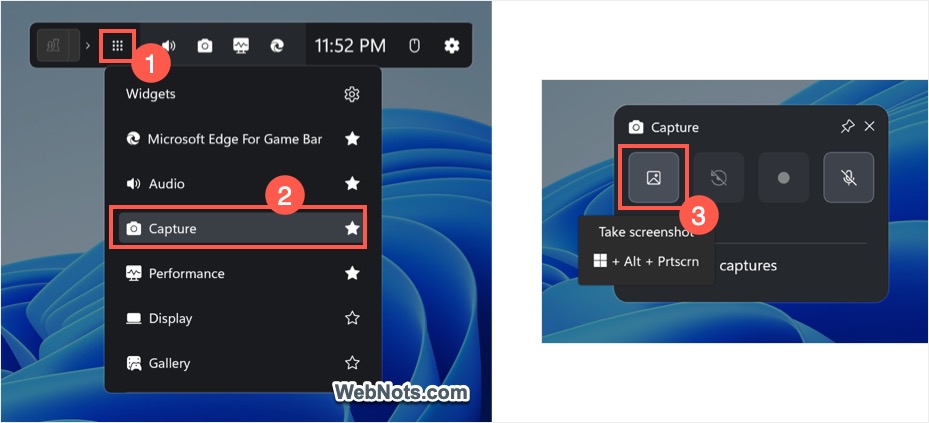
You can also use Windows + Alt + PrtSc shortcut when Xbox Game Bar is enabled. Screenshots taken using Xbox Game Bar are generally saved in the “C:\Users\<Username>\Videos\Captures” folder. Xbox Game Bar is particularly useful for capturing gameplay, game interfaces, and other supported application content.
5. Using On-Screen Keyboard
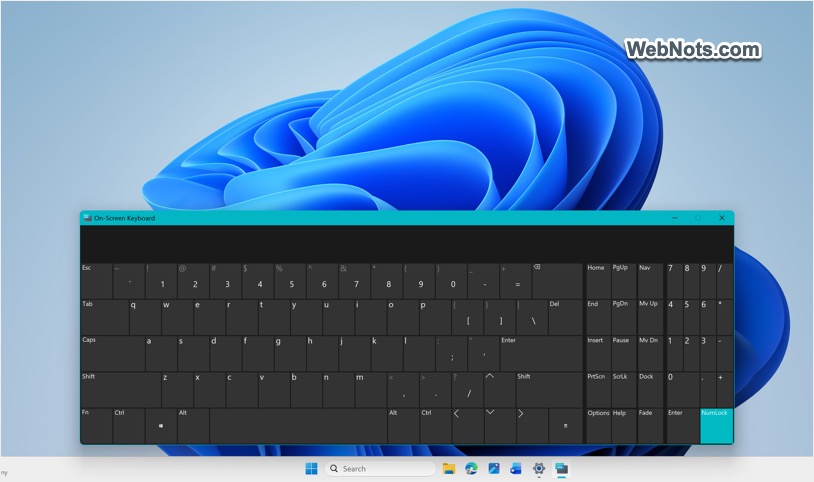
If your physical keyboard is damaged or a particular key is not working, you can use the Windows On-Screen Keyboard. The On-Screen Keyboard displays a virtual keyboard on your desktop, allowing you to select keys using your mouse or touchscreen.
- Go to “Settings > Accessibility > Keyboard” section and turn on “On-Screen Keyboard”. Alternatively, press Windows + Ctrl + O keys to launch the keyboard.
- Locate and click the Print Screen key on the virtual keyboard to perform the screenshot action.
Note: On touchscreen devices, press the Windows button and the volume-down button simultaneously to capture the screen.
6. Take Screenshots Using Microsoft Office Apps
You can also capture screenshots directly from Microsoft Office applications like Word, PowerPoint, or Excel. These apps include a screenshot feature that allows you to insert images of open application windows into a document.
- Open Microsoft Word, Excel, or PowerPoint.
- Open the document where you want to insert the screenshot.
- Go to “Insert” tab and click the “Screenshot” option in the Illustrations group.
- Select an available window thumbnail to insert a screenshot of that window.
- Otherwise, select “Screen Clipping” option that allows you to select a portion of the screen.

7. Take Screenshots Using Third-Party Applications
Third-party applications can provide advanced features such as scrolling screenshots, automatic image uploads, annotation tools, and configurable keyboard shortcuts. Some commonly used screenshot applications include:
- ShareX: Offers advanced capture options, image annotations, and automated workflows.
- Greenshot: Provides screenshot capture and annotation features.
- Lightshot: Offers simple screenshot capture and sharing features.
- Snagit: A premium app to capture windows, specific portion, and record screen.

Where Are Screenshots Saved in Windows 11?
The location of a screenshot depends on the method you use. Here are the most common locations and behaviors.
| Screenshot Method | Where the Screenshot Goes |
|---|---|
| PrtSc | Usually copied to the clipboard or opens the Snipping Tool, depending on your settings |
| Alt + PrtSc | Copied to the clipboard |
| Windows + Shift + S | Copied to the clipboard and made available through the Snipping Tool |
| Windows + PrtSc | C:\Users\<Username>\Pictures\Screenshots |
| Snipping Tool | Can be saved to a chosen location; automatic saving under Pictures > Screenshots. |
| Xbox Game Bar | C:\Users\<Username>\Videos\Captures |
| Microsoft Word | Inserted directly into the document |
Frequently Asked Questions
Windows 11 includes a setting that allows the Print Screen key to open the Snipping Tool. As mentioned above, you can change this behavior under “Accessibility” settings.
Yes. Use the time delay feature in Snipping Tool to capture when the dropdown menu is visible.
You can often capture the visible video frame using the Snipping Tool or another screenshot method. However, some protected video content may appear black or prevent screenshots because of digital rights management restrictions.
Open the screenshot in the Snipping Tool or Microsoft Paint. You can crop the image, add annotations, highlight important areas, and save the edited version.
The built-in Snipping Tool does not provide a general-purpose scrolling screenshot feature for capturing an entire long webpage or document. For that task, use a browser’s built-in full-page screenshot feature, where available, or a suitable third-party application.
Yes. Windows 11 includes screen recording options in the Snipping Tool and Xbox Game Bar. In the Snipping Tool, press Windows + Shift + R to open the video capture interface. Xbox Game Bar is useful for recording supported applications and games.