Hosting companies like HostGator and Bluehost were popular in earlier days due to blogging boom. However, other companies like SiteGround grown up considerably compared to these EIG companies (now called Newfold Digital). If you are using HostGator and the hosting plan is going to expire, it is a good idea to look for SiteGround. The migration from HostGator to SiteGround is free but a lengthy process depending upon your site’s current setup. Also, check out how to migrate Bluehost site to SiteGround using a hassle-free method.
Why to Choose SiteGround?
Every company has its own advantages and disadvantages. SiteGround offers less than $3 initial purchase and the renewal is at $17.99 per month for the lowest StartUp plan. This is similar to HostGator’s lowest Hatchling plan for shared hosting. Though SiteGround does not offer 1-year free domain, it has better options:
- Free email
- Multi-level caching
- Free CDN with limited features
- 30 days automatic online backup
- Stagging and Git for GoGeek plan
- Highly rated customer support

SiteGround Web Hosting
Get super fast managed WordPress hosting with free email, CDN, ultrafast PHP and three levels of caching on Google Cloud Platform.
1. Delete Site from Cloudflare
As mentioned, the process highly depends on your domain registrar, CDN and email setup. Go to step 2, if you are not using Cloudflare or any other CDN which changes nameservers. If you are using Cloudflare CDN, you must remove your site from Cloudflare and change the DNS pointing to your HostGator nameservers. This is because Cloudflare does not offer any option to rescan DNS when you change the hosting company. Removing the site will delete your current DNS zones with HostGator IPs and then adding the site again will start using SiteGround server’s IP. Though you can also manually edit the DNS entries in Cloudflare to point to SiteGround, deleting and re-adding will do that automatically for you.
- Login to your HostGator account and navigate to “Websites > Site’s Settings > Overview” and find your current nameserver details.


- Go to your domain registrar’s website and replace Cloudflare DNS nameservers with HostGator. Below is the screen from GoDaddy for changing nameservers.

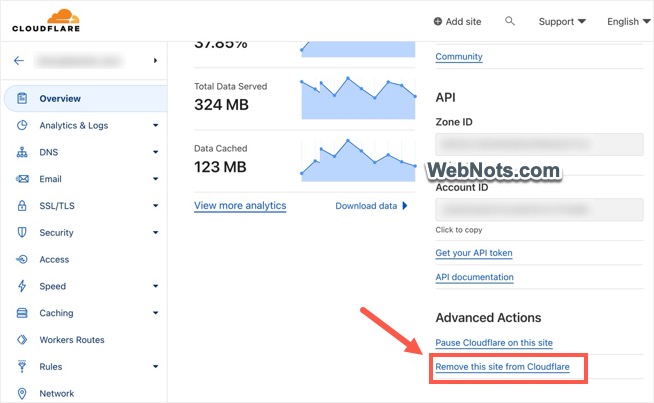
- Go to your Cloudflare account and click “Remove this site from Cloudflare” link showing on the bottom right corner of the dashboard. Confirm your action to delete the site from your account.
Wait for some time and check the is accessible through HostGator servers. Earlier, it used to take few days for propagation of DNS changes. Nowadays, this is no more the case and you hardly need to wait for few minutes to see your site is working through HostGator (not through Cloudflare). You can use any online DNS checker or hosting server checker tool to confirm your site is showing HostGator nameservers and IP address.
Also note that, all configuration settings in Cloudflare will be available as before when you re-add the site. So, you do not need to reconfigure again.
2. Adding a Site and Generating Migration Key in SiteGround
The migration process works with SiteGround Migrator plugin which needs an API key to connect with SiteGround hosting account. For generating the key, login to your SiteGround hosting account and click on “New Website” button under “Websites” tab.

- Since you already have a site existing in HostGator, select “Existing Domain” option, enter your domain name in the box and click “Continue” button.

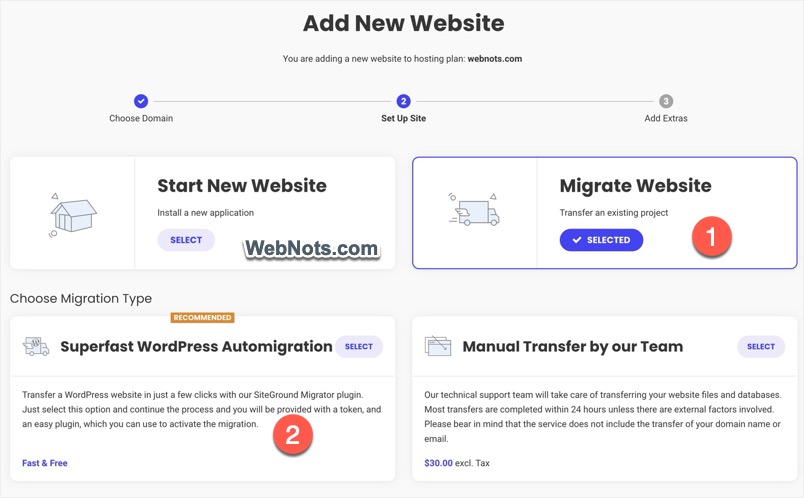
- Select “Migrate Website” option and then click on “Superfast WordPress Automigration” which is a free option.
- Ignore if you are prompted to buy any add-on like Site Scanner or CDN and click on “Finish” button.

- SiteGround will create a new site in your account which may take few minutes.

- Once the site is created successfully, you will see few options for downloading the plugin, migration token and nameservers. Just click the “Copy” link next to the token to get the key in your clipboard.

Note: Anytime you can go to “Site Tools > WordPress > Migrator” section to get the migration token key.
3. Install SiteGround Migrator Plugin on Existing Site
Login to you current WordPress site (which uses HostGator) and go to “Plugins > Add New” section. Find and install “SiteGround Migrator” plugin which is available for free in WordPress repository.

4. Link Migration Token in Plugin
Once the plugin is activated, go to “SG Migrator” menu. Paste the copied migration token and click on the “Start Migration” button. You can also provide an email address as optional to get a notification when the migration process is completed.

The process will start and the plugin will download all your files to SiteGround account. You can monitor the download progress or navigate to any other page and continue your work. However, do not create any new content as it will not reflect in your new SiteGround site.

If everything goes fine, you will see a message showing “Data Transfer Complete” message as shown below. On this screen, you will not see any temporary URL or nameserver.

However, you will get a clear email with the temporary URL link and nameservers. So, make sure to provide an email address when entering the migration token at least to get these details.

5. Check Temporary Site and Change to SiteGround Nameservers
This may be confusing you as you have added an existing domain but the migrator plugin still created a temporary URL. This is because, the plugin ALWAYS creates a temporary URL which will be accessible for 48 hours. You can check the site using the temporary URL and confirm everything works fine.
Next step is to change the DNS nameservers to SiteGround IPs so that your site will start working though new setup. Simply go to your domain registrar and change the nameservers to ns1.siteground.net and ns2.siteground.net. These are the default nameservers for SiteGround which you should receive in the email.

Open your site in a browser tab and check everything is working fine. As mentioned, you can use DNS or hosting checker tools to confirm the site works through SiteGround setup.

6. Install SSL in SiteGround Site Tools
One important point is that SiteGround does not automatically install SSL for the migrated site. So, go to Site Tools section and navigate to “Security > SSL Manager”. Here, you can install free Let’s Encrypt SSL for your site.

After installing SSL, go to “HTTPS Enforce” section and enable your site for only using HTTPS protocol. This is necessary if you have ecommerce store to make sure everything works only through HTTPS.

7. Readding Site in Cloudflare
SiteGround offers in-built free CDN with limited features. You can check the options under “Speed > CDN” section and decide whether to use that or not. If you decided to use Cloudflare, simple go to your account and add your site. This will rescan your DNS and add SiteGround entries. You can check and delete in case if there are any HostGator DNS entries still showing in the editor.
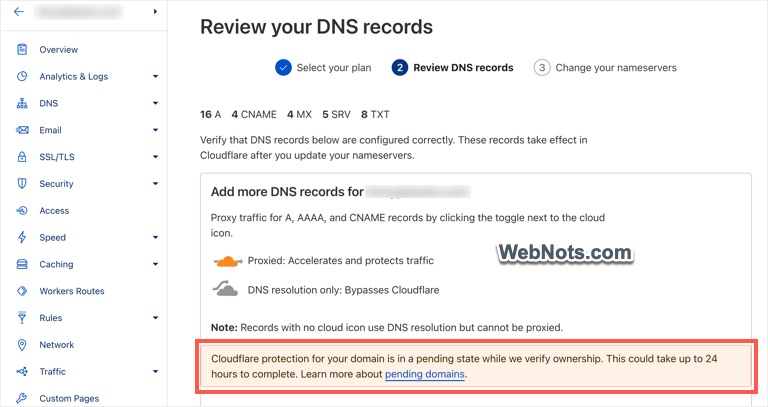
Though normal domains will wait for 24 hours in pending status, readding the same site will take an hour or two. You do not need to worry about this as old settings will be retained and the traffic will go through Cloudflare once the domain is approved.
8. Email Setup
If you are using any third-party email service with your HostGator IP, make sure to change that to SiteGround. By default, SiteGround DNS will have three MX entries for emails (which also will be added to Cloudflare). You can setup and start using SiteGround Webmail from Site Tools section.
Final Words
Once everything is completed successfully, make sure to stop auto renewal and permanently delete your site’s content from HostGator account. Now, you can login to WordPress admin section and start publishing new content.