Plugins are the lifeline for any WordPress.org website. Whether you want to add a review schema, sell digital products online, or add data tables, you have a plugin for that. If a free plugin is not available in WordPress repository, you can purchase a premium plugin from third-party websites and marketplaces. However, the problem comes when a plugin is used only on few pages but loads its resources (CSS & JS files) on entire site. The solution is to disable the unused plugins on specific posts so that it is not loaded on those pages at all.
Example Scenarios
Here are some of the scenarios where you might want to disable plugins on selective posts / pages:
- A contact form plugin is used on few pages and you don’t want the plugin to load CSS / JS on all other pages on your site.
- You have an online store with WooCommerce plugin and wanted to load the plugin only on shop and product pages and not on the blog posts.
- You are using a review plugin to include schema with star ratings only on few posts. All other pages / posts should not load the review plugin at all.
Note: It is also possible to remove unused CSS on page level. This will combine the used CSS from all your plugins and theme and loads inline in the header or as a separate file. We don’t recommend this as it will break your layouts and the plugin’s JS files will be still loading.
Disable Plugins with Perfmatters
Ideally, you can dequeue JS and CSS files of unnecessary plugins so they do not load at all. However, this type of optimization typically requires a developer, as it involves modifying how assets are enqueued. Ironically, you need another plugin, such as Perfmatters, to disable existing plugins on your site. Perfmatters is a premium-only plugin, but it is very easy to use.
- Go to Perfmatters site and purchase the plugin. You can get up to 30% discount using the coupons here.
- Install and activate the plugin on your site. Go to “Tools > Perfmatters > License” section and activate your premium license.
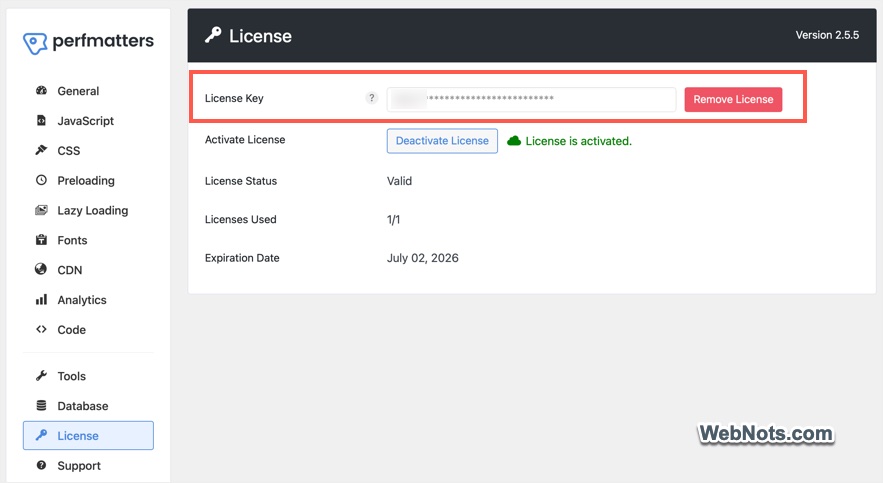
- After that, go to “Tools” section (within Perfmatters menu and not on admin sidebar) and turn on “Script Manager” option.
- Click “Save Changes” button to apply your changes.

Using Perfmatters Script Manager
The plugin offers a dedicated Script Manager tool for handling resources on individual post or page level.
- Edit your post or page (or custom post type) where you want the plugin to load (for example, your contact page where you want to load the contact form plugin and disable on all other pages).
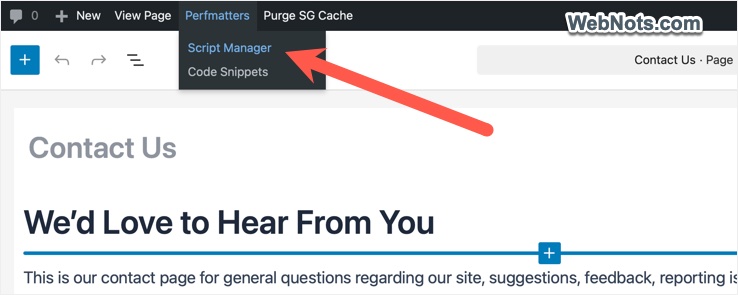
- Hover over the “Perfmatters” menu on top menu bar and select “Script Manager” option.
- Script Manager will show all resources loaded on that page grouped by plugins, themes and miscellaneous.
- Find the plugin and select “Everywhere” for “Disabled” to disable the plugin on entire site.
- Select “Current URL” as “Locations” under “Exceptions” heading.
- Click “Save Changes” button.
- Now, click the “Edit Page / Post” from top menu bar to get back to the editor.
- Publish or save your content.

That’s all!!! Now, the disabled plugin will not be loaded anywhere on your site except that excluded page. You can also exclude the plugin from loading on post type level (for example – load the page builder plugin only on pages).
View and Manage All Exceptions
If you are excluding the plugins on various pages, it will be difficult to remember the whole picture. Perfmatters make this easier for you:
- Go to “Global View” section in Script Manager.
- Here, you can view all exceptions under “Disabled” and “Enabled” headings.
- Hove on any item and click the trash icon to delete any rule that you don’t need.

Testing Your Site
After disabling the plugin, open that post or page in a new browser window and check the source code. You should not see the disabled plugin’s CSS and JS files loaded. However, there is also an option to test your changes only by administrators before deploying for all users.
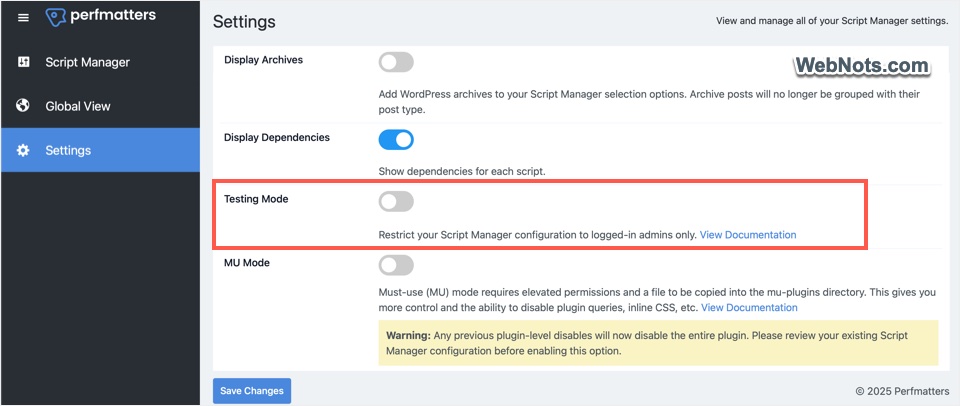
- When you are in the Script Manager, go to “Settings” tab.
- Turn on “Testing Mode” option and save your changes.
- Now, open the site in a new browser tab while remaining logged in as an administrator in a separate tab.
- Once you confirm that everything is functioning correctly, turn off “Testing Mode” so the changes are visible to all users.
Using MU Mode in Perfmatters
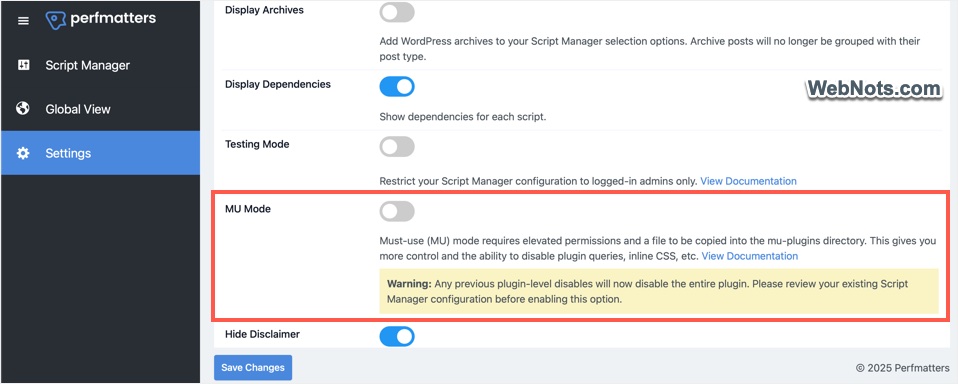
Though Script Manager works to disable CSS and JS files loaded by a plugin, it does not remove inline CSS / JS by default. Also, you can’t stop database queries triggered by the plugin (even if it is disabled) when the page loads. Perfmatters offers a tool called “MU Mode” within Script Manager for this purpose. This will completely dequeue all CSS / JS files, remove inline code and disable database queries.
- Go to “Settings” tab in Script Manager and enable “MU Mode” (Must-use Mode).
- This will copy a MU plugin (perfmatters_mu.php) to your /wp-content/mu-plugins/ directory.
- Now, go to “Script Manager” tab to disable and exempt plugins from “Script Manager” tab. When the plugin is disabled, you will see a “MU Mode” badge indicating it is completely removed.
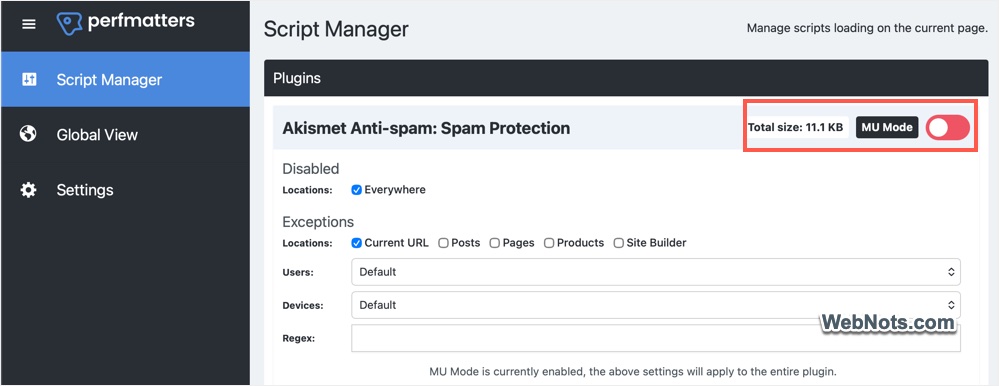
This is the correct way to completely disable a plugin on selective pages or posts on your site. However, MU Mode may not work on some hosting setups, which does not allow Muse-use plugins. In such a case, you will see an error when enabling that option. You can still use FTP and upload the file perfmatters_mu.php to /wp-content/mu-plugins/ directory or discuss with your hosting support to get help.
Free Option – Using Asset CleanUp
If you don’t want to spend money, then there is a free plugin available for you with limitations. It’s called Asset CleanUp and works exactly like Perfmatters plugin for disabling CSS / JS files from plugins.

However, you need to go for a premium version for stopping database queries and removing inline codes. That will cost $49 per year for a single site while you can get Perfmatters for $29.95 with Script Manager (prices are without discount). That’s the reason we recommend using Perfmatters with clean interface without upselling by locking features.