When using your computer, some apps and processes will always run in the background and consume resources without your knowledge. This may slow down the performance, especially on devices with limited hardware capabilities and affect the current task you are doing. So, disabling unnecessary background apps is necessary to boost performance and extend battery life on laptops and here is how you can do that in Windows 11.
Why to Disable Background Apps in Windows 11?
Background apps are applications that continue to run even when you are not actively using them. While this can be useful for getting real-time notifications and updates, it can also drain your system’s resources. Here is why you might consider disabling them:
- Freeing up RAM and CPU allows your system to focus on active tasks, resulting in faster speeds.
- Disabling background apps can reduce the power consumption of your laptop or tablet.
- Some apps may track your usage or run data-collection processes in the background. You should disable them to protect your privacy.
Finding Background Apps in Task Manager
You can use Task Manager to find which apps and processes are running in the background.
- Right-click on the Taskbar or Start icon and select “Task Manager” option.
- Go to the “Processes” tab and click on the “CPU” or “Memory” column to find the processes that consume more resources.
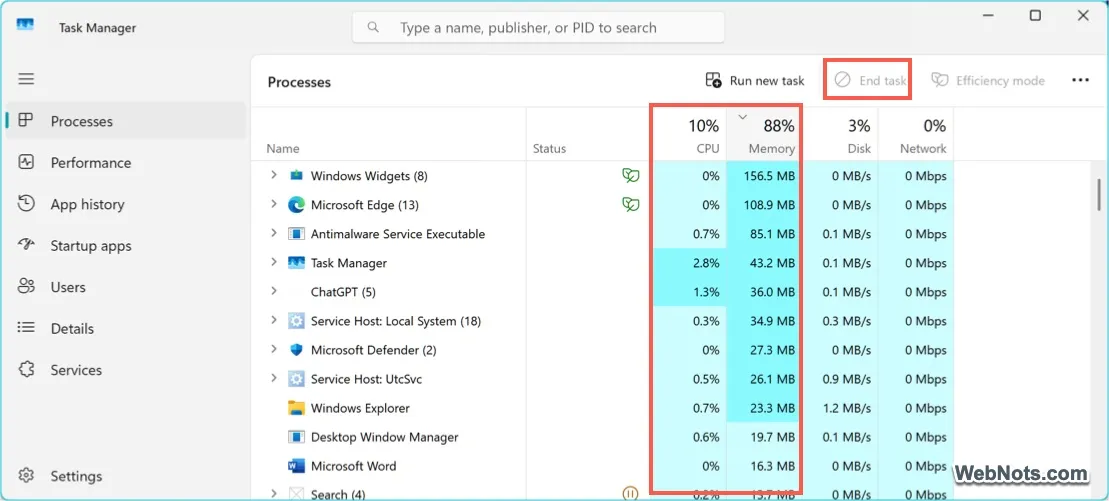
As an immediate and temporary measure, select the process name and click on the “End task” option to terminate it. Do this only if you are not running the app and you do not need that process. Otherwise, follow one of the below methods to disable the resource consuming apps running in background.
1. Disable Background App Permission from Settings App
This method is useful only if you know the app’s name from Task Manager.
- Right-click on Start menu button on Taskbar and select “Settings” option.
- Navigate to “Apps > Installed apps” section.
- Search and find the app name, you can use the search box to filter the app quickly.
- Click the “More options” icon and then select “Advanced options”.

- Find “Background apps permissions” section, click the dropdown menu and choose “Never” option.

This will prevent the selected app from running in the background, freeing up resources.
Note: “Advanced options” will be shown only for the applicable apps.
2. Use Battery Settings to Disable Background Apps
If you’re primarily concerned with battery life on a laptop or tablet, the Battery settings offer a way to restrict apps based on power consumption.
- Press “Windows Logo + I” keys to open Windows Settings app.
- Go to “System > Power & battery” section.
- Scroll down to find the “Battery usage” section and click on it to expand.

- Find the app that consumes more battery. Click on “More options” icons and select “Manage background activity” option.

- Click the dropdown below “Let this app run in background” and select “Never” option to disable it.

Note: “Manage background activity” option will be shown only for the applicable apps.
3. Using Local Group Policy Editor
If you are running Windows 11 Pro, Education, or Enterprise edition, you have the option to use Local Group Policy Editor to disable all background apps by setting a policy.
- Press “Windows Logo + R” key to open Run dialog box.
- Type gpedit.msc in the box and press “OK” button to open Local Group Policy Editor app.

- Go to “Computer Configuration > Administrative Templates > Windows Components > App Privacy” section.
- Find “Let Windows apps run in the background” policy and double click on it.

- Select “Enabled” option, click the “Default for all apps” dropdown and select “Force Deny” option.
- Click “Apply” and then “OK” button.

This will stop all Windows apps from running in the background, effectively boosting performance on your device. Users can’t change this setting for individual apps as explained in method 1 & 2.
4. Using Registry Editor
If you are using Windows Home edition, then using Registry Editor can help as Local Group Policy Editor app will not be available. However, be cautious with this method, as modifying the registry can affect your system if done incorrectly. Make sure to take a backup of your registry before doing changes.
- Search and open Registry Editor app. Click “Yes” if prompted by User Account Control.
- Copy paste the following path in the address bar and press enter to go to that location.
Computer\HKEY_LOCAL_MACHINE\SOFTWARE\Policies\Microsoft\Windows- Right-click on the “Windows” folder and select “New > Key” option.

- Rename the newly created key as “AppPrivacy”. Right-click on the right pane and select “New > DWORD (32-bit) value” option.

- Rename the DWORD as LetAppsRunInBackground and double-click on it. set the “Value data” as 2 and click “OK” button.

- Restart your system and all the background activities will be stopped after that.
Final Words
When you disable background apps in Windows 11, these applications are prevented from running processes, sending notifications, and updating data when they’re not actively open on your screen. This restriction frees up system resources like CPU and memory, reducing the strain on your device, and extend battery life by minimizing power consumption. However, you may lose real-time notifications and updates for those apps, so it’s best to disable only non-essential apps. If you decide you need an app to run in the background again, you can follow method 1 or 2 and re-enable background activity.