Building a website from scratch can seem like an overwhelming task, but platforms like Squarespace make the process much easier, even for beginners. Squarespace is a popular all-in-one website builder tool that offers a wide range of features to help you create a professional-looking site without needing to know how to code. In this guide, we’ll take you through everything you need to know to get started with Squarespace, from setting up an account to publishing your first site.
Introduction to Squarespace
Founded in 2004, Squarespace has grown into one of the most popular website builders on the market, serving millions of users around the world. Whether you’re an entrepreneur, a small business owner, an artist, or a hobbyist, Squarespace provides the tools to help you create a website that represents your brand and reaches your audience. You can build professional websites without the need for extensive technical skills.
Why Choose Squarespace?
Before diving into the technical aspects of Squarespace, let’s explore some of the reasons why you might want to choose it over other website builders:
- User-Friendly Interface: Squarespace is designed to be intuitive and easy to use. The drag-and-drop editor allows users to build and design their websites without needing to learn code.
- Beautiful, Responsive Templates: Squarespace offers a wide range of professionally designed templates that are mobile-responsive, meaning your website will look great on any device.
- All-in-One Platform: You can manage your website, domain, hosting, and ecommerce in one place. Squarespace also offers built-in SEO tools, analytics, and integrations with third-party services.
- Customizable: While the templates are pre-designed, they are highly customizable, allowing you to change colors, fonts, and layouts to fit your brand’s needs.
- Reliable Support: Squarespace provides 24/7 customer support through email and live chat, making it easier to get help when you need it.
Setting Up Your Squarespace Account
To start building your website on Squarespace, you first need to set up an account. Follow these simple steps:
Step 1: Getting Started
Go to Squarespace’s website and click on the “Get Started” or “Start a Free Trial” button. You’ll be prompted to answer few questions and then shown options to choose a template or build with AI.
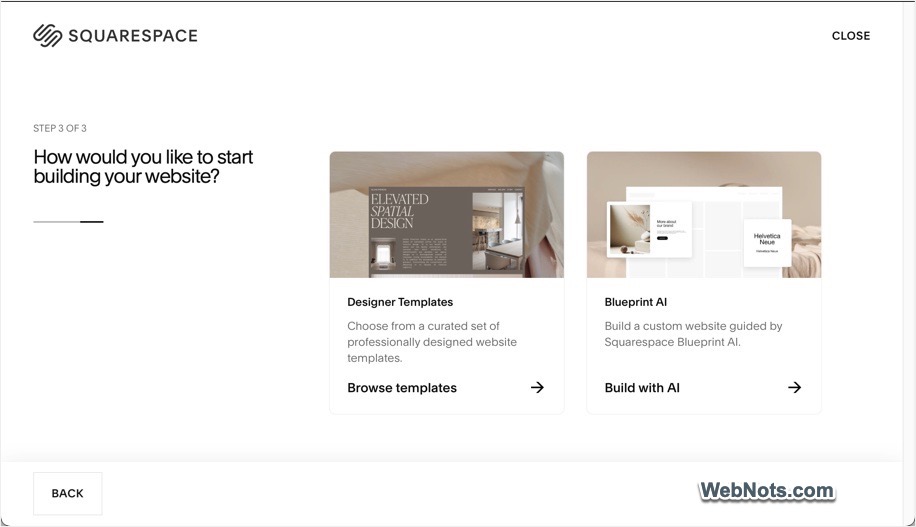
Step 2: Choose a Template or Start with AI
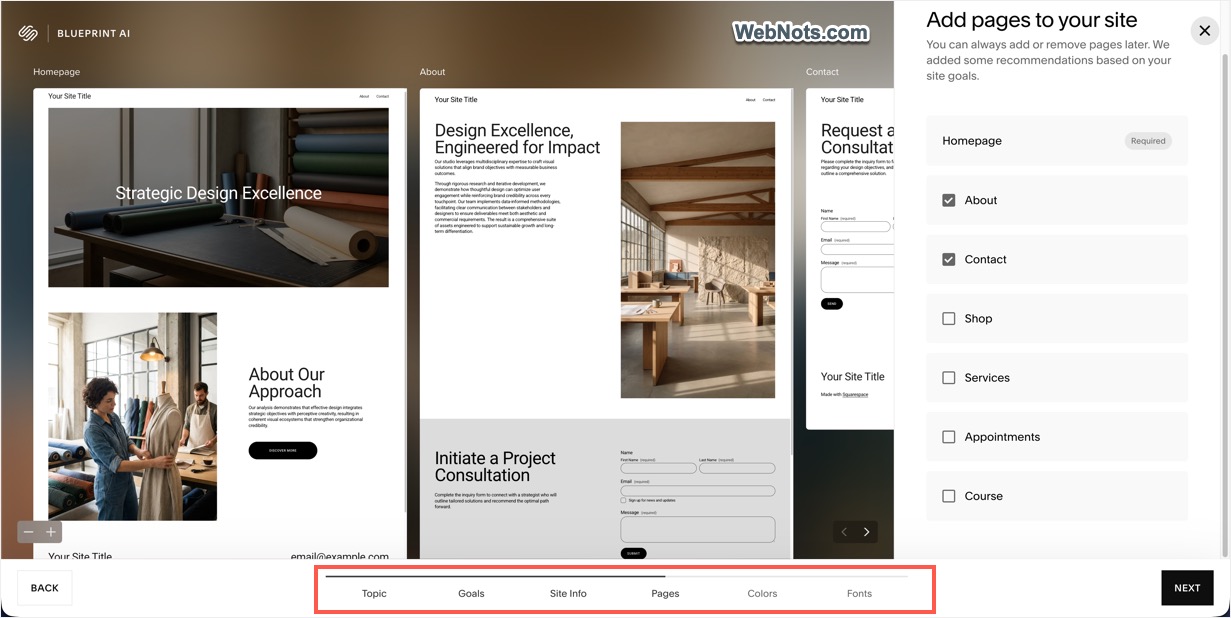
Squarespace offers Blueprint AI for creating your site based on a wizard. All you need is to go through a wizard and select applicable items (like sections and pages) for your site. AI will create a skeleton site based on your answers.
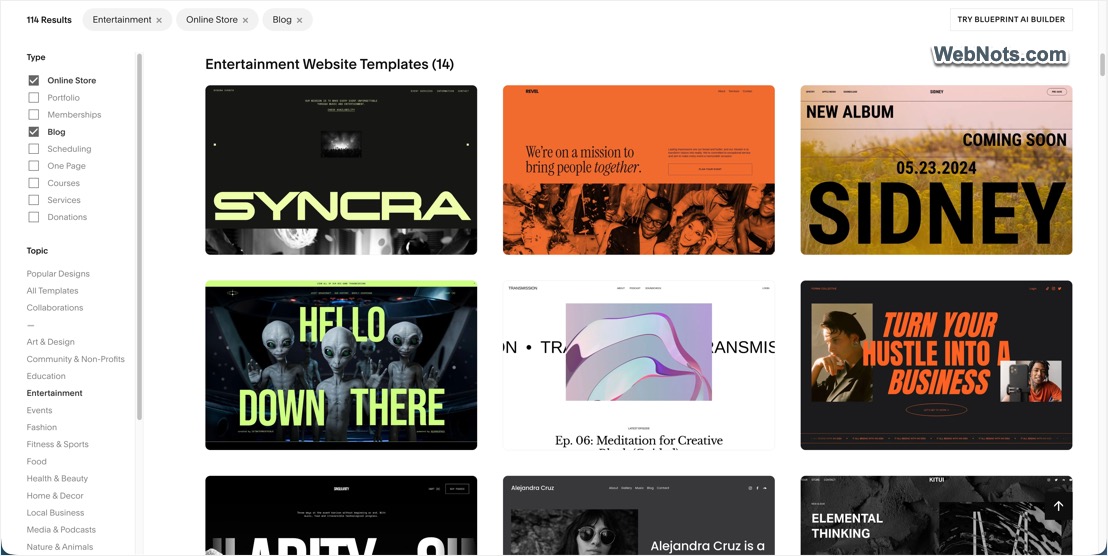
We recommend you to go with the manual option by selecting a template. This will help you to visually see the available templates and choose the one you like (suitable for your site). You will see various categories on the left sidebar to filter quickly and select a relevant template for your business type. After selecting a template, you can choose the preset colors to to start with that design.
Step 3: Start the Free Trial
After selecting a template, you’ll be directed to a page for creating an account. You can either sign up with an email address or use a Google or Apple account for quicker access. Squarespace offers a 14-day free trial, which gives you enough time to explore the platform and start building your website. You won’t need to provide credit card details until you decide to publish your site.
Warning: Be clear when choosing a template. Unlike the earlier versions (till 7.0), the latest Squarespace version with Fluid Engine setup does not allow you to change the template later. You can only customize the selected template to better suit your needs.
Navigating the Squarespace Dashboard
Once you’ve set up your account, you’ll land on your site’s dashboard. This is where you’ll manage all aspects of your website (specific site).

Let’s break down the main areas:
You can click the “Edit Menu” icon (next to search lens icon) and turn off some of these item on the left sidebar to keep your dashboard clean.
- Setup Guide: If this is the first time you are creating a website, we recommend you to go through this guide. This guide will show a steps and other articles to help in building your content.
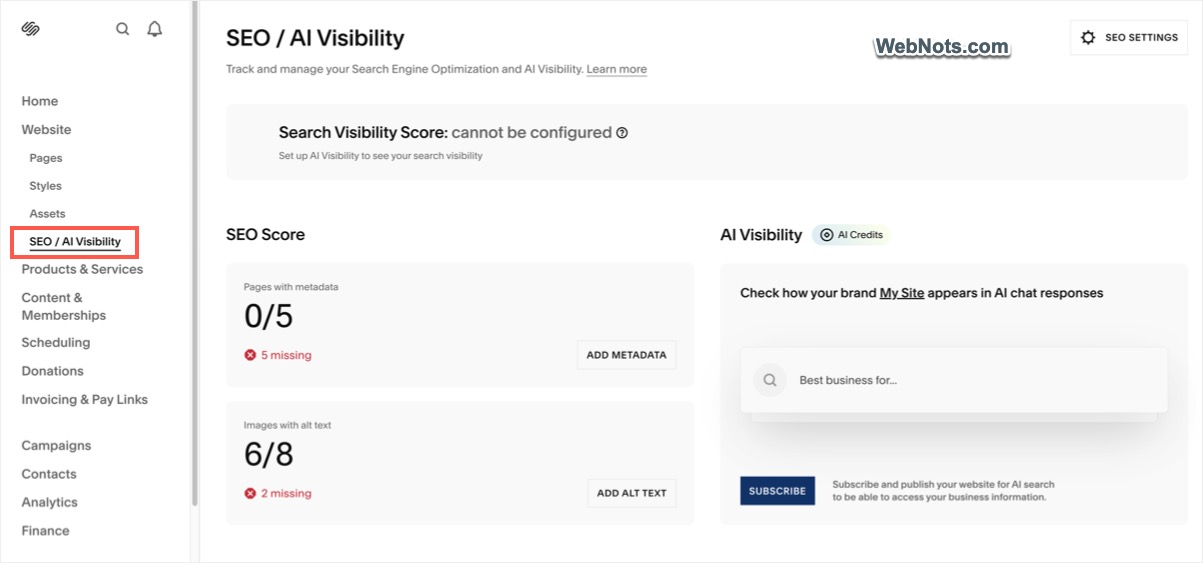
- Website: This is where you’ll add pages, organize blocks, and manage the content of your website. Select “Pages” start adding individual pages like your homepage, about page, and contact page. You can change the template’s style settings, including colors, fonts, and the overall layout under “Styles” section. “Assets” section shows all your site’s files like images and you can create folders to organize the files. The latest version includes “SEO / AI Visibility” section to monitor your site’s visibility in search engines and AI platforms.
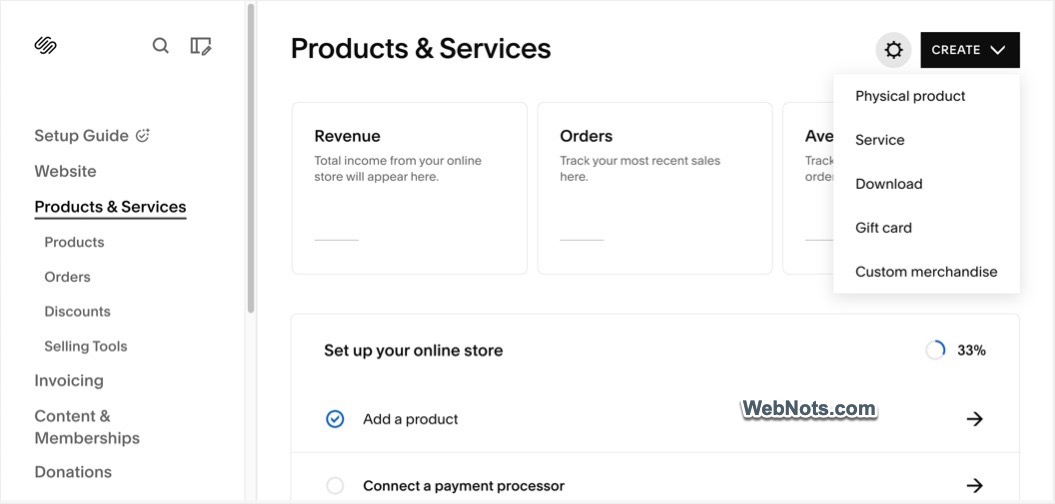
- Products & Services: If you plan to run an online store, this section will help you manage products, orders, discounts, and selling tools.
- Invoicing: Manage your invoices and projects here.
- Content & Memberships: From here, you can create pricing plans, courses, membership site, blog, etc. to manage orders and products related to that.
- Donations: Setup your donations, fundraiser or crowdfunding using the available tools.
- Scheduling: Schedule and accept appointment. This is a premium only feature for which you need to pay additionally. The lowest Emerging plan will cost you around $16 per month.
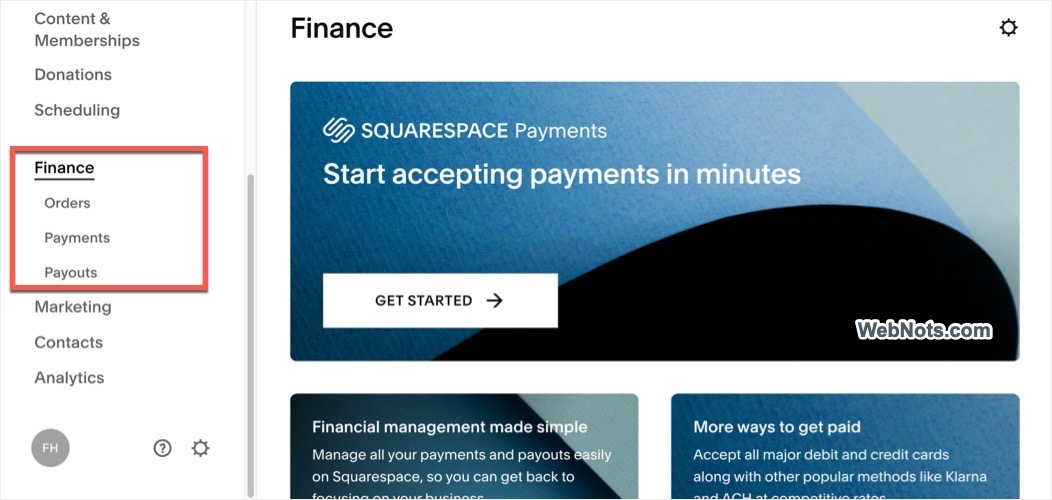
- Finance: Manage your orders, payments and payouts (like setup your Squarespace Payments).
- Marketing: Squarespace provides marketing tools like email campaigns, and discounts to help you grow your business.
- Contacts: Manage all your customers, subscribers and members.
- Analytics: Check traffic and sales analytics details.
- Settings: In this section, you can configure general site settings, including domain settings, SEO, and integrations with third-party services.
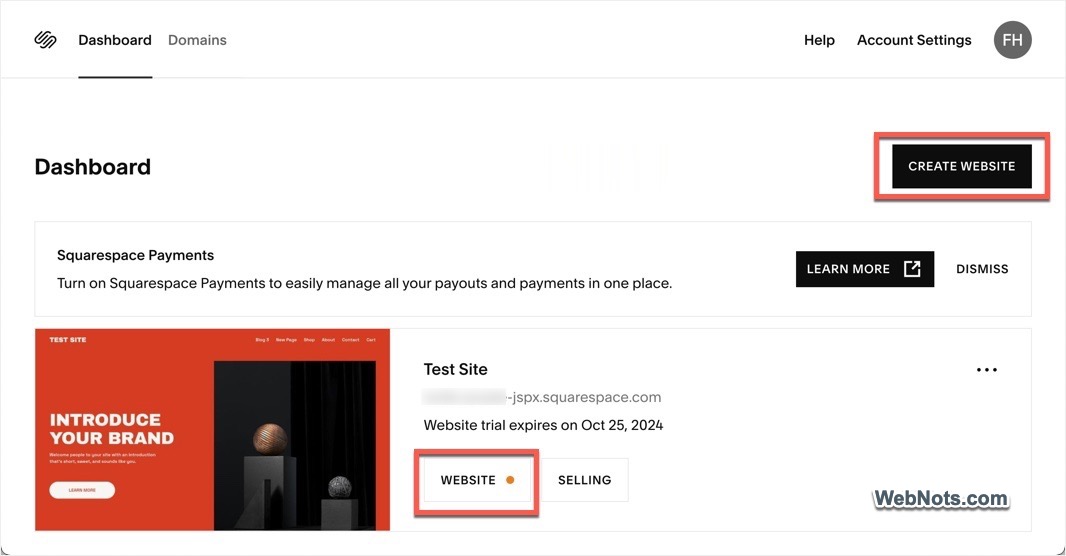
Note: If you have created multiple sites, you will first see a dashboard showing list of all your websites. You can select a site from the list and go to the site’s dashboard as explained above.
Customizing Your Template
Once you are in the site’s dashboard, go to “Website” section and click on the “Site Styles” icon (brush icon on top right section). Otherwise, go to “Styles” section under “Website” menu on the left sidebar. This will show “Site Styles” section allowing you to make adjustments to fonts, colors, and spacing. Here’s how to start:
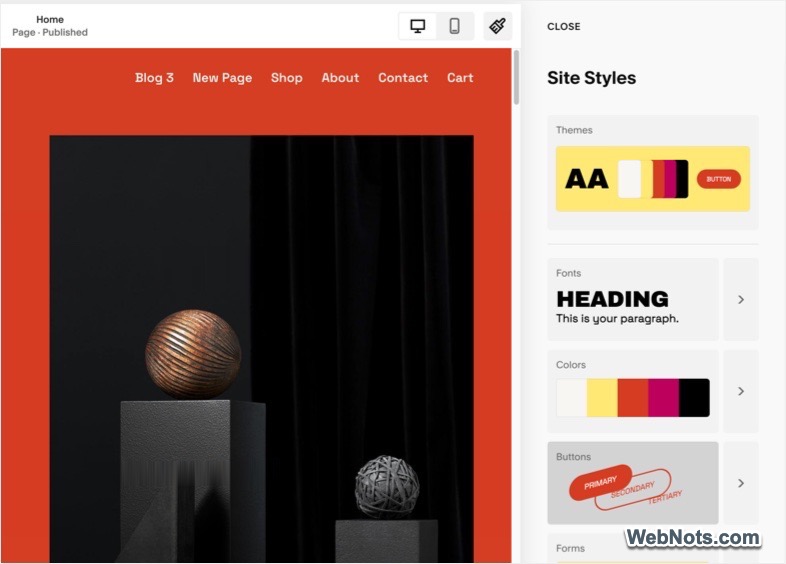
- Theme: Choose a preset theme for your template (this will not change the template).
- Fonts: Choose a font pack for your headings, paragraph, buttons, and other elements to match your brand.
- Colors: Adjust the color scheme to align with your brand’s colors. Squarespace provides pre-selected color palettes, but you can also input custom hex codes for precise color matching.
- Buttons: Select text style, shape, outline style, border radius, etc. for primary, secondary and tertiary buttons.
- Forms: Customize form element’s shape, fill, border, etc.
- Miscellaneous: Customize animations, spacing and image block setup.
Adding Pages and Content to Your Site
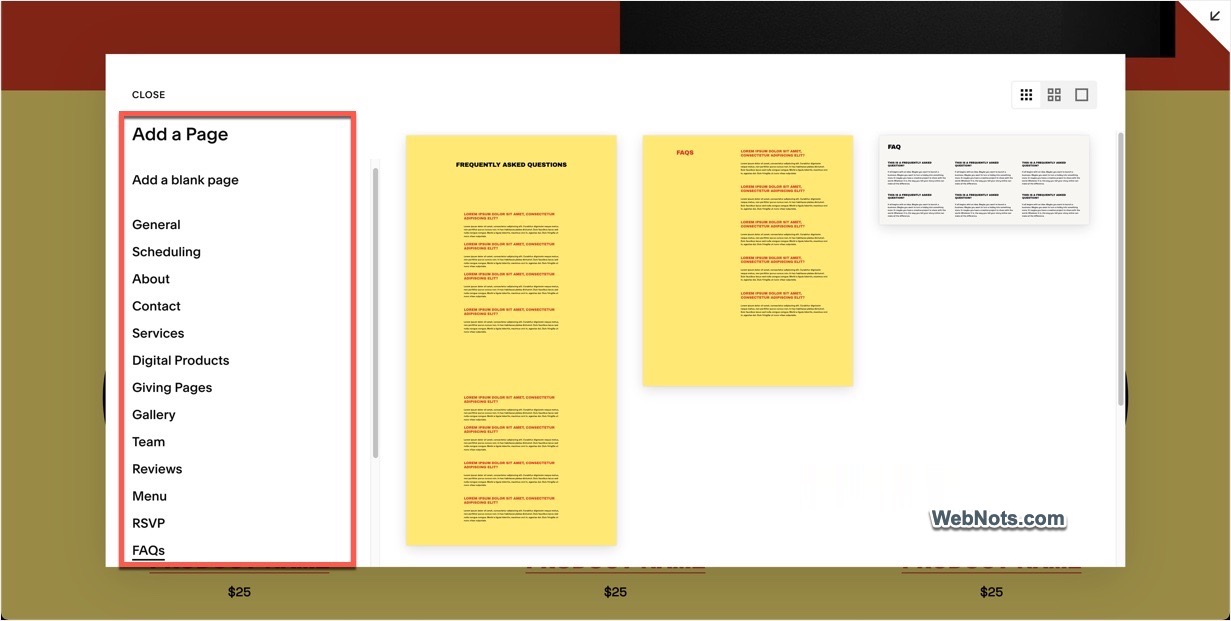
Adding content to your Squarespace site is a straightforward process. You’ll need to add different pages to structure your website. Click the + Icon next to “Main Navigation” and select the type of page you want to add like blank page, blog, portfolio or store.
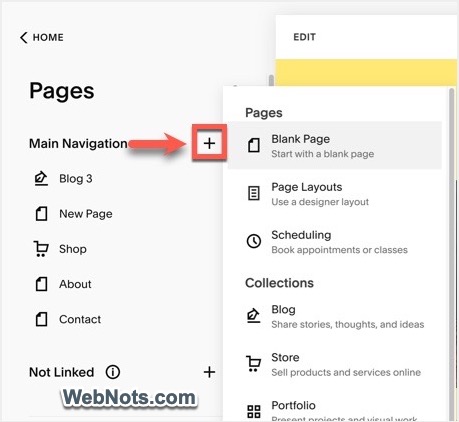
You can choose the predefined layouts from “Page Layouts” section. There large number of layouts you can find like FAQ, RSVP, Reviews, Team, Services, Contact, etc. So, you can simply select the layouts instead of creating from scratch.
Using Blocks to Structure Your Pages
Squarespace uses a block-based system to help you structure your content. Each page is made up of different blocks, such as text, images, videos, or forms. You can click an item on the editor to open relevant options. For example, clicking on the header menu will show “Add Elements” button and allows you to add buttons, social links, cart, etc. in header. Similarly, you can click on section in the editor to add a new block or edit that section.
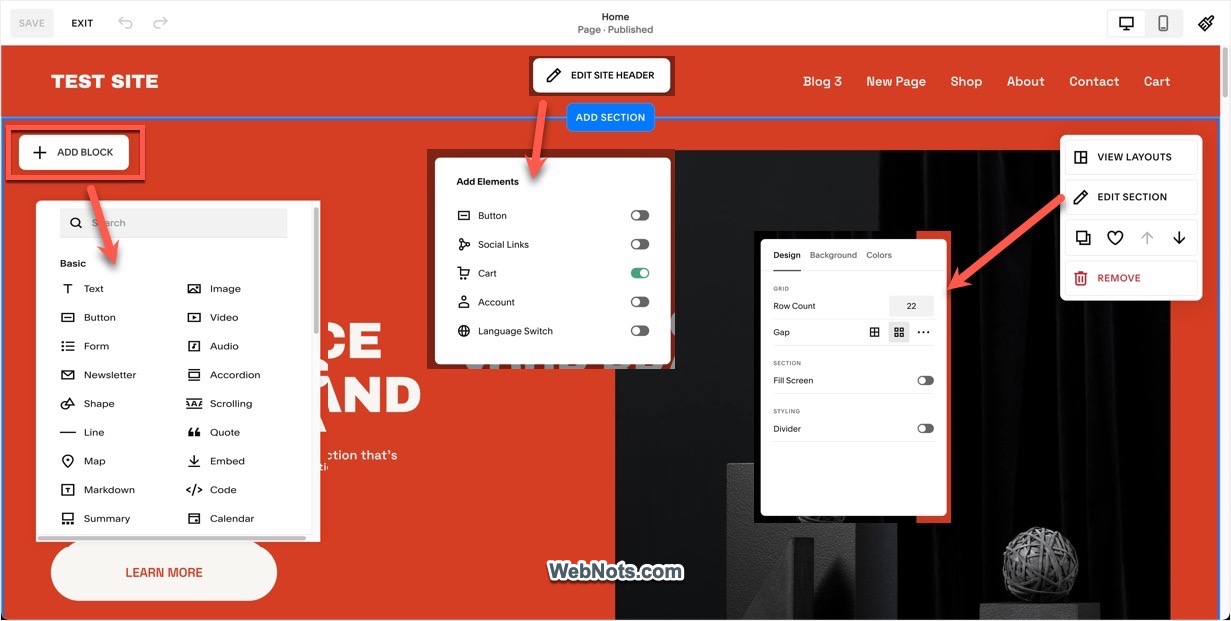
Here’s a breakdown of some commonly used blocks:
- Text Block: This is where you’ll add your written content. You can format your text with headings, lists, and links to create a readable and visually appealing layout.
- Image Block: Use this to upload images to your site. You can customize image alignment, size, and add captions or links.
- Gallery Block: Perfect for portfolios or visual content, the gallery block allows you to display a collection of images in various layouts, such as slideshows or grids.
- Form Block: This is useful for creating contact forms, sign-up forms, or surveys.
- Button Block: Add call-to-action buttons to encourage visitors to take specific actions, like signing up for a newsletter or purchasing a product.
- Code and Embed: Use these blocks to add third-party codes and embeds.
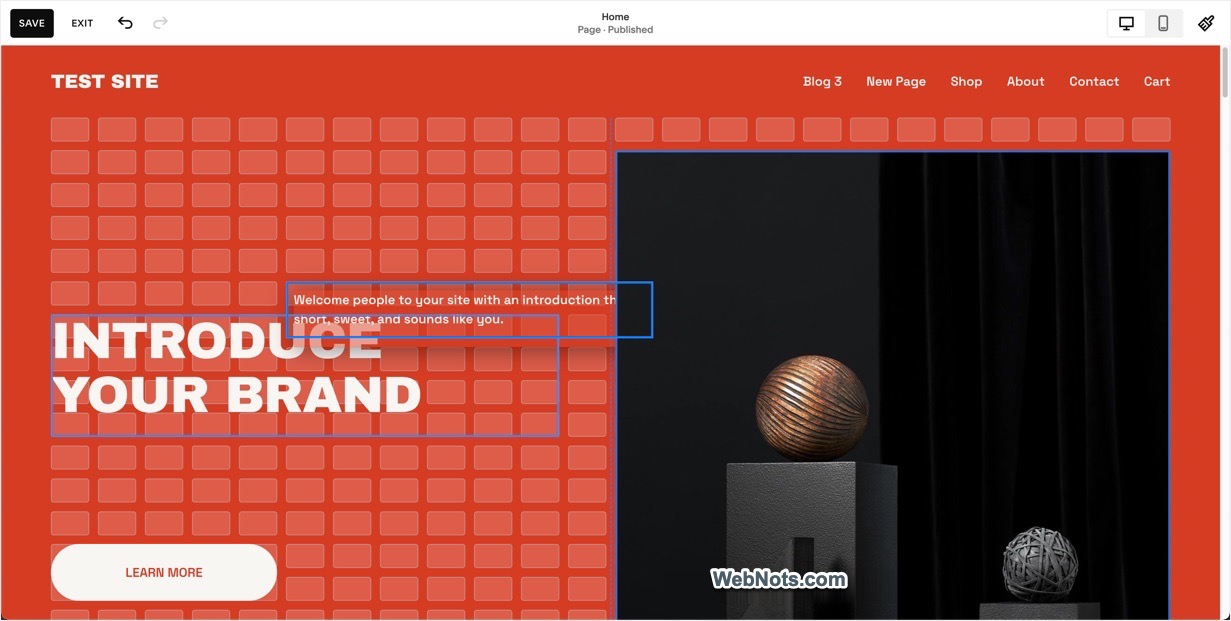
By dragging and dropping these blocks into place, you can create custom page layouts that suit your needs.
Optimizing for Mobile and SEO
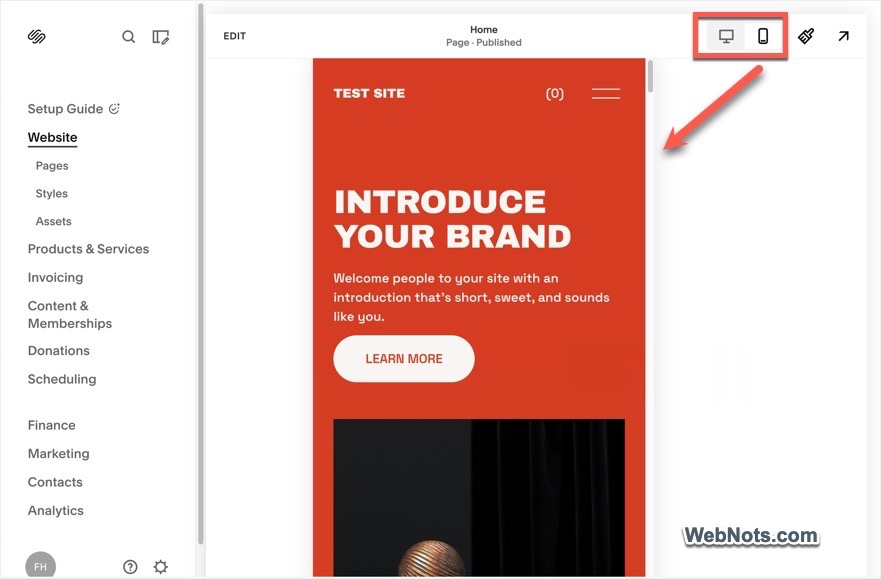
Mobile optimization is important in today’s web environment. Fortunately, all Squarespace templates are mobile-responsive, meaning they automatically adjust to fit different screen sizes. However, it’s still important to preview and tweak your site’s mobile layout to ensure it looks great on smartphones and tablets. You can toggle desktop and mobile views within the editor and adjust the content accordingly.
Mobile Optimization Tips:
- Keep your design simple and uncluttered.
- Ensure that buttons and links are large enough to be easily tapped.
- Test your site on multiple devices to ensure a consistent experience.
SEO Best Practices:
Squarespace has built-in SEO tools to help improve your website’s search engine rankings. Here are a few tips to get started:
- Page Titles and Descriptions: Add custom page titles and meta descriptions that include relevant keywords.
- Alt Text for Images: Always include alt text for your images, as this helps search engines understand your content.
- Clean URLs: Ensure your page URLs are simple and descriptive, rather than using random strings of letters and numbers.
- Blogging: Regularly publishing high-quality content is one of the best ways to improve SEO. Squarespace’s blogging platform makes it easy to add posts that are optimized for search engines.
Click the gear settings icon against each added page and fill your SEO details. For site level settings, click the gear icon showing at the bottom of left sidebar (next to help icon) on dashboard and adjust your favicon, social, language, and other site settings.
Integrating Ecommerce Features
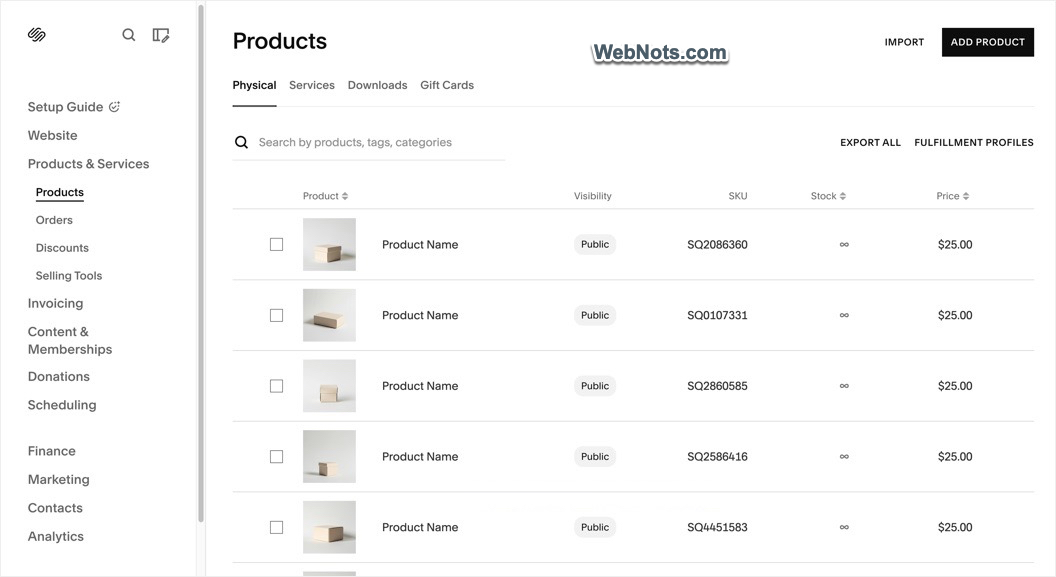
If you plan to sell products or services online, Squarespace has robust ecommerce features built in. Add your products under “Products & Services > Products” section from the dashboard.
Here’s a quick overview:
- Products: You can add products, set prices, and manage inventory. Products can be physical items, digital downloads, or even services.
- Payments: Squarespace integrates with payment processors like Stripe and PayPal, allowing you to accept credit cards and other payment methods. They also offer Squarespace Payments for limited countries.
- Shipping: Set up shipping rates based on weight, price, or location. Squarespace also integrates with shipping services like FedEx and USPS.
- Taxes: Automatically calculate sales tax based on customer location.
You can manage invoices, finance and other details from the dashboard as explained in the above section.
Managing Your Site and Launching
Once your site is ready, it’s time to launch. Before publishing, make sure you’ve reviewed the following:
- Proofread all content for spelling and grammar errors.
- Test your site on multiple devices and browsers to ensure everything looks and works as intended.
- Review your SEO settings to ensure your site is optimized for search engines.
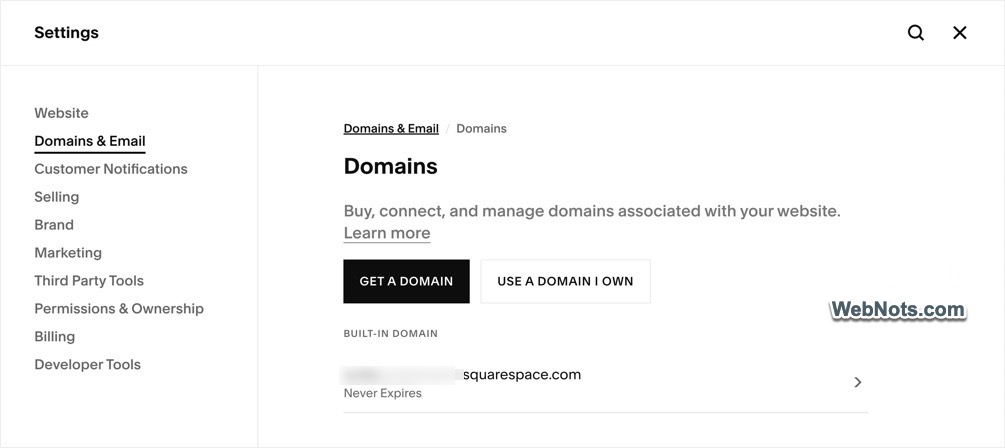
To publish your site, click on the “Settings” icon in the dashboard, go to the “Domains & Emails > Domains” section. From here you can either purchase a domain through Squarespace or link your existing domain from another provider. Once your domain is set up publish your site to make it live.
Squarespace Pricing and Plans
Squarespace’s pricing plans are based on geographical location. Unlike Weebly or Wix, Squarespace does not offer a free plan, though you can make use of the 14-days trail period. There are four pricing plans for USA users – Basic ($19/month), Core ($29/month), Plus ($49/month), and Advanced ($99/month). You will get ecommerce features under all plans, however, number of contributors, video hosting storage, and transaction fee are the major differences in higher level plans.
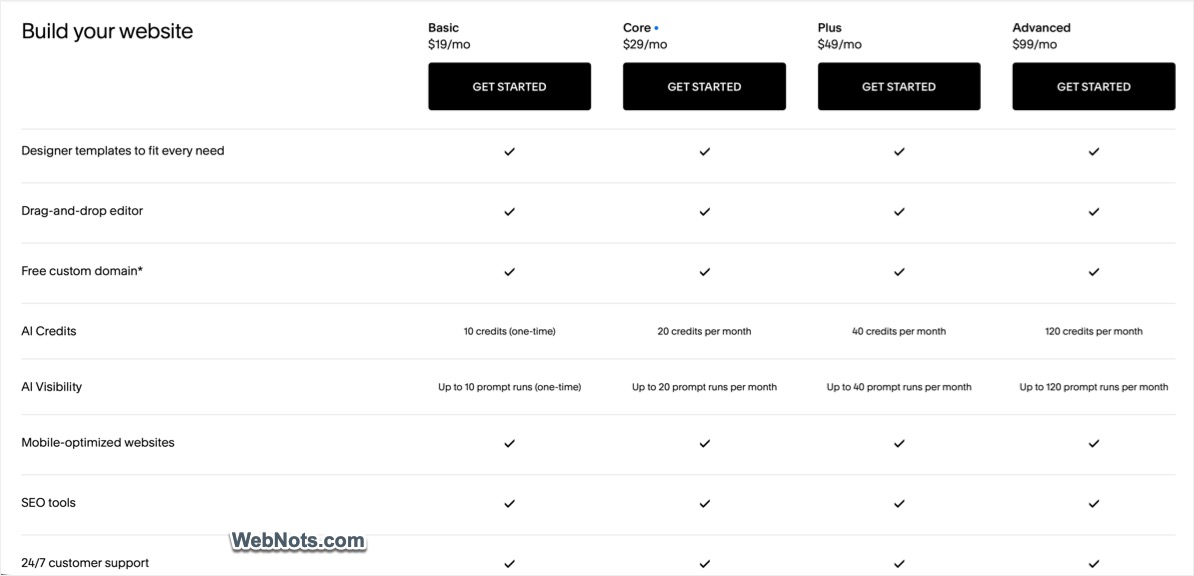
- Basic: Designed for individuals, personal websites, portfolios, blogs, and small websites. It supports up to two contributors and includes essential website and selling features. However, it has a 2% online store transaction fee and a 7% fee on digital content and memberships.
- Core: Aimed at growing businesses that need more flexibility. It adds unlimited contributors, advanced analytics, custom CSS and JavaScript, code injection, premium integrations, and more business features. The online store transaction fee drops to 0%, while digital content and membership fees are 5%.
- Plus: Designed for businesses with higher sales volume. It includes the advanced features of Core while offering lower payment processing costs, 50 hours of video storage, and a 1% transaction fee on digital content and memberships. Online store transaction fees are 0%.
- Advanced: The top standard plan, intended for established or high-volume online businesses. It offers the lowest payment processing costs, unlimited video storage, advanced commerce features, and 0% transaction fees for both online stores and digital content or memberships.
All plans include a free custom domain for the first year (with annual billing), SSL security, and 24/7 customer support.
Conclusion
Squarespace is an excellent option for beginners looking to create a professional, polished website without the need for coding skills. Its user-friendly interface, beautiful templates, and robust features make it possible for anyone to build and launch a website quickly. Whether you’re building a blog, portfolio, or online store, Squarespace provides the tools you need to succeed.
Now that you’ve got a handle on the basics, it’s time to start building your own Squarespace website. Take your time exploring the platform, customizing your site, and adding your content. With this guide, you’re well on your way to launching a stunning and functional website that reflects your brand.