By default, Windows PC will display the screens in white background with black color text. This is called light mode display and cause trouble to your eyes especially when you focus on the display on brighter environment. Though night mode option is available to set warmer colors, it will not help in changing the entire screen to dark something you can do in smartphones easily. Dark mode feature was already available from Windows 10 including for the apps like File Explorer. It enables you to change the display to black and the text to white colors and focus on the screen with cool eyes.
Using Dark Mode in Windows
Since the interface is different in Windows 10 and 11 versions, in this article, we will explain how to enable dark mode in both Windows 10 and 11 along with its impact on the appearance. Note that Apple macOS allows you to automatically schedule system wide dark mode based on day and night time. Unfortunately, this is not possible in Windows 11/10 with the default settings. You need third-party apps for scheduling dark mode in Windows PC.
Enable Dark Mode in Windows 11
- Press “Win + I” keys to open Windows Settings app.
- Navigate to “Personalization” section from left sidebar, scroll down on right pane and select “Color” option.

- Click the dropdown box against “Choose your mode” option and select “Dark” option from the list.

System’s appearance will be changed immediately when you change the color mode. Custom mode will allow you to set light or dark mode separately for Windows default items and apps. For example, default Windows default mode will affect components like taskbar and default app mode will affect apps like Notepad.

Below is how the File Explorer app in Windows 11 will look in dark and light modes.


Enable Dark Mode in Windows 10
- Type “settings” in Windows Search box and open Settings app.
- Click on “Personalization” option.

- Go to “Colors” section in the left pane and scroll down on the right pane.
- Choose “Dark” option under “Choose your default app mode” section.
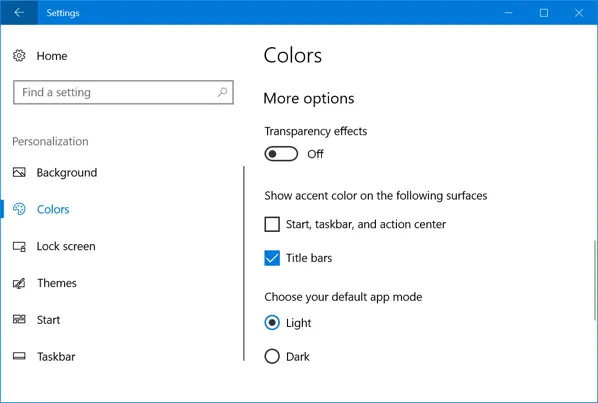
Below is how the light and dark mode will look like in Windows 10.


Bypassing System Dark Mode for Apps
Though dark mode in Windows will be applied to entire system including File Explorer, some of the Microsoft apps have their own settings to bypass system mode. This means you can use dark mode for Windows and light mode for the app. Below is how you can set custom color mode for some of the Microsoft apps:
- Notepad – click on the gear Settings icon showing on top right corner. Click “App theme” and select the color mode for the app.
- Calculator – click on the “Open Navigation” icon (three horizontal lines) showing on top left corner and select “Settings” menu. Click “App theme” and select your theme from the list.
- Edge – go to edge://settings/appearance page and select System default, light or dark mode as per your preference.
- Microsoft Office apps – go to “File > Options > General” section. Click the dropdown against “Office theme” under “Personalize your copy of Microsoft Office” heading and select the color mode. This works for all Office apps like Word, Excel and PowerPoint.
Remember, third-party apps may or may not follow Windows dark mode setting. Due to this reason, you may still see some third-party apps work with default white or grey background if they do not support Windows dark mode.