WordPress is a powerful content management system (CMS) widely used for its flexibility and simplicity. Among its many features, Status or Post Status is essential for managing the lifecycle of posts and pages. These statuses help you to organize, plan, and control your content effectively. In this article, we will explore different WordPress post statuses and how to change the status of posts.
What Are WordPress Post Statuses?
A post status in WordPress defines the current state of a post or page and affects the visibility. It could be a draft, published, or scheduled state and affects all type of content like posts, pages, and custom post types. Post statuses streamline content workflows, making them especially useful for bloggers, developers, and teams collaborating on projects.
For example, an author can create a post and set the status as “Pending” and then a proofreader can review it and change the status to “Scheduled”. Finally, the post will be “Published” and visible publicly on the schedule date. This is a common setup followed by sites with multiple authors and editors to have a streamlined workflow.
Default WordPress Post Statuses
WordPress includes several built-in post statuses for different use cases and control visibility.
- Manual post statuses – Draft, Pending, Published, Private, Scheduled, and Trash.
- Manual visibility controls – Password protect and Sticky.
- Automatic statuses – Autosave and Revisions.
1. Draft
A draft is an unpublished, editable version of a post. When creating a post in Gutenberg or Classic Editor, simply click on the “Save” button to keep the post in Draft status. These posts will NOT be visible publicly and can only be seen by logging into WordPress admin panel. After logging in, you can preview the draft post like any published content.
- Save posts as drafts while they are still in progress.
- Ideal for content that needs more research or refinement before publishing.
2. Pending or Pending Review
Pending status marks a post as ready for editorial review before publishing. As mentioned above, this is most useful in team workflows where one person writes the post, and another approves it (by publishing). However, there are no options in WordPress to indicate the reviewer rejected a post content. It will be still in a “Pending” status and you can create a custom status for rejection state as explained at the end of this article.
3. Published
This makes a post live and visible to all website visitors publicly. Make sure to proofread, add featured image and fill up SEO settings before publishing. WordPress will also show a checklist to verify the author and other settings before publishing. In addition, WordPress and the installed plugins do plenty of stuffs when a post status is changed to published:
- Post is added to archive pages like blog index, categories, tags, and feed.
- SEO plugins will add the post to XML Sitemap.
- Caching plugins will purge the cache of relevant archive pages and homepage to show the latest content.
- CDN services like Cloudflare will instantly feed your content to search engines using IndexNow API.
- Search engines will start crawling and indexing your new posts.
4. Private
This state makes a post visible only to logged-in users with the appropriate role, such as Administrators or Editors. You can use this status for internal notes, restricted content, or team communications.
5. Scheduled
Scheduled posts will be automatically published at a specific date and time in future. This is perfect for maintaining a consistent posting schedule, announcing an important event, or a discount deal.
6. Trash
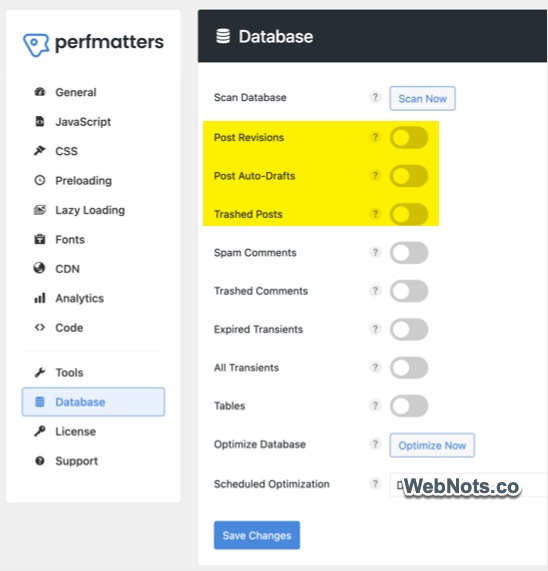
This is similar to Trash or Recycle Bin where all your deleted posts are stored temporarily. You can move unnecessary posts to Trash to declutter your dashboard. It is possible to restore the posts from Trash or delete them permanently. WordPress will also automatically empty the Trash after 30 days or you can use cleanup plugins like Perfmatters to schedule a task for this purpose (it can also help to delete revisions and autosaves from database).
7. Password Protected
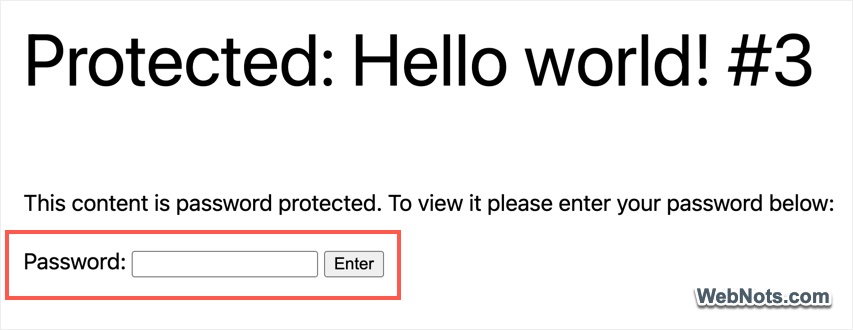
Though this is not a status, you can combine this with other statuses like Draft, Pending, Scheduled and Published. This protects a post with a password so that only users with the password can view it. Even the post is protected, the post URL will be included in all archive pages and in XML Sitemap if it in published state. This is ideal for sharing exclusive content with specific users without requiring them to log in.
Note that Private status and password protection can’t be used together.
8. Sticky
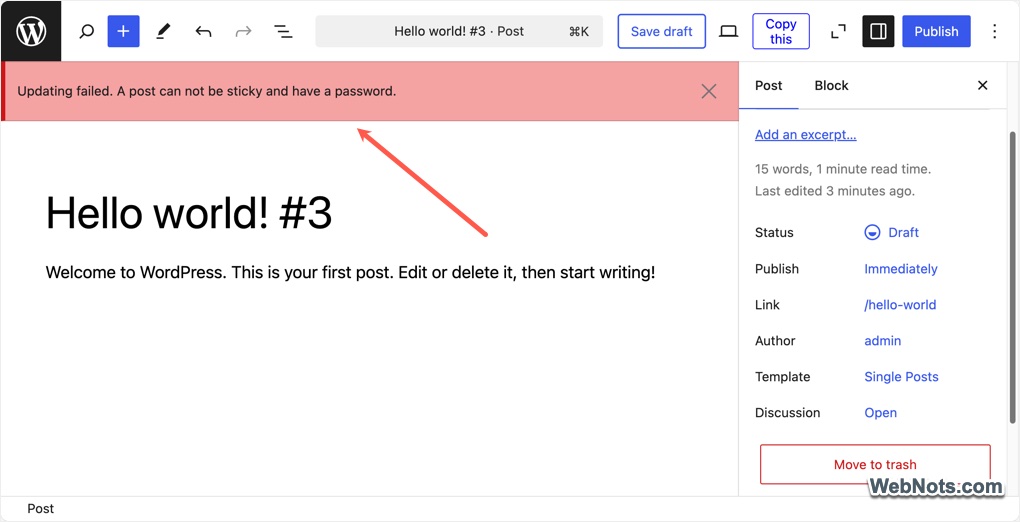
Sticky posts are pinned to the top of your blog page, ensuring they remain visible regardless of publication date. You can use this status for important announcements, featured articles, or popular posts. This can be used along with any other statuses including Private. However, you can’t use password protection for a sticky post.
9. Autosave or Auto-Draft
This is a status for posts automatically saved by WordPress during the editing process (whenever you save, publish or update the content). The primary purpose is to prevent data loss, and you can’t manually assign a post to Autosave status.
10. Revisions
WordPress will also automatically save post revisions periodically. By default, your content will be saved every 60 seconds as a revision so that you can restore them anytime if the connection is lost or you want to revert to older content. This is also automatically done in the background, and you can’t create revisions manually. In fact, autosave is part of revisions and both of them are stored in database. The difference is that a post can have only one autosave while unlimited revisions are possible.
Change Post Status in WordPress
Go to “Posts > All Posts” to view the status of individual post as well as filter options are added on the top. Other than Published status, all other options will show at the end of post title like “Post Title – Scheduled” or “Post Title – Sticky”.
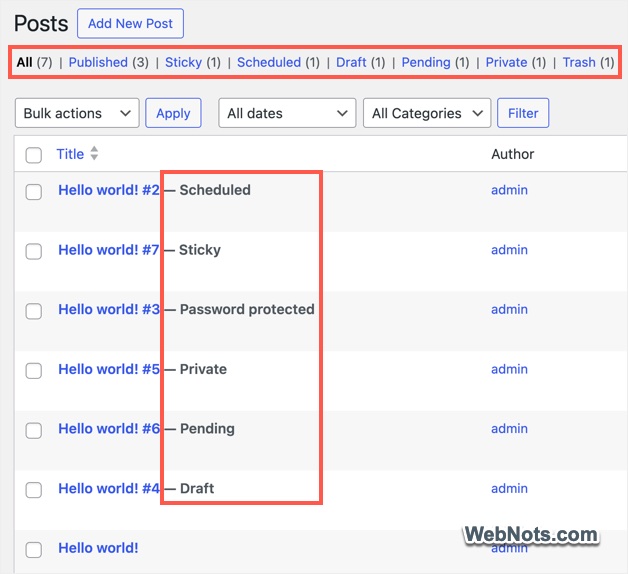
You can change the status for single post or bulk change as you need.
Single Post:
- Navigate to “Posts > All Posts” in the WordPress dashboard.
- Click on the post title or “Edit” link under the post you want to modify. Otherwise, click on the “Add New Post” button to create a new post.
- Enable right sidebar by clicking on the “Settings” icon and then navigate to “Post” tab.
- Click on the current status showing against “Status” to open “Status & visibility” pop-up.
- Select a new status from the list (Draft, Pending, Private, Scheduled, or Published).
- Choose Password protect or Sticky options if needed.
- Close the pop-up after making changes, click the Update, Save, Save Draft, or applicable button to apply the new status.

If you have selected “Password Protect” option, provide the password to protect your post content. Similarly, provide the date / time for “Scheduled” option.
Bulk Changing Post Status:
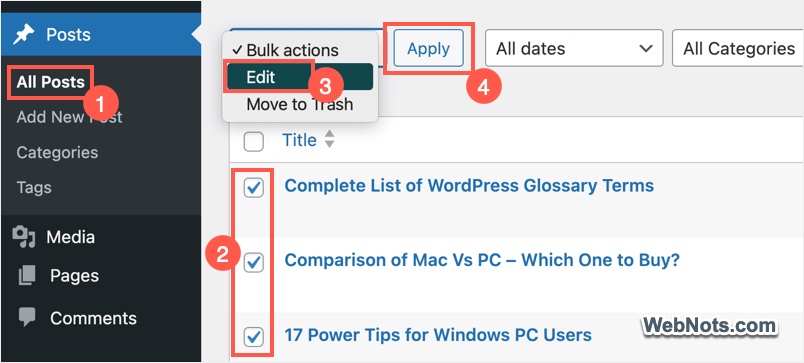
- Go to “Posts > All Posts” section and select the posts by checking the box in front of each item.
- Click the “Bulk actions” dropdown, select “Edit” option and then click “Apply” button.
- Click on the “Status” dropdown and select a new status from the list.
- Finally, click the “Update” button to change the status of all selected posts.
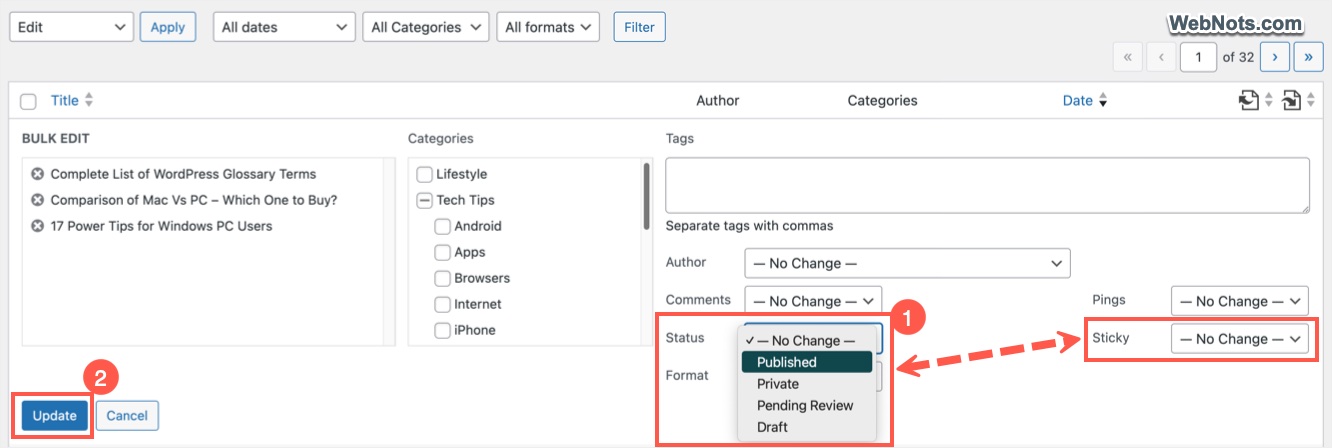
You can use the top filters to view all posts from a particular status and change them to a new status with few clicks in bulk.
Creating Custom Post Statuses
As mentioned, you can create custom post statuses if the default statuses don’t fit your needs, For example, add the below code in your theme’s functions.php file for creating a Rejected status.
function register_custom_post_status() {
    register_post_status('rejected', array(
        'label' => _x('Rejected', 'post'),
        'public' => false,
        'internal' => true,
        'label_count' => _n_noop('Rejected (%s)', 'Rejected (%s)'),
    ));
}
add_action('init', 'register_custom_post_status');
You can use plugins like Code Snippets to insert code instead of manually adding.
Effectively Using WordPress Post Statuses
WordPress post statuses are powerful tools for managing content at every stage, from drafting and reviewing to publishing and scheduling. Understanding and using post statuses effectively can streamline your content strategy, whether you’re a solo blogger or part of a larger team.
Here are some of the ways you can make use of various statuses:
- Save content as drafts to give yourself time for revision.
- Schedule posts to automate publication for consistent posting.
- Use password protection to share posts only with specific audiences when necessary.
- Use Sticky posts to draw attention to critical updates or featured articles.
- Periodically clean up Trash and Pending review drafts to ensure a clutter-free workflow.