
Images are the simple way to convey your thoughts more powerfully than words. As the popular quote goes “An image can convey thousand words”, images help users to grasp your page content quickly. You can upload images in Weebly either for decoration or for instructional purposes. In this article, we will go through various options available for Weebly users to upload images in their site.
Ways to Upload Images in Weebly
There are many ways to upload images in Weebly site as listed below:
- Using image element
- Using gallery element to create showcasing gallery
- Create slideshow with slideshow element
First element is used to handle single image and the last two elements are used to handle multiple images.

Users can also upload images directly to server by navigating to Weebly theme editor through the menu “Theme > Edit HTML / CSS > Assets”.
Uploading Single Image in Weebly Site
Using Default Image Element
Uploading images to your site is as simple as dragging and dropping. First drag and drop the image element into your content area and then just drag and drop your image into the upload image element box. The image will be uploaded into your site automatically.

Note: You can drag and drop an image directly to your site’s content area without using image element and Weebly will automatically upload the image to your site. If you drag and drop multiple images at a time then Weebly will automatically ask you whether the images are to be converted to a gallery or a slideshow.
Once the image element is added on the content area, you have the following options to upload images on your site.
- My Computer
- Search
- Favorites
- Image URL
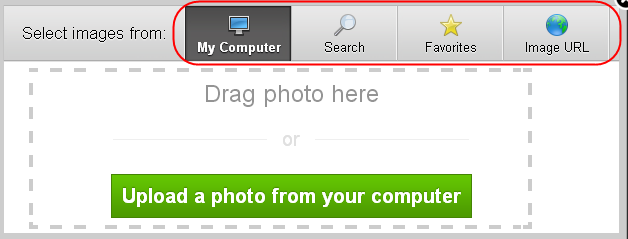
Let us see what each option can do for you:
Upload Image from Local Computer
“My Computer” is the option to search and select an image from your local computer and upload on your site. Here also you have an option to drag and drop an image to the “Drag photo here” box.
Upload Images by Searching Repository
Search option allows you to search images from the Weebly image repository. Weebly offers images under two categories which you can find after the search:
- Professional Photos
Weebly professional photos are of high quality, royalty free and high resolution photos. You need to pay $5 to use each photo and the images will be available for immediate use.
- Free Photos
If you are not interested in paying $5 for each professional photo then you can check the availability of the photos under free photos tag. These photos are free to use in your site and available through creative common license. If you want to use these photos then an automatic attribution link will be added to your site footer that you are using a free photo under a creative common license.

Quick Upload Using Favorites
During the image search you have an option to add photos to your favorites. Photos added to favorites will be available under “Favorites” section and you can select anytime without searching again. This option helps to reduce the time in searching the same image set of images again and again.
Uploading with External URL
“Image URL” is the last option available in which you need to provide the URL of an image in the web to insert the same image into your site. This helps to select the images from your own site without uploading it again. Avoid using anonymous image URLs from other’s sites without appropriate permission from the site owner.
Image Element Options
Once the image is uploaded, users will have the following additional customization options:
- Edit the image with Weebly imageperfect editor
- Replace the image with different image
- Resize the image by dragging with proportional dimensions
- Enable or disable lightbox option
- Create hyperlink
- Align image to left, right or center
- Adjust the margin spacing
- Add caption, border and alt text

1. Edit or Replace Image
You can edit the image using Weebly’s imageperfect editor or replace the complete image keeping the same caption and ALT text on the previous image.
2. Lightbox
Lightbox is the option to show images on a separate popup fancy box when clicked on the published site. Lightbox can’t be enabled if the image is linked to other page.
3. Linking Images to a Webpage
You can also use images to help users to navigate to another page. Click on the Weebly image and then click on the “Link” option to see the options available to link your image.
Website URL
This option allows to connect your image to an external page and you have an additional option to allow the external page to open in a new window.
Page on Your Website
Using this option you can select any page from the drop-down which is part of your own site.

File on Your Website
Use this option to select the files to be linked with an image. Simple example here could be linking a PDF file to an image showing Download now button.
Email Address
You can directly link an email address to an image. For example, your contact email address can be linked to an image showing Contact us text. Clicking on the image will open the default email service provider on that computer.
Uploading Images to Server
Though it is easy to upload images using default “Image” element there are many situations you may need to insert the image using “Embed Code” element on the page with modified styles. For example, you may want to create a hovering effect to show sharing buttons when the mouse is moved on your images. In such scenarios, navigate to “Theme > Edit HTML / CSS > Assets > Upload File(s)…” section and upload your images.

URL of a Weebly Image
The image uploaded on a Weebly site using “Image” element will have the URL similar to the one below:
https://yoursite.com/uploads/4/8/5/3/4853992/image_number.jpgAll images by default will be saved under the “uploads” folder with the name as numbers. There is no option to organize the images under different folders or save with a meaningful description. When you resize or edit an image, Weebly will automatically create a new image and change the original image name with “_orig”. If the image is deleted then both the original and the modified images will be deleted from the site and there will no option to restore the deleted images again.
When the image is directly uploaded on the server, the image URL will be like below:
https://yoursite.com/files/theme/image.pngThe advantage here is that the uploaded image URL can be used as a relative URL “/files/theme/image.png” anywhere on your site using HTML <img> tag.
The URL of the uploaded image can also be obtained by right clicking on the image which may look like: https://www.weebly.com/editor/uploads/4/8/5/3/4853992/custom_themes/12345/files/image.png
Uploading Multiple Images on Weebly Site
Gallery and the Slideshow elements allows you to upload multiple images at one time to your site. Gallery allows you to show a group of photos and customize the cropping, borders and spacing between the photos.

Slideshow is one of the beautiful elements available to both free and Pro users. You can add photos to create a slideshow and customize the navigation and look of your slideshow in a few clicks.

In addition to image elements, you can also add images to your site header based on the page layout selection. If you have an ecommerce site then the images can be uploaded through product element.




Hi,
For some bizarre reason, weebly only lets me post two pictures. I have no clue why.
I need some help.
Best,
Juan
Hello,
When I upload the image, for some reason, the negative of the image is what appears. Meaning the colors are reversed. What am I doing wrong?
We do not see any negative image on your site. You can clear browser’s cache and check how it appears.
Hi,
How can I add an ALT attribute to a picture (my logo on the landing page)
that is located above the navigation menu?
Weebly does not offer to add this attribute in this position.
Using Microsoft Pro Photo Tools do not have the option to add ALT attribute,
i did not find there.
Could I do it with any other special tools offline?
SEO Tools recommend to add this ..
Hello, I was wondering if there was any way for me to combine pictures; so I can show the outside and the inside of my product in one picture, rather than taking up two spaces for one product I am trying to show?
I would like to upload images to the html and then insert code to fetch the image into the page. Is that possible?
Is there a sample code for embedding the url link?
First upload the image under “Design > Edit HTML / CSS > Assets > Upload File(s)…”. The uploaded images will have URL like this: “http:///files/theme/“.
Use this URL and embed image using “Embed Code” element. Refer the HTML image tutorial if you ned help on embedding images.
The uploaded images are actually under: /files/theme/images/
Plus any custom folder name you might have created under images.
Hi,
I wonder if I can change the size of the image that appears when a user clicks on a thumbnail, in the gallery, and if so, how to do it, and also, get rid of the border or at least, be able to change it to be smaller, other color and size, etc..
Thanks so much!
Marcelo
Weebly uses fancy box to provide lightbox effect to images, size of the image can’t be adjusted from the front-end. For the border, you can remove it from advanced options.