Although smartphones have become an integral part of our lives, laptops remain essential for getting most work done. Buying a brand-new laptop is always a good option, but it can be costly. Purchasing a second-hand Windows laptop is one of the easiest ways to save money. However, not every bargain is worth buying. Some laptops may look perfect on the outside but hide expensive problems, such as a worn-out battery, failing SSD, overheating processor, or locked firmware. A low purchase price quickly loses its appeal if you have to spend hundreds of dollars on repairs just a few weeks later.
Why Buy a Used Laptop?
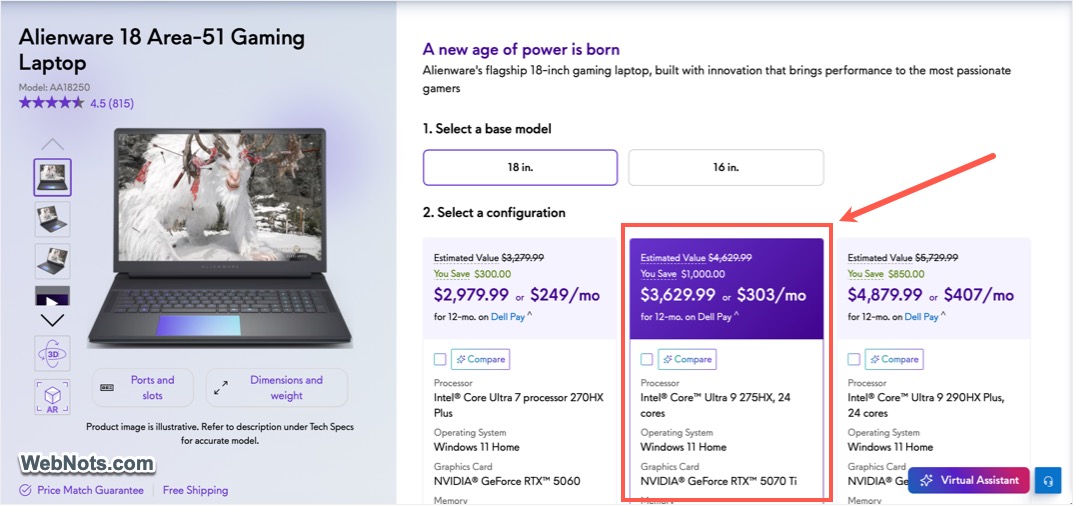
Let’s take the popular Alienware gaming laptop as an example. A new, official model from Dell costs $3,629 for an 18” display, 32GB of RAM, an Intel 24-core processor, and an NVIDIA GeForce RTX 5070 graphics card.
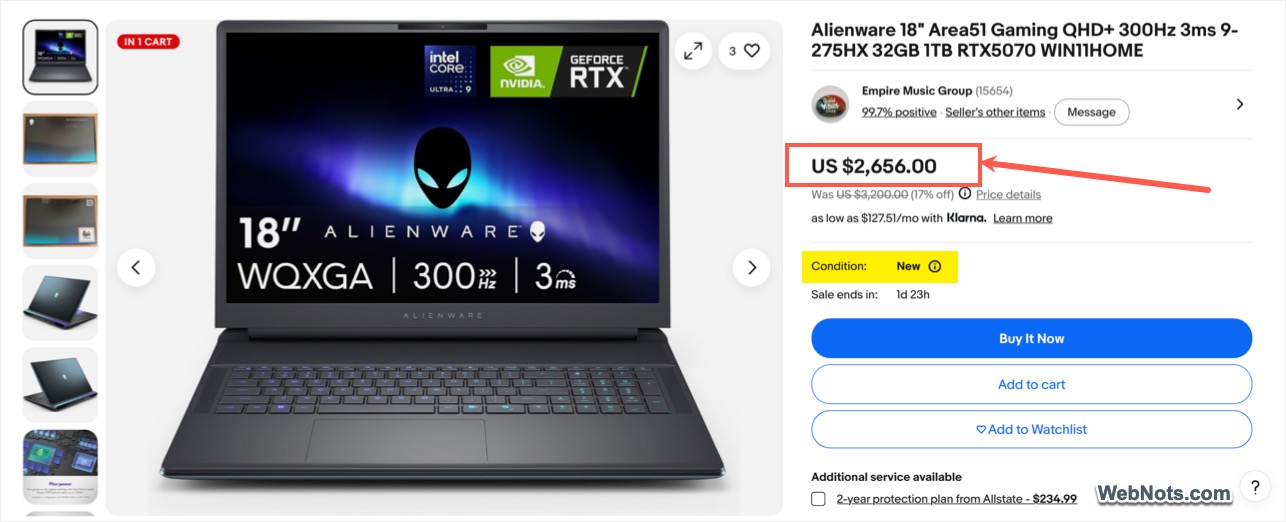
A quick Google search shows that a secondhand laptop of the same brand is available on eBay for $2,656. It’s listed in “New” condition, meaning it is unopened and unused. With this purchase, you save nearly $1,000, which is more than 33% of the retail price.
You can spend even more time hunting for the best discounts on the laptop model you want. However, be sure to spend a few minutes checking the laptop properly before finally confirming to the seller. This guide walks you through everything you should inspect before buying a used Windows laptop.
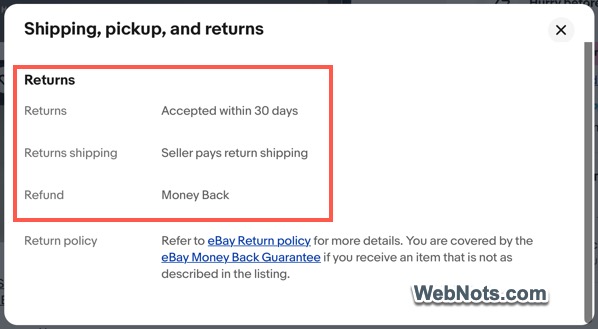
Since you can’t physically inspect or test the laptop during an online purchase, make sure to check the return policy carefully. Only proceed if the seller offers a no-questions-asked refund with free return shipping in case of an issue. Once you have the physical product in hand, check the following.
1. Examine the Laptop’s Physical Condition
The first step is obviously to inspect the laptop’s physical condition. You don’t need to worry about this if the item is unopened (as in the eBay example above).
- Look for cracks, dents, chipped corners, or deep scratches. Minor cosmetic marks are expected on a used device, but heavy damage often suggests rough handling.
- Open and close the display several times. The hinges should move smoothly without making noises or feeling loose. If the screen wobbles while you’re typing, the hinges may be worn and expensive to repair.
- Turn the laptop over and inspect the bottom screws. Factory screws usually have an even finish. If several screws are scratched or damaged, the laptop has likely been opened before for repairs or hardware replacement. While this isn’t always a problem, it’s worth asking the seller what work was done.
- Check the display for dead pixels, bright or dark spots, screen flickering, horizontal or vertical lines, uneven brightness, or color discoloration. Screen replacement is one of the most expensive laptop repairs, so don’t skip this step. Also, increase and decrease the brightness several times to confirm it adjusts smoothly.
- Test every key on the keyboard. Make sure no keys stick, fail to register, or type the wrong character. Also, check that the touchpad clicks properly and responds consistently across its entire surface.
If you are happy with the physical state, move on to testing the software, hardware specifications, and other important components.
2. Check the Battery Health
Battery replacement is one of the more expensive fixes for used laptops. The problem is that most laptops perform perfectly while plugged into the charger but shut down quickly once disconnected. The good news is that you don’t need to be an expert to test the battery, as Windows includes a built-in battery report.
Open Command Prompt as an administrator and run the following command:
powercfg /batteryreport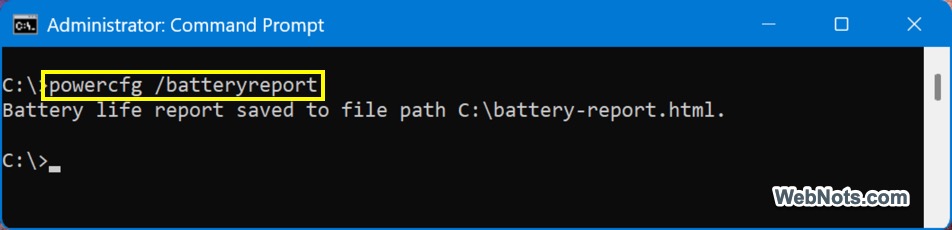
Windows will create an HTML report showing:
- Original battery capacity (design capacity).
- Current full charge capacity.
- Battery cycle count.
- Usage history.
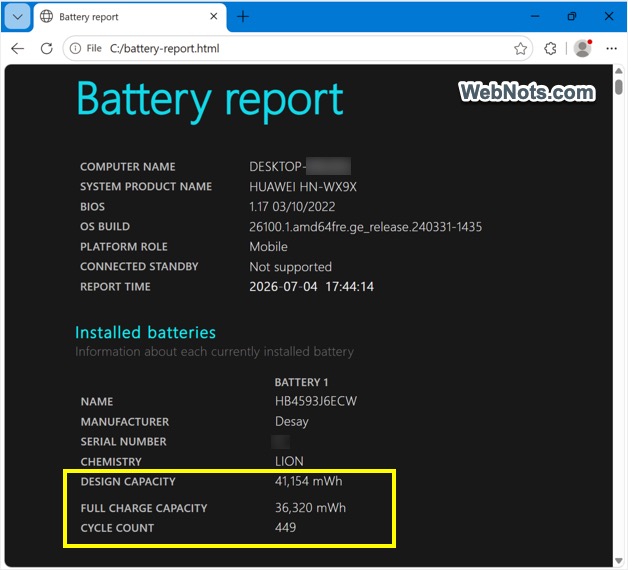
Compare the current capacity with the original design capacity. A battery that has lost a significant percentage of its capacity will need replacement sooner rather than later. If the battery is heavily worn, factor the replacement cost into your price negotiation.
3. Inspect the SSD or Hard Drive
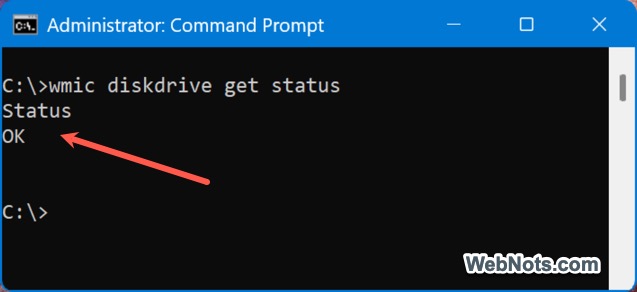
A failing SSD or hard drive can cause slow performance, random crashes, corrupted files, and even complete data loss. For a quick health check, open Command Prompt and run:
wmic diskdrive get statusThe status should read “OK”. You can also use third-party tools for a much more detailed inspection. However, make sure to confirm with the seller before installing any software, as it may void the return policy.
4. Test the RAM
Faulty memory can cause random freezes, application crashes, and the dreaded Blue Screen of Death. You can use the built-in memory tester that comes with Windows.
- Press Win + R to open the Run dialog.
- Type mdsched.exe and click “OK.”
- Choose “Restart now and check for problems”.
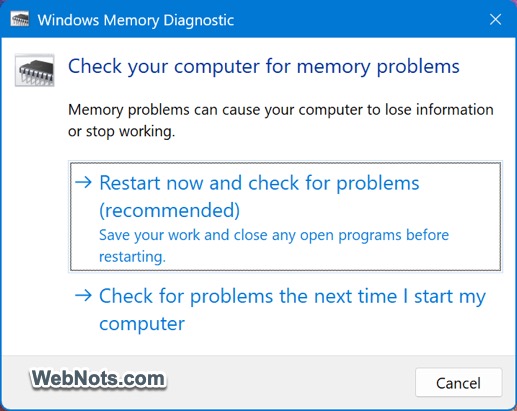
The laptop will reboot, perform a memory test, and report any errors after Windows starts again.
5. Test Every Port and Wireless Feature
Even if you don’t regularly use every port, they should all work properly.
- Bring along a USB flash drive and test every USB port individually.
- If available, also test HDMI output, USB-C ports, the headphone jack, the SD card reader, and the Ethernet port.
- Connect the laptop to Wi-Fi, pair a Bluetooth device, test the webcam, play audio through the speakers, and verify that the microphone works during a voice recording.
6. Don’t Skip the BIOS
Many buyers never enter the BIOS before purchasing a laptop, but this is where you can discover issues that Windows may not reveal.
- Check whether the BIOS is password protected. If the seller cannot remove the password immediately, avoid buying the laptop. A locked BIOS limits your ability to change important settings or reinstall the operating system.
- Look for any active security technologies, the laptop may remain linked to a previous organization and could potentially be managed remotely.
- Confirm that TPM 2.0 is enabled and verify that Secure Boot is supported (both are required for Windows 11).
7. Verify the Hardware Specifications
Never rely solely on the seller’s description of the hardware.
- Open the Settings app and go to “System > About”.
- Confirm the processor, installed RAM, and Windows edition.
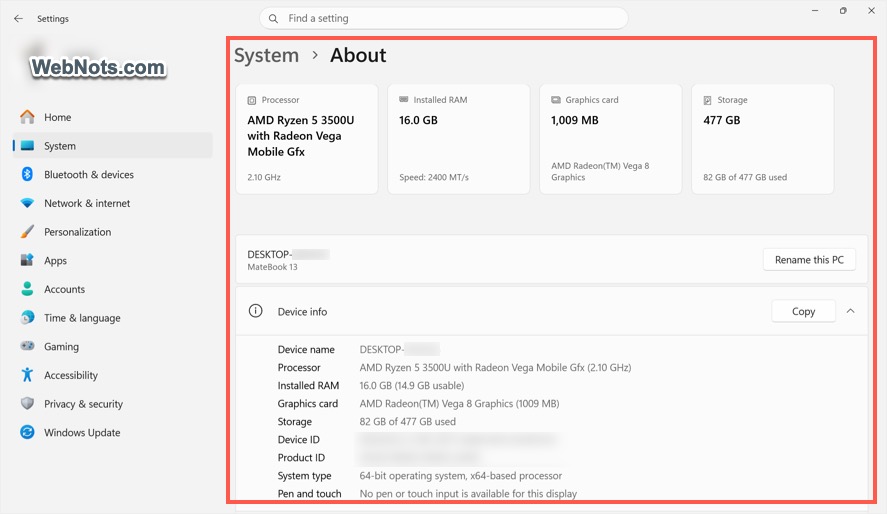
- Then open Task Manager and switch to the “Performance” tab to verify the CPU, memory, storage, and graphics hardware.
- You can also review Device Manager to ensure Windows correctly detects all installed components.
Always verify the specifications yourself before confirming the purchase to the seller.
8. Confirm Windows Activation
This is another point of confusion for many used laptop buyers. Windows offers three types of licenses:
- OEM – The license is linked to the device’s motherboard, and no product key is usually required.
- Volume – Used by organizations for bulk licensing. Avoid this, as the laptop may still be enrolled in organizational management.
- Retail – For individual users. If the previous owner purchased Windows separately and installed it, they legally have the right to transfer that license to another computer. It will either have a product key or be digitally linked to a Microsoft account.
Open Command Prompt and run the following command to find the type of license currently activated on the laptop:
slmgr /dli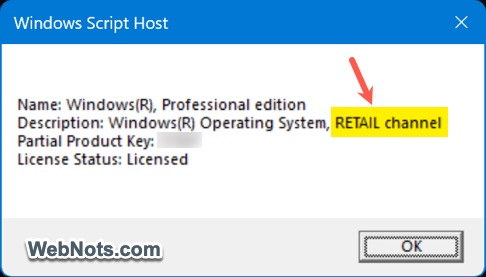
An OEM license should not be a problem, as it will remain tied to the device and transfer automatically to you. However, the license cannot be transferred to your name, so avoid purchasing the device if you plan to use your own Windows license.
For a retail license with a key, make sure to get the license key (25 characters long) from the seller. If it is a digital license, go to “Settings > System > Activation” and Windows should report that it is activated with a digital license. You can then log in with your Microsoft account and link the device to your account. Confirm with the seller that the device has been removed from their account.
Note: Since Windows 10 reached its end of support in October 2025, make sure the laptop is running Windows 11. Also, be clear about whether you need the Home or Pro edition, as features like the Local Group Policy Editor are only available in Pro (and Business and Education) editions.
9. Check for Previous Ownership Restrictions
Frankly, it’s best to simply avoid purchasing a device that was previously linked to any organization or institution. If you do like the laptop and want to proceed, make sure it has been fully removed from any previous owner’s management systems.
- As mentioned, you may need to purchase a retail Windows license and reinstall Windows. Consider the price and effort required for that.
- Business-owned laptops may still be enrolled in Mobile Device Management (MDM) systems that continue enforcing restrictions even after Windows has been reinstalled. Confirm with the seller that the device is no longer on the organizational network. If possible, ask for the original purchase invoice or proof of ownership.
- Open Settings and navigate through various sections to confirm that all options are available for editing. If not, you may find some settings locked with the notification saying, “Some settings are managed by your organization”. You can also check the Edge browser’s settings page to ensure no policies are enforced that restrict browser usage.

10. Ask About Warranty and Return Policy
Even used laptops may still have a manufacturer’s warranty remaining. If you’re buying a refurbished device, look for:
- At least a one-year warranty.
- A return period.
- Clearly stated battery health.
- Tested hardware components.
As mentioned earlier, read the return policy carefully before making payment.
Final Words
Find an unpacked laptop if you’re looking for minor savings, which is similar to purchasing a new device. For bigger savings, you need to spend some time reading the seller’s terms and inspecting the device when it is physically in your hands. Spending just 15 to 20 minutes inspecting the laptop can help you avoid expensive surprises later.