In the PRE-Table Era of HTML
Imagine creating a time table or a student mark sheet in a webpage without using HTML table tag. Well, once upon a time before table tag was evolved, people used to code with PRE tags (Preformatted text) to achieve this. Want to see how PRE tag works?. Below is an example code snippet along with the results of creating a simple mark sheet table with PRE tags.
<PRE>
Let's make a mark sheet
Sr.   Student ID        MATHS        PHYSICS           HISTORY
1        6859             A             B                 C
2        8412             B             C                 A
3        6985             C             B                 B
4        5474             D             C                 C
</PRE>
Notice the below output exactly looks like the source HTML code, which is the text in the preformatted manner. However, it is not recommended to use <PRE> tag since it is not meant for creating tables in HTML.

Related: How to insert tables in WordPress website?
What are HTML Tables?
Tables are very similar to an excel sheet or any spreadsheet document and a great way to organize data in a tabular form and in the current web design environment tables are extensively used to compare and contrast different types of data in a structured manner. Once tables were also used to position the content of the webpage like sidebar, header or footer in a more structured manner. Now CSS is highly recommended to have a precise control over the layout design rather than using tables.
Elements of Table Tag
Let us look at a simple HTML table structure and understand each element. Though these are the minimum tags needed to produce a simple table, there are many other attributes to customize HTML tables to suit the requirement.
<TABLE> <!-- start of table -->
<CAPTION>Table Caption</CAPTION> <!-- caption for the table -->
<TR> <!-- start of header row -->
<TH> First Header Cell Content </TH>
<TH> Second Header Cell Content </TH>
</TR> <!-- end of header row -->
<TR> <!-- start of first row -->
<TD> First Row, First Cell Content </TD>
<TD> First Row, Last Cell Content </TD>
</TR> <!-- end of first row -->
<TR> <!-- start of second row -->
<TD> Second Row, First Cell Content </TD>
<TD> Second Row, Second Cell Content </TD>
</TR> <!-- end of second row -->
</TABLE> <!-- end of table -->
The table will look like below on the browser:

Adding a border to the table <TABLE border=1> will convert the text content to a good looking table:

Basic elements are shown in the pictorial table format as below:

Using Attributes with Table Elements
<TABLE>
This tag defines the starting of a table and supports the following attributes:
| Attribute | Description |
|---|---|
| BORDER | Border of the table. E.g. BORDER=1. In order to have an overall control of a site it is recommended to use Style sheets instead of controlling HTML |
| WIDTH | Width of the table. E.g. WIDTH=100%. It can also contain absolute values in pixels but percentages are preferred. Again style sheets can do this job better! |
| ALIGN | Relative alignment of the complete table. Can take three values LEFT, CENTER, RIGHT |
<TH>
This tag defines a table heading i.e. the title row. By default the text in this cell is bold and centered. Other attributes are similar to that of the table and they override the table attributes! An additional attribute not mentioned above is:
| Attribute | Description |
|---|---|
| VALIGN | Vertical alignment of the cell content. Can take three values TOP, MIDDLE, BOTTOM |
<TR>
This defines a row of the table and has same attributes listed above. Make sure that you include the closing tag </TR> as is the case with all the other tags too!!
<TD>
Defines a table data cell. The attributes for this tag include ALIGN, VALIGN, WIDTH and also something called ROWSPAN and COLSPAN. Note that the settings here will override the table and row settings! ROWSPAN gives the number of rows that this cell covers and COLSPAN the number of columns.
Sample Table
Now you know the structure of a table and it’s time for an experiment, let us look at some examples along with the code which can be used in a webpage. Below is an example of a simple tabular data with border and border color. Border provides the visible boundary for the table element which can be customized any color to render with the page layout.
| Cell 1 | Cell 2 | Cell 3 |
| Cell 4 | Cell 5 | Cell 6 |
| Cell 7 | Cell 8 | Cell 9 |
And here’s the code for it!
<TABLE border=1 bordercolor=silver >
<TR>
<TD>Cell 1</TD>
<TD>Cell 2</TD>
<TD>Cell 3</TD></TR>
<TR>
<TD>Cell 4</TD>
<TD>Cell 5</TD>
<TD>Cell 6</TD></TR>
<TR>
<TD>Cell 7</TD>
<TD>Cell 8</TD>
<TD>Cell 9</TD>
</TR>
</TABLE>
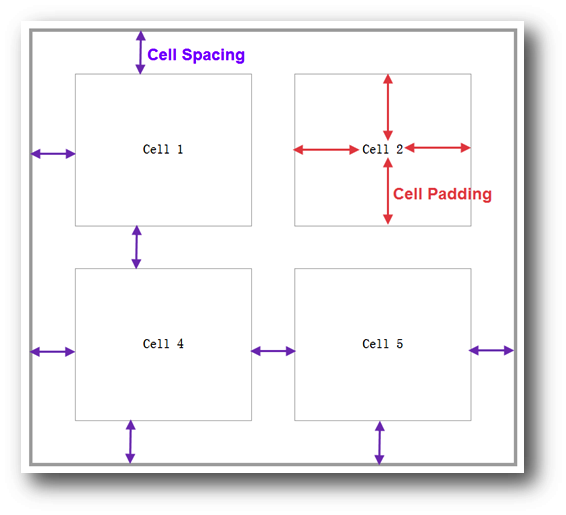
Border attribute is out of its way from HTML standard. It is recommended to use CSS instead. There are more attributes for customizing table background and embedding images inside a cell. Cellspacing and cellpadding are two important attributes used to adjust the cell content.
- Cellspacing – It is the distance between each cell in a table which is same as the distance from the border of the table to the cell position.
- Cellpadding – It is the distance between the cell content and cell border used to compress or expand the content within a cell.
Cellpadding and cellspacing are explained in the below picture.
Related: How to insert tables in Weebly site?
Column Span
You can merge the columns using “colspan” attribute like below:
<TABLE border="1" cellspacing="12" cellpadding="6">
<TR>
<TD>Cell 1</TD>
<TD>Cell 2</TD>
<TD>Cell 3</TD></TR>
<TR>
<TD COLSPAN="2">Cell 4 and 5</TD>
<TD>Cell 6</TD></TR>
<TR>
<TD>Cell 7</TD>
<TD>Cell 8</TD>
<TD>Cell 9</TD>
</TR>
</TABLE>
In this example, colspan=”2″ attribute is used to merge cell 4 and 5 values and shown as a single cell like below:
| Cell 1 | Cell 2 | Cell 3 |
| Cell 4 and 5 | Cell 6 | |
| Cell 7 | Cell 8 | Cell 9 |
You can combine any columns using colspan attribute.
Row Span
Similar to column space, you can merge any rows together using “rowspan” attribute.
<TABLE border="1" cellspacing="12" cellpadding="6">
<TR>
<TD>Cell 1</TD>
<TD>Cell 2</TD>
<TD>Cell 3</TD></TR>
<TR>
<TD ROWSPAN="2">Cell 4 and Cell 7</TD>
<TD>Cell 5</TD>
<TD>Cell 6</TD></TR>
<TR>
<TD>Cell 8</TD>
<TD>Cell 9</TD>
</TR>
</TABLE>
The result should look like below:
| Cell 1 | Cell 2 | Cell 3 |
| Cell 4 and Cell 7 | Cell 5 | Cell 6 |
| Cell 8 | Cell 9 |
Note: Remember most of the table attributes like width, cellspacing, cellpadding are not supported in HTML5. Hence, you may not get proper output on the modern browsers when using these outdated attributes. Ensure to use CSS for controlling visual behavior of tables.
Sample HTML Table Codes for Websites
Above, we discussed the basic table structure, elements and simple code for creating a HTML tables. Now it’s time for an experiment with more attributes. Let us look at some examples along with the code which can be directly used in a webpage.
1. Table with Border and Border Color
Border is the way to differentiate the table data from other webpage content and provides the visible boundary for the table which can be customized any color to render with the page layout.

And here’s the code for it!
<TABLE border=1 bordercolor=Red>
<TR>
<TD>Cell 1</TD>
<TD>Cell 2</TD>
<TD>Cell 3</TD></TR>
<TR>
<TD>Cell 4</TD>
<TD>Cell 5</TD>
<TD>Cell 6</TD></TR>
<TR>
<TD>Cell 7</TD>
<TD>Cell 8</TD>
<TD>Cell 9</TD></TR>
</TABLE>
2. Table with Heading and Caption
<TH> tag is used to define a heading row for the table and the heading is always bolded and centered by default. You also can add caption to your table using <CAPTION> tag.

Here is the code for it!!!
<TABLE border=1>
<Caption>Table Caption</Caption>
<TR>
<TH>Movie</TH>
<TH>Rating</TH>
<TH>Ticket</TH>
</TR>
<TR Align=Center>
<TD>Movie 1</TD>
<TD>Good</TD>
<TD>$30</TD></Tr>
<TR Align=Center>
<TD>Movie 2</TD>
<TD>Poor</TD>
<TD>$20</TD></TR>
<TR Align=Center>
<TD>Movie 3</TD>
<TD>Bad</TD>
<TD>$10</TD>
</TR>
</TABLE>
Related: How to create advanced data tables in Weebly using Bootstrap?
3. Tables with Cellspacing and Cellpadding
Cellspacing and cellpadding are used to adjust the space between the table content. Cellspacing is the distance between each cell as well as the distance from the border of the table to the cell position. Whereas cellpadding is the distance between the cell content and cell border.

And the code goes as below:
<TABLE border=1 bordercolor=silver cellspacing=3 cellpadding=3>
<TR ALIGN=RIGHT>
<TD><FONT COLOR=RED><B>Cell 1</B></FONT></TD>
<TD><FONT COLOR=RED><B>Cell 2</B></FONT></TD>
<TD><FONT COLOR=RED><B>Cell 3</B></FONT></TD></TR>
<TR ALIGN=RIGHT>
<TD><FONT COLOR=RED><B>Cell 4</B></FONT></TD>
<TD><FONT COLOR=RED><B>Cell 5</B></FONT></TD>
<TD><FONT COLOR=RED><B>Cell 6</B></FONT></TD></TR>
</TABLE>
4. Table with Background Color
Adding background color to the table will help you easily highlight it from other content in the page. This can be achieved using the bgcolor attribute and background color of the table or a cell can be changed by adding this attribute in the required tag.

Below is the code for it!!!
<TABLE border=1 bordercolor=silver cellspacing=1 cellpadding=1 bgcolor=lightgrey>
<TR ALIGN=RIGHT>
<TD><FONT COLOR=RED><B>Cell 1</B></FONT></TD>
<TD bgcolor=yellow><FONT COLOR=RED><B>Cell 2</B></FONT></TD>
<TD><FONT COLOR=RED><B>Cell 3</B></FONT></TD></TR>
<TR ALIGN=RIGHT>
<TD><FONT COLOR=RED><B>Cell 4</B></FONT></TD>
<TD><FONT COLOR=RED><B>Cell 5</B></FONT></TD>
<TD><FONT COLOR=RED><B>Cell 6</B></FONT></TD></TR>
</TABLE>
5. Adjusting Width and Height of Table
Width and height of the table can be adjusted to fit inside your content. You can mention these attributes either in a number or in a percentage.

Below is the table code with height and width attributes!!!
<TABLE border=1 bordercolor=silver cellspacing=1 cellpadding=1 bgcolor=lightgrey width=70% height=100>
<TR ALIGN=CENTER>
<TD><FONT COLOR=RED><B>Cell 1</B></FONT></TD>
<TD><FONT COLOR=RED><B>Cell 2</B></FONT></TD>
<TD><FONT COLOR=RED><B>Cell 3</B></FONT></TD></TR>
<TR ALIGN=CENTER>
<TD><FONT COLOR=RED><B>Cell 4</B></FONT></TD>
<TD><FONT COLOR=RED><B>Cell 5</B></FONT></TD>
<TD><FONT COLOR=RED><B>Cell 6</B></FONT></TD></TR>
</TABLE>
6. Structuring Table with Header and Footer
You can structure the table into header, body and footer using the below elements:
- <thead> – Table Header
- <tbody> – Table Body
- <tfoot> – Table Footer
Table can have any number of <tbody> elements with one <thead> and <tfoot> element each.

Here is the code for the table!!!
<table border="1" bgcolor=lightgrey width="70%">
<thead>
<tr>
<td colspan="4">Here your Header goes!!!</td>
</tr>
</thead>
<tbody>
<tr>
<td>Cell 1</td>
<td>Cell 2</td>
<td>Cell 3</td>
</tr>
</tbody>
<tbody>
<tr>
<td>Cell 1</td>
<td>Cell 2</td>
<td>Cell 3</td>
</tr>
</tbody>
<tfoot>
<tr>
<td colspan="4">Your Footer goes here!!!</td>
</tr>
</tfoot>
</table>
Related: How to create tables in Bootstrap?
7. Table with Column and Row Merge
Now let’s create more customized tables where the cell sizes can be different for different cells by varying the number of rows and columns it spans (default is 1).

How to do that?!
<TABLE cellspacing=1 cellpadding=1 width="100%" border=1 bgcolor=lightgray>
<TR ALIGN=CENTER >
<TD COLSPAN=2>This cell spans 2 columns!</TD>
<TD>Cell</TD></TR>
<TR ALIGN=CENTER >
<TD ROWSPAN=3>This cell spans 3 rows!!</TD>
<TD>Cell</TD>
<TD>Cell</TD></TR>
<TR ALIGN=CENTER >
<TD>Cell</TD>
<TD>Cell</TD></TR>
<TR ALIGN=CENTER >
<TD>Cell</TD>
<TD>Cell</TD>
</TR>
</TABLE>
8. Form and Text Elements Inside Table
Sometimes it is necessary to align the form and table elements to create a beautiful form. Checkout the below table aligned with form elements.
Check out the below table which is aligned inside a <FORM> tag.

It is simple to do that!!!
<TABLE cellspacing=1 cellpadding=1 width=100%>
<FORM>
<TR>
<TD VALIGN=CENTER><FONT COLOR=Red>See how this text and the form elements </TD>
<TD><INPUT TYPE=TEXT SIZE=50></TD></TR>
<TR>
<TD VALIGN=CENTER><FONT COLOR=Red>are nicely aligned and placed </TD>
<TD><SELECT SIZE=4> <OPTION>Default</OPTION></SELECT></TD></TR>
<TR>
<TD VALIGN=CENTER><FONT COLOR=Red>with the help of an invisible table!</TD>
<TD><INPUT TYPE=Button VALUE="I do nothing"></TD>
</TR>
</FORM>
</TABLE>
9. Table with Embedded Image in Cell
You can embed an image inside the cell using <IMG> element within the <TD> element.

How will you do it?. Replace the image URL with your own image URL.
<TABLE cellspacing=1 cellpadding=1 width=100%>
<TABLE border=1 cellspacing=1 cellpadding=1 width=205 bgcolor=antiquewhite>
<TR>
<TD><IMG src="https://www.webnots.com/uploads/4/8/5/3/4853992/1356618715.png" width=150></TD>
<TD>Cell 2</TD>
</TR>
<TR>
<TD>Cell 3</TD>
<TD>Cell 4</TD>
</TR>
<TR>
<TD>Cell 5</TD>
<TD>Cell 6</TD>
</TR>
</TABLE>
10. Table with Background Image
Instead of embedding an image within a cell, you can also fill the background image for the complete cell.
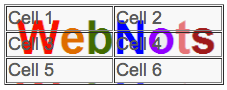
The image will be titled automatically when the height of the table increases. Below is the code for making a table with a background image.
<TABLE border=1 cellspacing=1 cellpadding=1 width=220 bgcolor=antiquewhite
background="https://www.webnots.com/uploads/4/8/5/3/4853992/1356618715.png">
<TR>
<TD>Cell 1</TD>
<TD>Cell 2</TD>
</TR>
<TR>
<TD>Cell 3</TD>
<TD>Cell 4</TD>
</TR>
<TR>
<TD>Cell 5</TD>
<TD>Cell 6</TD>
</TR>
</TABLE>
Related: How to created comparison table in WordPress?
11. Nested Tables
Using one table within another table is called nested table. Below is an example of how nested table will look like.

Here is the code for it!!!
<table border="1" bgcolor=lightgrey>
<tr>
<td>
<table border="1" bgcolor=skyblue>
<thead align="center">
This is a table inside a cell
</thead><tr>
<th>Plan</th>
<th>Price</th>
</tr>
<tr>
<td>One Year Plan</td>
<td>60 USD</td>
</tr>
<tr>
<td>Two Year Plan</td>
<td>50 USD</td>
</tr>
</table>
</td>
<td>
This is another cell of main table
</td>
</tr>
<tr>
<td>Main table cell</td>
<td>Main table cell</td>
</tr>
</table>
Note: HTML tags are not case sensitive which means using <TD> and <td> are interpreted in the same manner by all browsers.
Complete HTML Tutorial (Index)
- Chapter 1: Creating a Simple Webpage
- Chapter 2: Using Formatting Tags
- Chapter 3: Creating Listed Content
- Chapter 4: Creating and Customizing Tables
- Chapter 5: Linking Text
- Chapter 6: Email Links
- Chapter 7: Image Maps
- Chapter 8: Using Images in HTML
- Chapter 9 : Creating HTML Forms
- Chapter 10: HTML Frames
- Chapter 11: Embedding Media in HTML5
- Chapter 12: HTML5 Tag Reference