
It’s very easy to turn on Personal Hotspot on your iPhone and share the internet connection with Mac or iPad. However, there are moments your Mac has a stable Wi-Fi connection and you need to share the connection with your iPhone or iPad. This process, often called “Internet Sharing”, transforms your Mac into a wireless hotspot. In this article, we will explain various methods for sharing Mac’s internet connection along with the troubleshooting steps.
Method 1: Wi-Fi Sharing (Common Method)
This method creates a Wi-Fi hotspot from your Mac. Your iPhone or iPad connects to it just like a standard home router.
Turning on the Connections
- Click the Apple logo in the top-left corner of your screen and select “System Settings…” menu.
- In System Settings app go to “General” section and select “Sharing” option.
- Scroll down to “Accessories & Internet” section. Find “Internet Sharing” option in the list. Do not turn it on now.
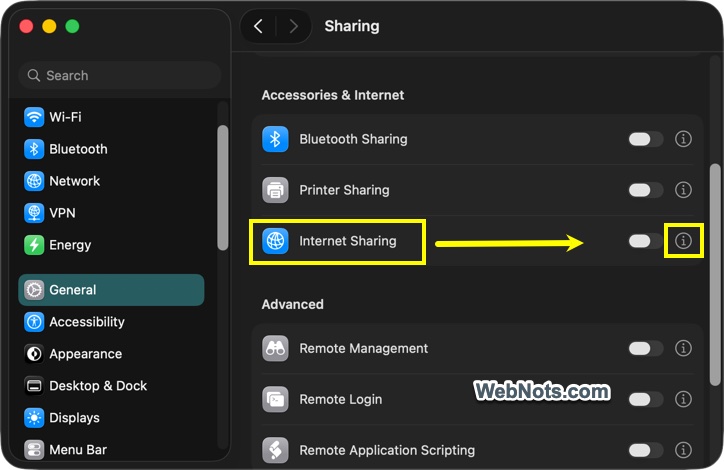
- Click the information ⓘ icon next to it to open the configuration pane.
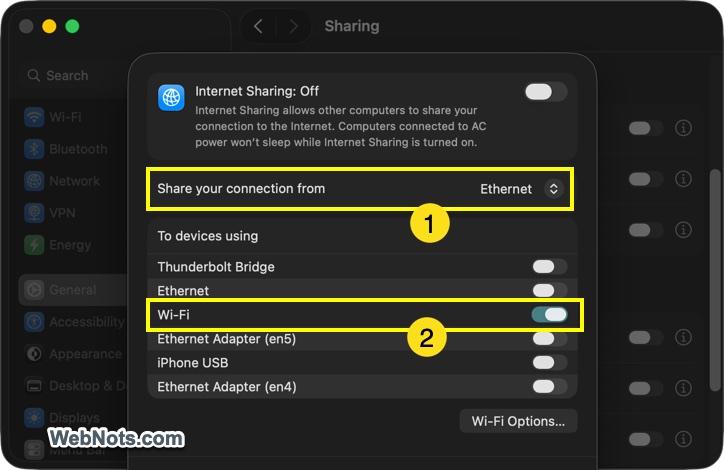
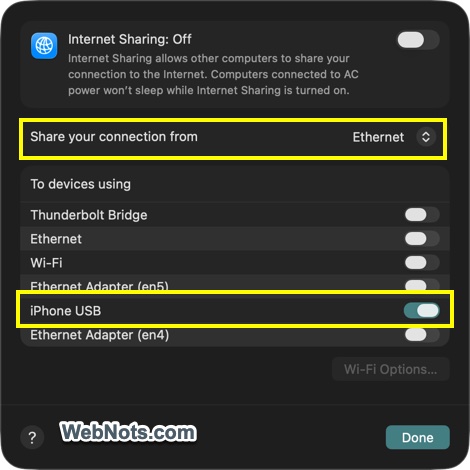
- Click the “Share your connection from” dropdown in the pop-up and select the source of your Mac’s internet. For example, select “Ethernet” if your Mac is plugged into a wall jack or router via cable or select “Thunderbolt Bridge” if you are using that.
- Turn on the “Wi-Fi” option under “To devices using” heading. Another configuration pop-up window will appear.
Configuring Wi-Fi Details
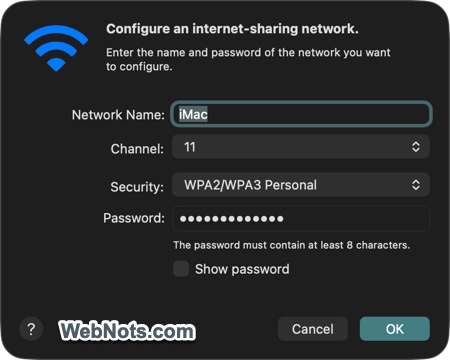
Enter the following details in the pop-up:
- Network Name (SSID): The name of your hotspot (for example – My Mac Hotspot).
- Channel: Leave this as default (11).
- Security: Choose WPA2/WPA3 Personal.
- Password: Enter a strong password, which should be at least 8 characters (or use the auto generated one). Check the “Show password” box and copy and save the generated password separately if you are using that.
- Click “OK” button.
Activating the Hotspot
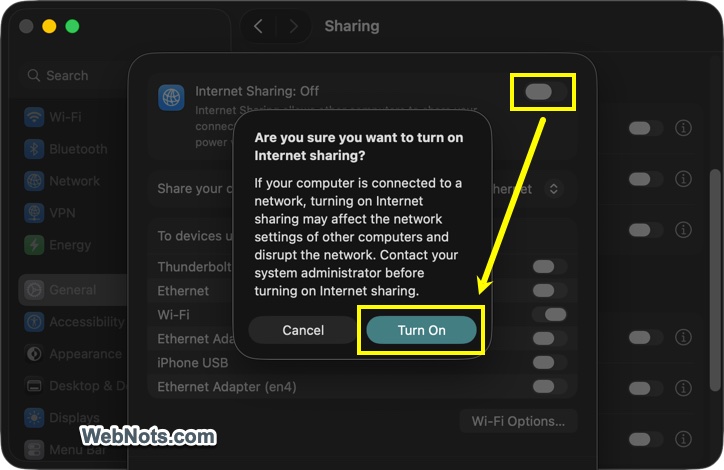
- Now, turn on the “Internet Sharing” option showing on top of the pop-up.
- You’ll see a warning message saying turning internet sharing may affect the network and confirm again by clicking “Turn On” button.
- Click “OK” button to close the pop-up.
- Now, you should see the “Internet Sharing” option in “Sharing” list should be turned on.
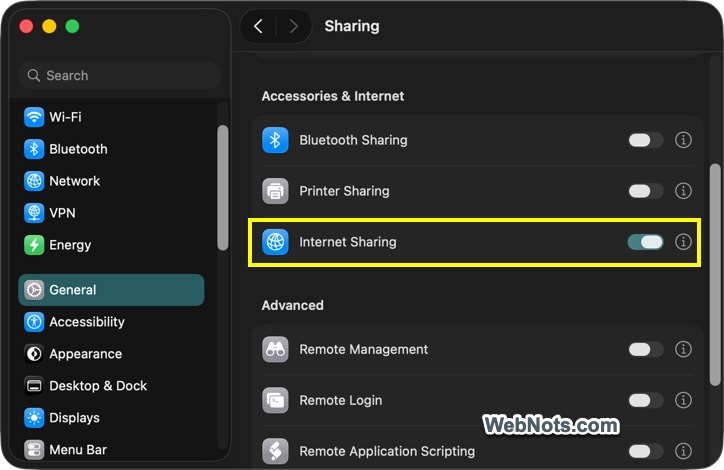
Connecting Your iPhone or iPad
- On your iPhone or iPad, open “Settings” app and go to “WLAN” section.
- Look for the Network Name you just created on your Mac.
- Tap it and enter the password you saved before.
- Once connected, a blue tethering icon (a chain link) will appear in the top bar of your Mac, confirming a device is connected.
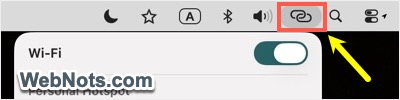
Note: If you select “Wi-Fi” for sharing your connection, the Wi-Fi option will disappear under “To device using” list. This means you can’t share Mac’s Wi-Fi and you need a wired source to share the internet connection from Mac.
Method 2: Bluetooth PAN (Personal Area Network)
Though Bluetooth tethering is slower than Wi-Fi, it’s a reliable alternative.
Pair Your Devices
- On your Mac, go to “Apple Menu > System Settings… > Bluetooth” section and ensure “Bluetooth” is turned on.
- On your iPhone/iPad, go to “Settings > Bluetooth” section and turn on the “Bluetooth” option.
- Pair the devices if they aren’t already by selecting the device name under “My Devices” or “Other Devices” section (either from iPhone or from Mac).
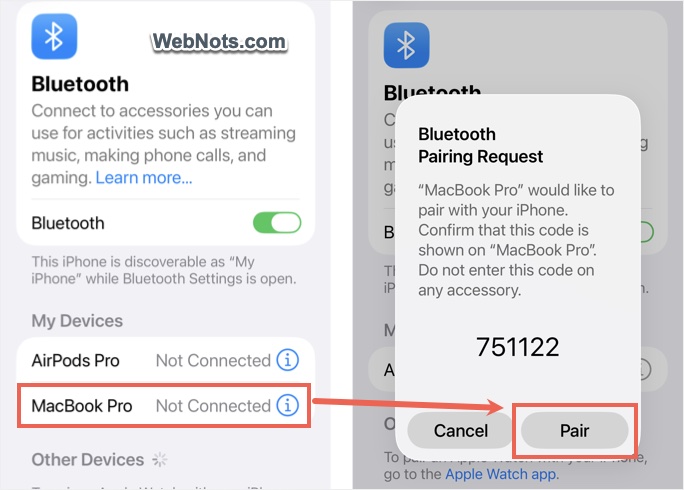
Enable Bluetooth Sharing on Mac
- Go to “Apple Menu > System Settings > General > Sharing” section.
- Click the information icon ⓘ next to “Internet Sharing” option.
- Select your internet source (for example, Ethernet) from “Share your connection from” dropdown.
- Select “Bluetooth PAN” under “To devices using”.
- Now, turn on “Internet Sharing” button.
Connect from iPhone/iPad
- On your iPhone/iPad, go to “Settings > Bluetooth”.
- Find your Mac in the list of devices and tap on it.
- After connecting, your device will route its internet through the Bluetooth connection.
Method 3: USB Tethering
If you want the most stable connection with simultaneous charging, you can share internet via a USB cable. This method often works automatically without enabling “Internet Sharing” in settings, but here is how to force it.
Configure Network Settings
- Plug your iPhone or iPad into your Mac via a USB cable.
- On your Mac, go to “Apple Menu > System Settings > Network”.
- Look at the list on the right, you should see “iPhone USB” or “iPad USB” under “Other Services” section. It will show as “Attached” indicating the iPhone / iPad is connected to the Mac.
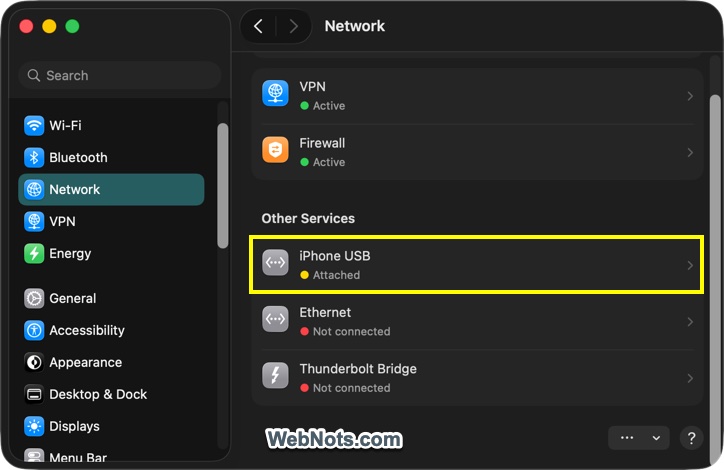
- Now, go to “General > Sharing” and click the ⓘ icon next to “Internet Sharing” option. Select the source as “Ethernet” and destination as “iPhone USB”.
- Ensure “Internet Sharing” is turned on and your iPhone will then use the Mac’s internet via the cable.
Security Considerations
When you enable Internet Sharing, you are effectively turning your Mac into a router. So, keep these points in mind:
- Use a strong password as anyone within range can connect and potentially access files on your local network.
- Monitor the connected devices and if you suspect someone unauthorized is using your internet, turn off Internet Sharing immediately.
- Sharing internet connection drains your Mac’s battery significantly faster. If you are using a MacBook, consider plugging it into power if you intend to share for several hours.
Troubleshooting Common Issues
1. Why can’t I find Wi-Fi option when enabling Internet Sharing?
This happens when you are trying to share the same Wi-Fi connection that your Mac is using to access the internet. Most Macs cannot function as both a Wi-Fi client and a hotspot at the same time. So, use Ethernet as the internet source.
2. Why does my hotspot not work when a VPN is enabled?
Most VPNs block local network sharing for security reasons. This can prevent connected devices from accessing the internet. So, disconnect the VPN before starting the hotspot. If you need the VPN, enable settings like “Allow local network access” or “Split Tunneling” in the VPN app.
3. Why does my iPhone connect to the hotspot but show “No Internet”?
This can happen due to temporary sharing issues, firewall settings, or DNS configuration problems.
- Restart Internet Sharing by turning it off, waiting 10 seconds, and turning it back on.
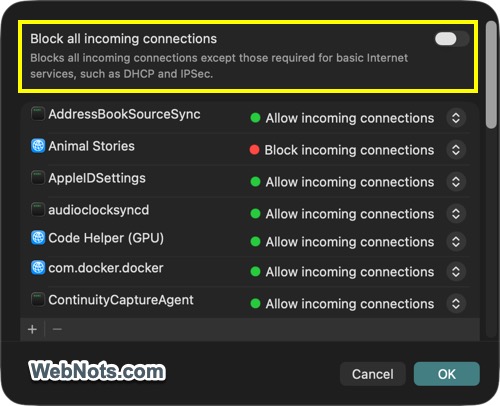
- Check Firewall settings under “Apple Menu > System Settings… > Network > Firewall”. Click the “Options…” button and ensure “Block all incoming connections” is disabled or properly configured.
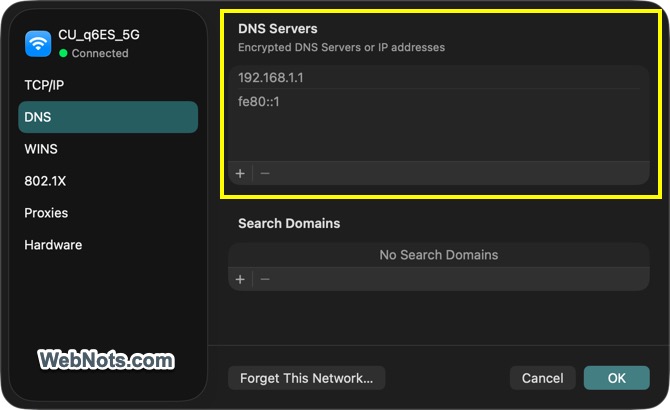
- Verify DNS settings by adding a public DNS like 8.8.8.8 (Google) or 1.1.1.1 (Cloudflare) in “Apple Menu > System Settings… > Network > Your source connection > Details > DNS”.
Summary
Here is a summary of internet sharing options available. By using one of these methods, you can leverage your Mac’s stable wired connection to keep your iPhone and iPad online.
| Method | Best For | Speed | Stability |
|---|---|---|---|
| Wi-Fi Sharing | General use, multiple devices | High | Moderate (susceptible to interference) |
| Bluetooth PAN | Low power, simple setup | Low | High |
| USB Tethering | Fixed desk setups, gaming | High (via cable) | Very High |


